 Posible User Guide
Posible User Guide
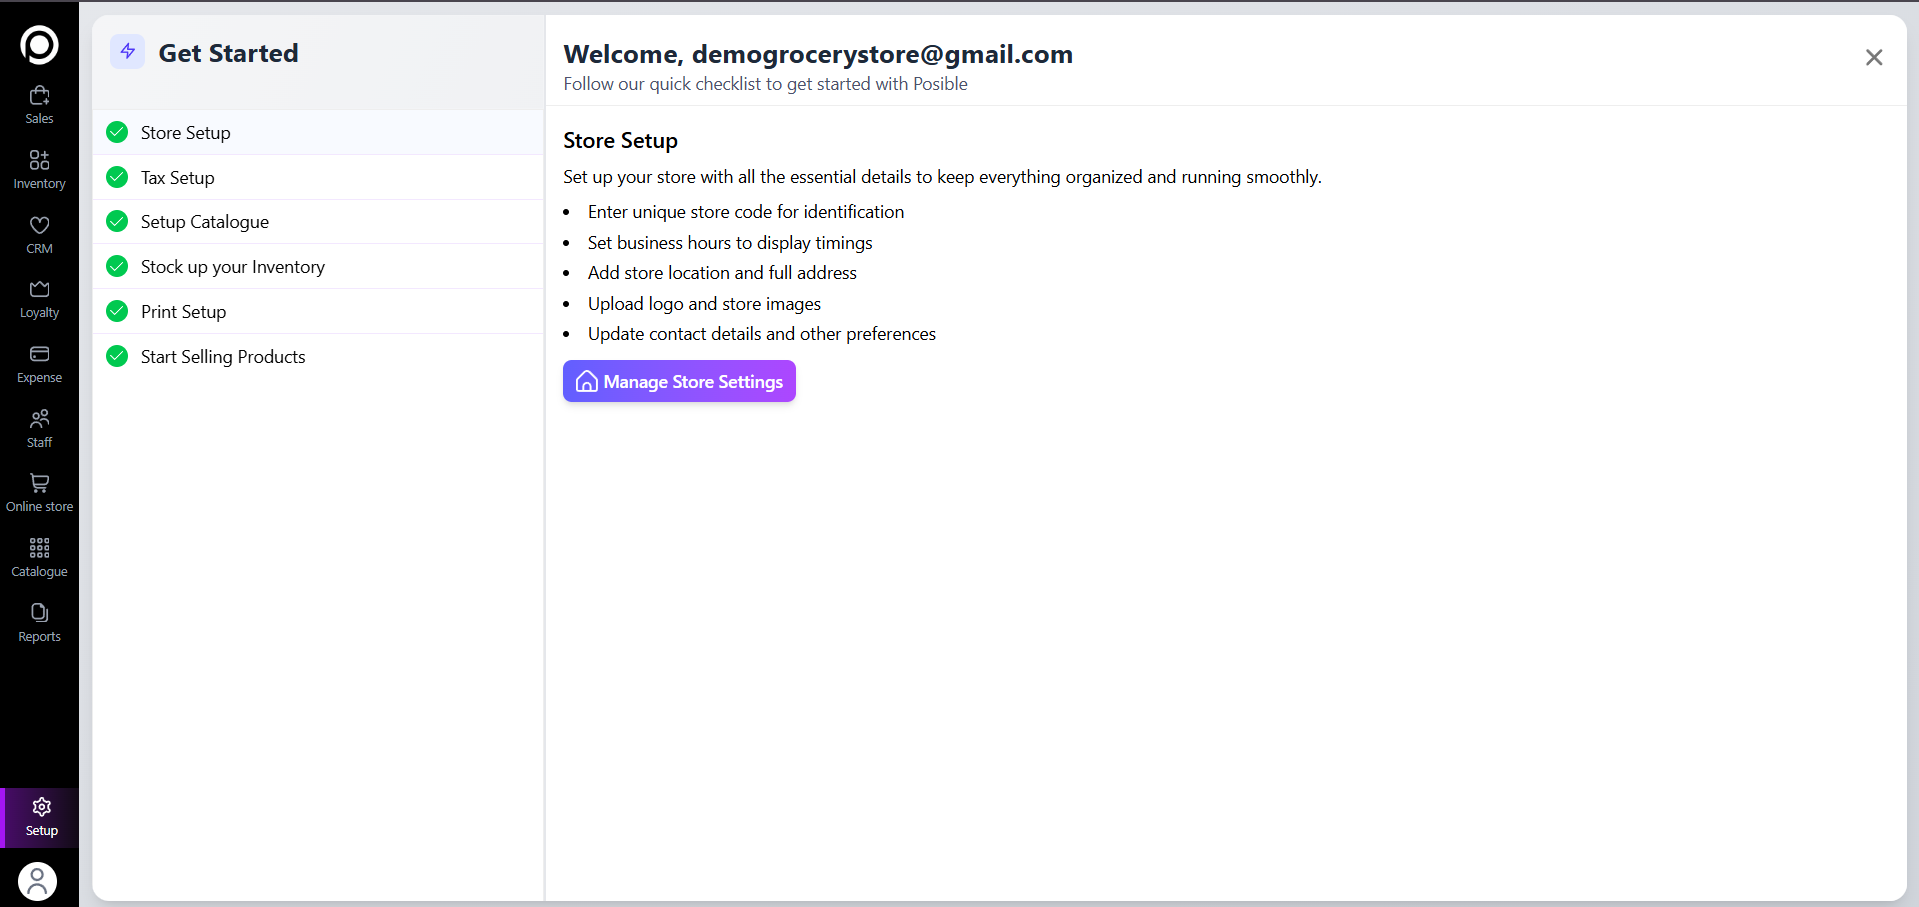
🌟 Get Started
Welcome to Posible, your all-in-one business management platform designed to handle every part of your business — including Sales, Inventory, CRM, Loyalty, Appointments, Expenses, Staff, Online Store, Catalogue, Reports, and Setup — all in one connected system.
To get started smoothly after registration, simply follow the guided setup checklist on this page:
- Store Setup: Begin by setting up your
store details — such as store code, business hours, location, contact info, and logo — to
ensure your store is properly configured.
- Tax Setup: Define your tax rates and
structures to ensure accurate billing and compliance.
- Setup Catalogue: Add and organize your
products with complete details, prices, and SKUs.
- Stock up your Inventory: Update stock
levels and manage product quantities across stores.
- Print Setup: Configure your billing and
invoice print formats for smooth counter operations.
- Start Selling Products: Once everything is configured, you’re ready to begin billing and sales in the Sales module via billing.possible.in
After completing these initial steps, you can explore additional modules to manage your business more efficiently:
- CRM for customer
relationships,
- Loyalty for rewards and
points,
- Appointments for scheduling,
- Expenses for cost tracking,
- Staff for employee
management,
- Online Store for e-commerce operations,
and
- Reports for detailed business
insights.
This structured flow ensures that from setup to daily sales, your entire business runs smoothly
in one integrated platform.
➡️ For more detailed steps or
advanced configurations, please check each section’s module guide.
1.Catalogue Module
After successfully registering and logging into the billing system, the next important step is to set up your Catalogue. The Catalogue contains all the information about your products, categories, brands, taxes, and offers. Think of it like a store setup – before you start billing customers, you need to add what you are selling.
Steps to Add Catalogue
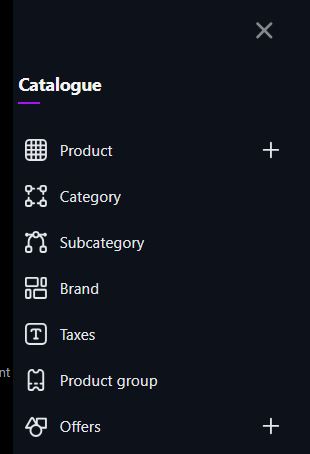
- Open Catalogue From The Main Menu
From the left-hand menu, click on Catalogue.
You will see different options like Product, Category, Subcategory, Brand, Taxes, Product Group, and Offers.
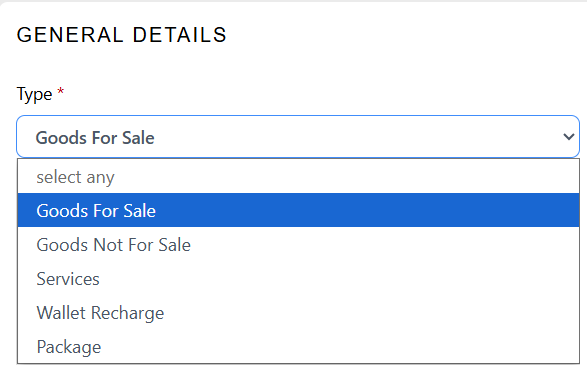
- Goods For Sale → usually sold items, inventory tracked.(Salt)
- Goods Not For Sale → not sold (consumables, internal items,row material) → no sales inventory tracking.
- Services → non-physical (Hair wash , Hair cutting) → no inventory.
- Wallet Recharge → top-up product for wallet → no inventory.(2000 Wallet Recharge).
- Package → Bundle of Services (you can assign the duration and the number of times a service can be provided in that particular package).
1. Add Product
Click on Product ➕.
When you add a product, the very first choice is Type. That choice changes which fields you must fill and whether the system will track inventory for that product.
Quick decision map
Common first steps (applies to all Types)
Go to Catalogue → Product → Create New Product.
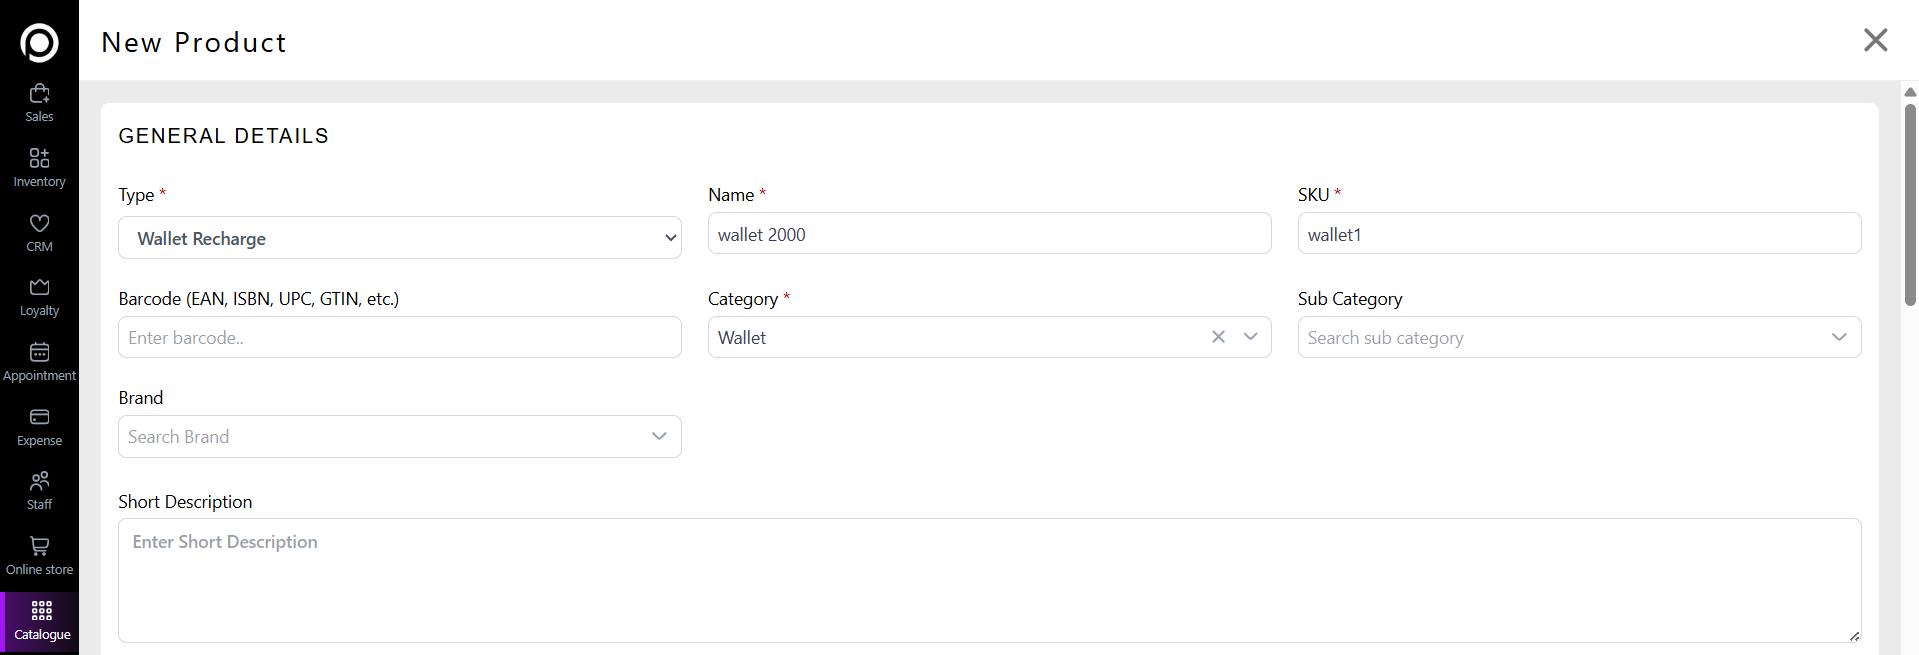
Select Type from the dropdown (choose one of: Goods For Sale, Goods Not For Sale, Services, Wallet Recharge, Package).
Fill General Details (fields you will typically see):
Product Name (required)
SKU (unique identifier)
Brand, Category, Subcategory
Description (optional)
HSN/SAC Code (tax code if needed)
Unit / UOM (e.g., Piece, Kg, Litre)
Fill Pricing and Tax: Supply Price (cost), Retail Price, MRP, Tax (GST %, VAT).
Add Images (drag & drop) and any attachments (brochures, spec sheet).
Additional Settings and Additional Information.
Click Save (or Save & Add Another if available).
If you selected Goods For Sale — (inventory managed)
After you pick Goods For Sale, go to the Inventory section and set Inventory Type. Follow the specific steps for each inventory option below.
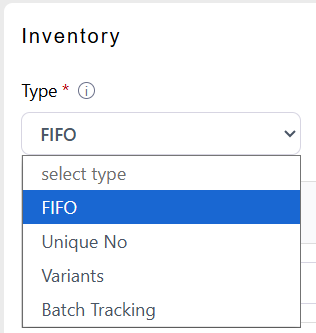
A. Inventory Type = FIFO
Used for normal (single line Product) stock items where first purchased stock is sold first.
Select FIFO in Inventory → fill:
Opening Qty (initial qty)
Min/Max Qty (optional)
B. Inventory Type = Unique No (Serial-numbered items)
Used for devices with serial numbers (phones, appliances).
Select Unique No. and add Unique Label(optional).
Save product.
When receiving stock, you must enter serial numbers for each unit.
On sale, select which serial number you are selling — system tracks warranty/repairs by serial.
Example: 2 units → Serial: SN1001, SN1002.

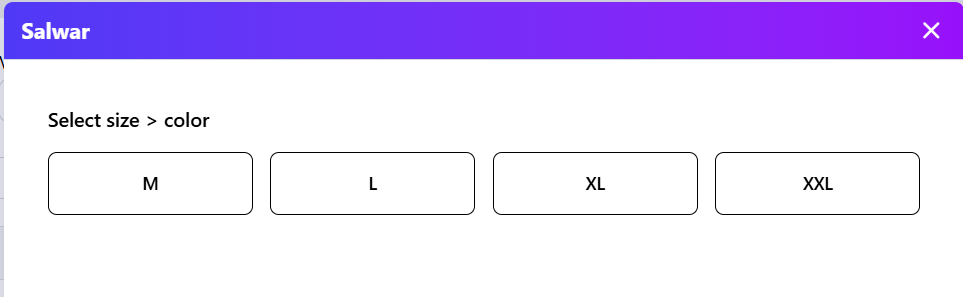
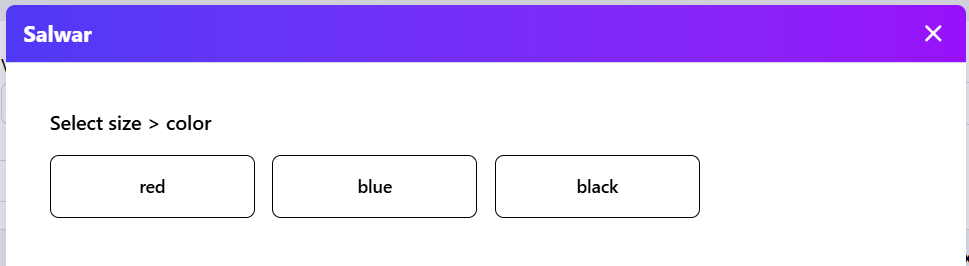
C. Inventory Type = Variants
Used for products with combinations (size, color).
Select Variants in Inventory.
Add Attributes (e.g., Size, Color).
Under each attribute, add values (Size → S, M, L; Color → Red, Blue).
For each variant, enter: SKU, Price, MRP etc.( Automatically Generate SKU toggle for automatically added the sku based on the parent sku)
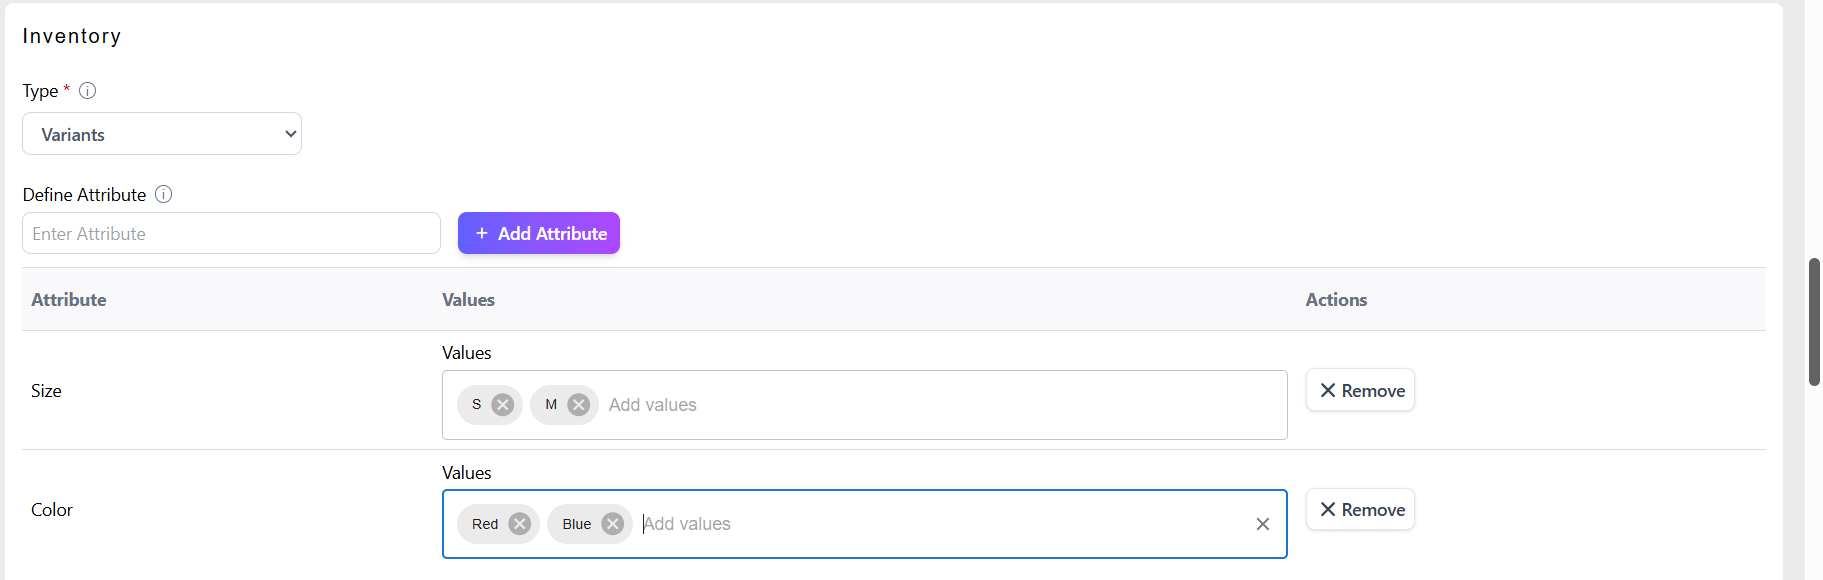
5. The system automatically takes the value from the parent product. If you want to change the value for your variant, you can do so as per your choice.
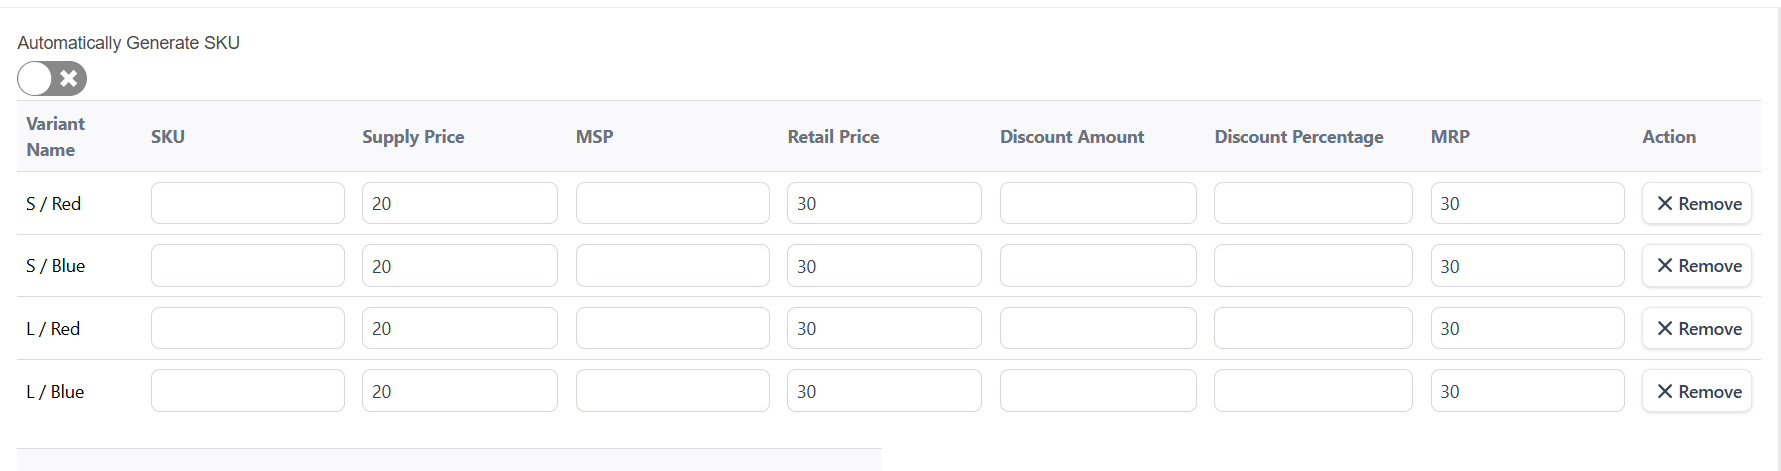
Tip: Use a clear SKU pattern: (e.g. TSHIRT01). That helps search & reporting.
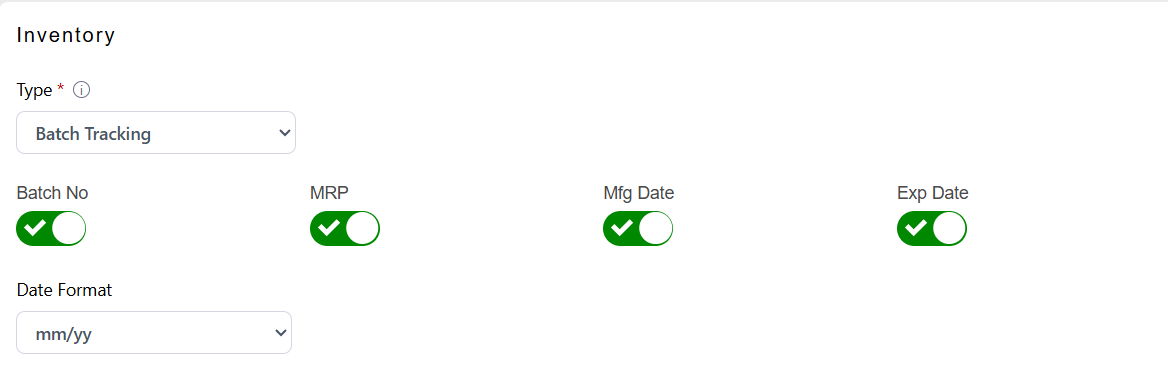
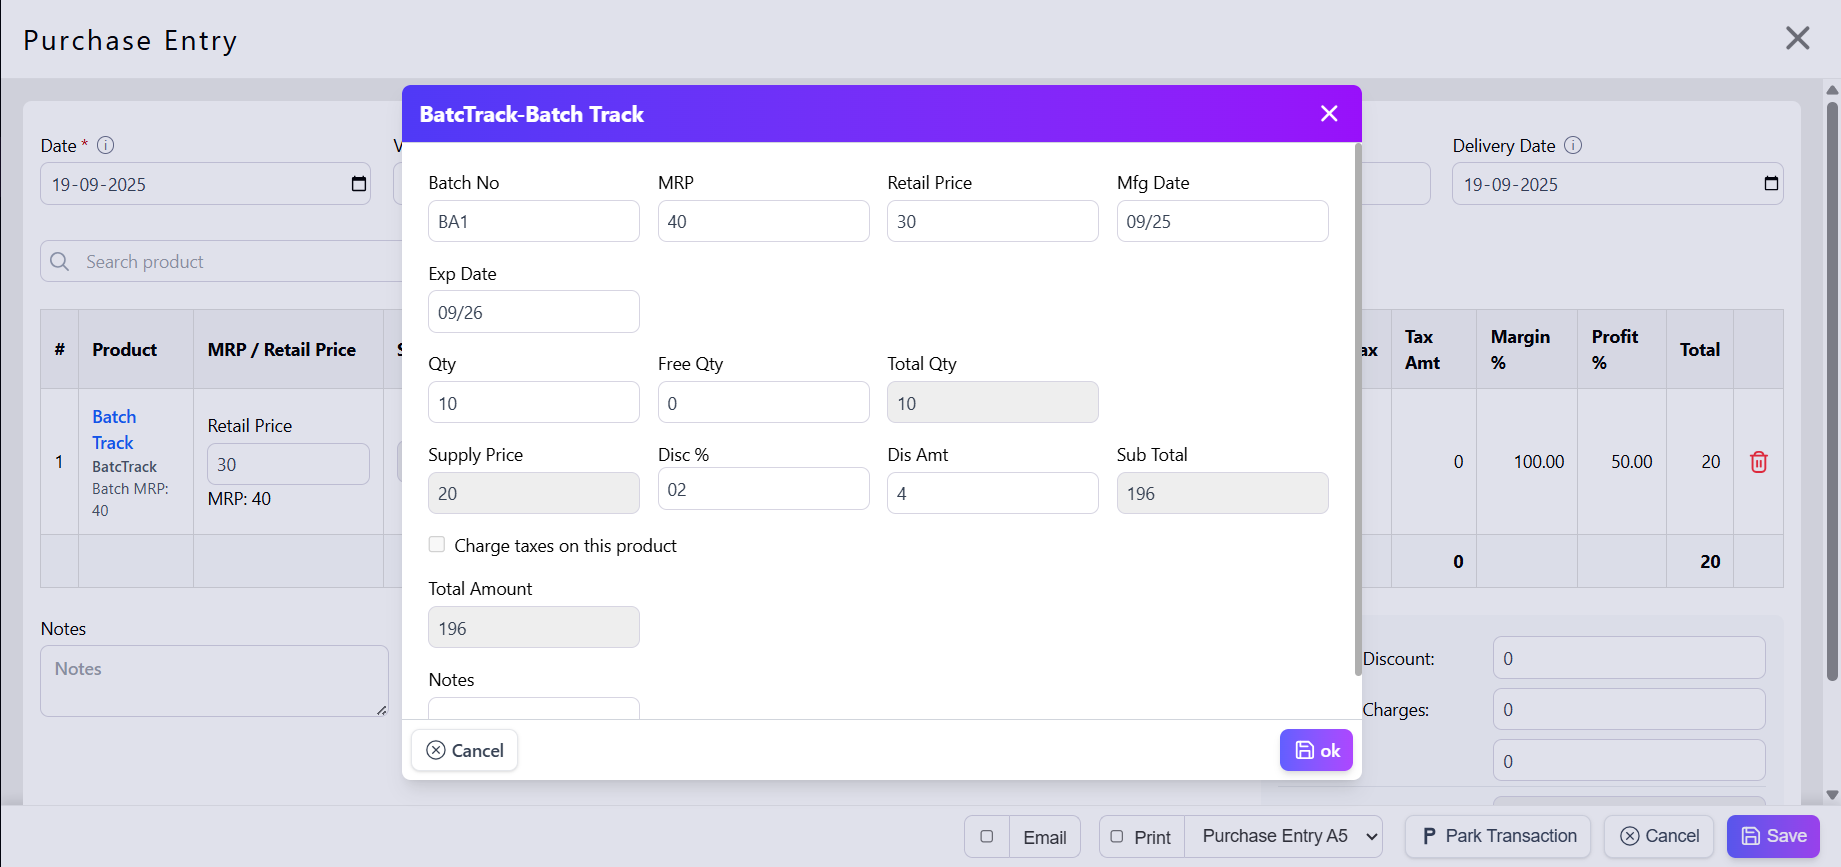
D. Inventory Type = Batch Tracking
Used for perishable/expiry goods (food, medicine).
Select Batch Tracking.
When recording receipt (Purchase Entry), enter Batch No, Mfg Date, Expiry Date, Batch Qty and MRP.
Sales will reduce stock of specific batches, and expiry checks can warn you for near-expiry stock.
Note: If you turn on this toggle, only then will you be able to enter a value during purchase.
Example: Batch B2025, Mfg 01-01-2025, Expiry 01-01-2027, Qty 100.
Example: Batch B2025, Mfg 01-01-2025, Expiry 01-01-2027, Qty 100.
If you selected Goods Not For Sale
Purpose: internal use/consumables (e.g., packaging, row material).
Steps: Choose Type = Goods Not For Sale, fill general details and Save.
Note: all steps as Goods For Sale.
Example: "Packing Boxes" — used internally, not sold to customers.
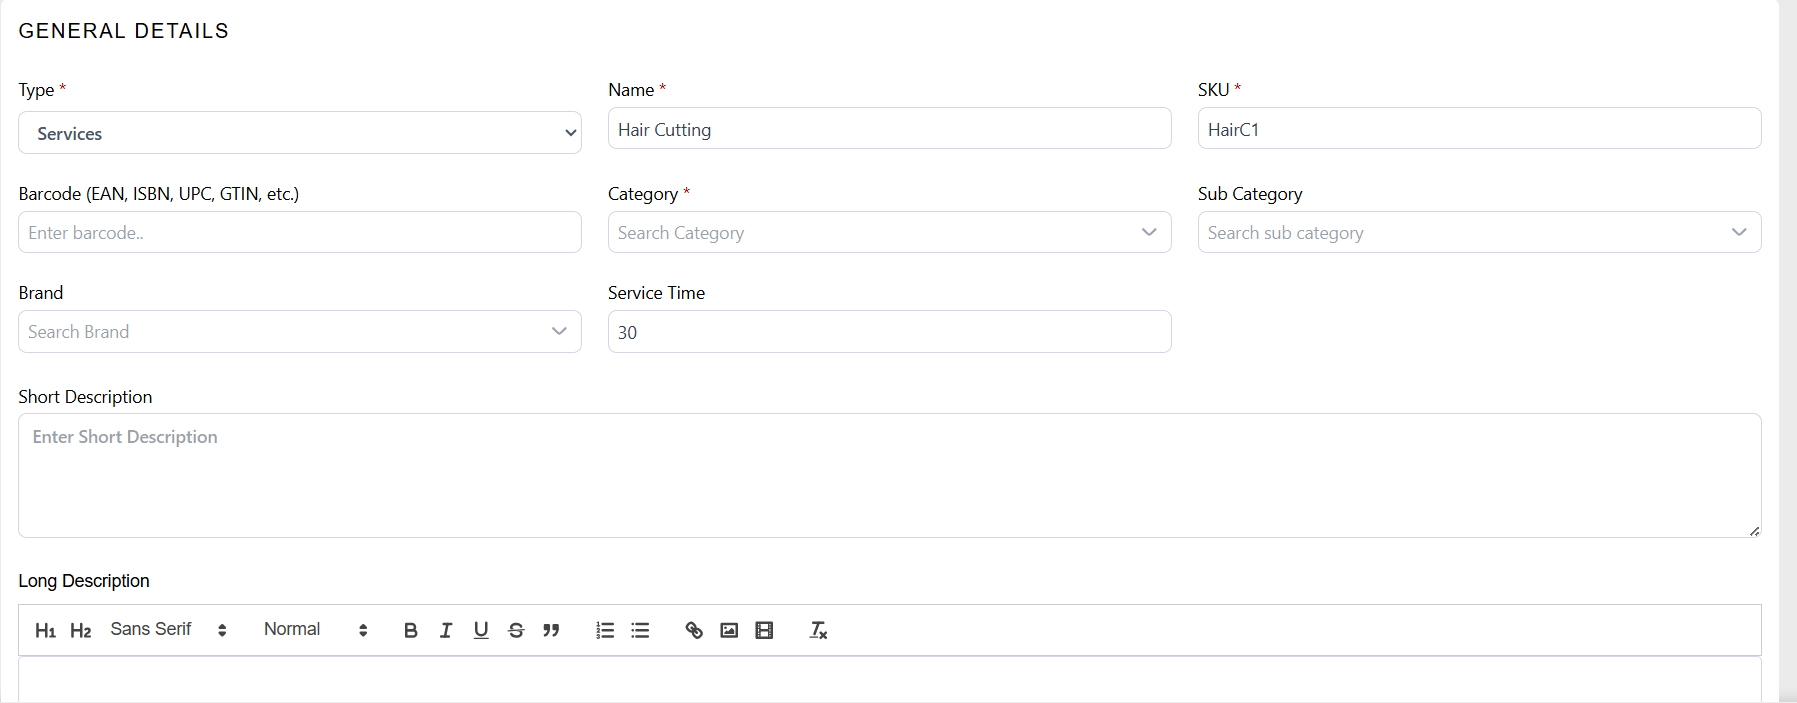
If you selected Services
Steps: Choose Type = Services, provide Service Name, Service Time in Minutes, Price and other details then Save.
Services will appear in billing, but won’t affect stock.
Example: "hair cutting" ₹250.
If you selected Wallet Recharge
Steps: Choose Wallet Recharge, set Denominations (or price), taxes if applicable, and description. Save.
Used only for wallet top-ups in billing flow.
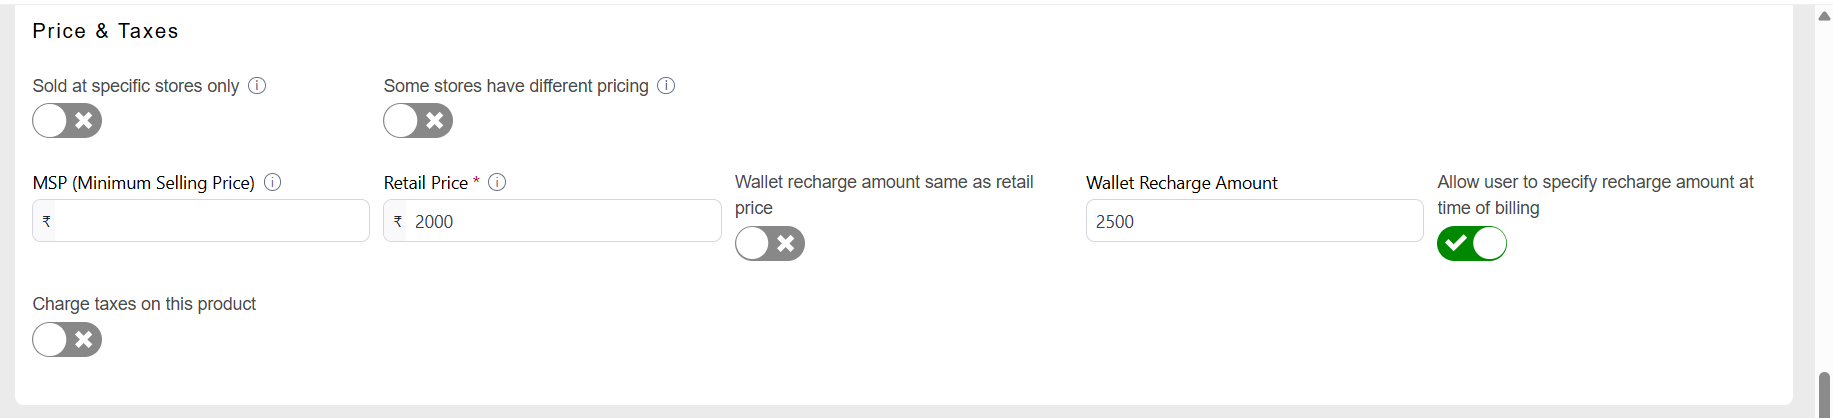
Go to the Price & Taxes Section (as shown in the screenshot).
Retail Price → Enter the default recharge price (e.g., ₹2000).
Wallet Recharge Amount → Enter the recharge value (e.g., ₹2500).
Wallet recharge amount same as retail price →
Turn ON if the recharge amount should always match the retail price.
Keep OFF if the recharge amount can be different.
Allow user to specify recharge amount at time of billing →
Turn ON if you want the cashier/customer to enter any recharge amount during billing.
Turn OFF if the recharge amount is fixed.
Charge taxes on this product → Enable/disable depending on whether wallet recharge is taxable in your region.
⚠️ Note: MSP (Minimum Selling Price) and store-specific pricing usually don’t apply for Wallet Recharge.
If you selected Package
Select Product Type
In the Type dropdown, choose Package.
Fill General Details
Enter Package Name (e.g., Premium Salon Package).
Add SKU (e.g., PKG-001).
Assign a Category (e.g., Beauty & Wellness).
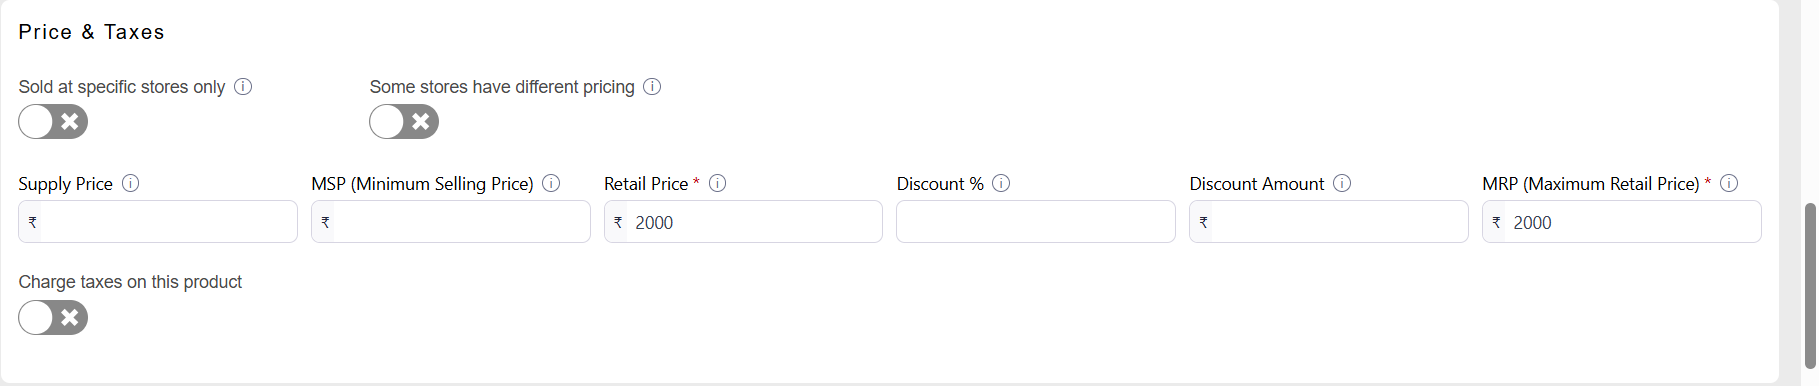
Set Price & Taxes
Supply Price → Cost for you (optional).
MSP (Minimum Selling Price) → Lowest allowed price.
Retail Price → Default selling price.
Discount % / Discount Amount → If you want to give a discount.
MRP (Maximum Retail Price) → Maximum selling price.
Charge taxes on this product → Enable if the package is taxable.
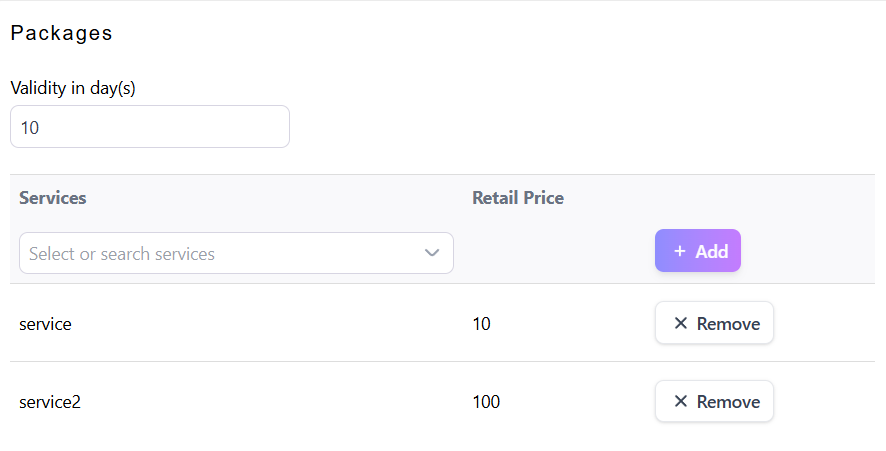
Configure Package Details
Validity in Days → Set package duration (e.g., 60 days).
Services → Select a service from the dropdown (e.g., Hair Wash, Facial, Massage).
Retail Price → Enter the price for each service in the package.
Click + Add to include more services.
Repeat until all services are added.
Use Remove if you need to delete a service.
Save the Package
After entering all details, click Save.
The Package will now appear in the Product List and can be billed as a bundled service.
✅ Example:
Package Name: Premium Salon Package
Validity: 60 days
Services Included:
Hair Wash – ₹60
Service1 – ₹1002
Tracking Packages
After successfully creating and selling the package, you can track and manage it from the Sales Module..
Steps:
Go to Sales from the main menu → Package.
Here, you will see the Package List.
The list shows:
Transaction No – Unique package transaction ID
Package Name – Name of the package (e.g., New Package, TEST Package)
Customer Details – Customer name, email, and contact number
Package Start Date – When the package becomes active
Package End Date – Expiry date of the package
Status – Current status of the package (Pending, Partial, Completed, Expired, Cancelled)
You can also use the status filters (Pending, Partial, Completed, Expired, Cancelled, All) to quickly check package progress
✅ Example Use Case:
If a customer buys a 60-day Salon Package, you can track whether they have used all services, how many are left, and whether the package is still active or expired.
How to Add Products in Bulk
If you have many products to add, instead of entering them one by one, you can upload them all at once using our Bulk Import option.
Step 1: Go to Product List
From the left-hand menu, click on Catalogue → Product.
Click on three dots(option) in which select Product Imports.
click on Create New Products. You will see an option to Download Import Template.
Step 2: A file (Excel/CSV) will be downloaded to your computer.
Open the downloaded file and fill in your product details.
Once you have filled the template, go back to the software with the same steps.
You will see an option to Drag and drop file to import or Choose File.
Either drag your completed file into the upload box or click Choose File and select it from your computer.
Step 3: Click Upload
After selecting the file, click on the Upload button.
The system will process your file.
If there are any mistakes (like missing SKU), the system will show an error message.
Once corrected, upload again.
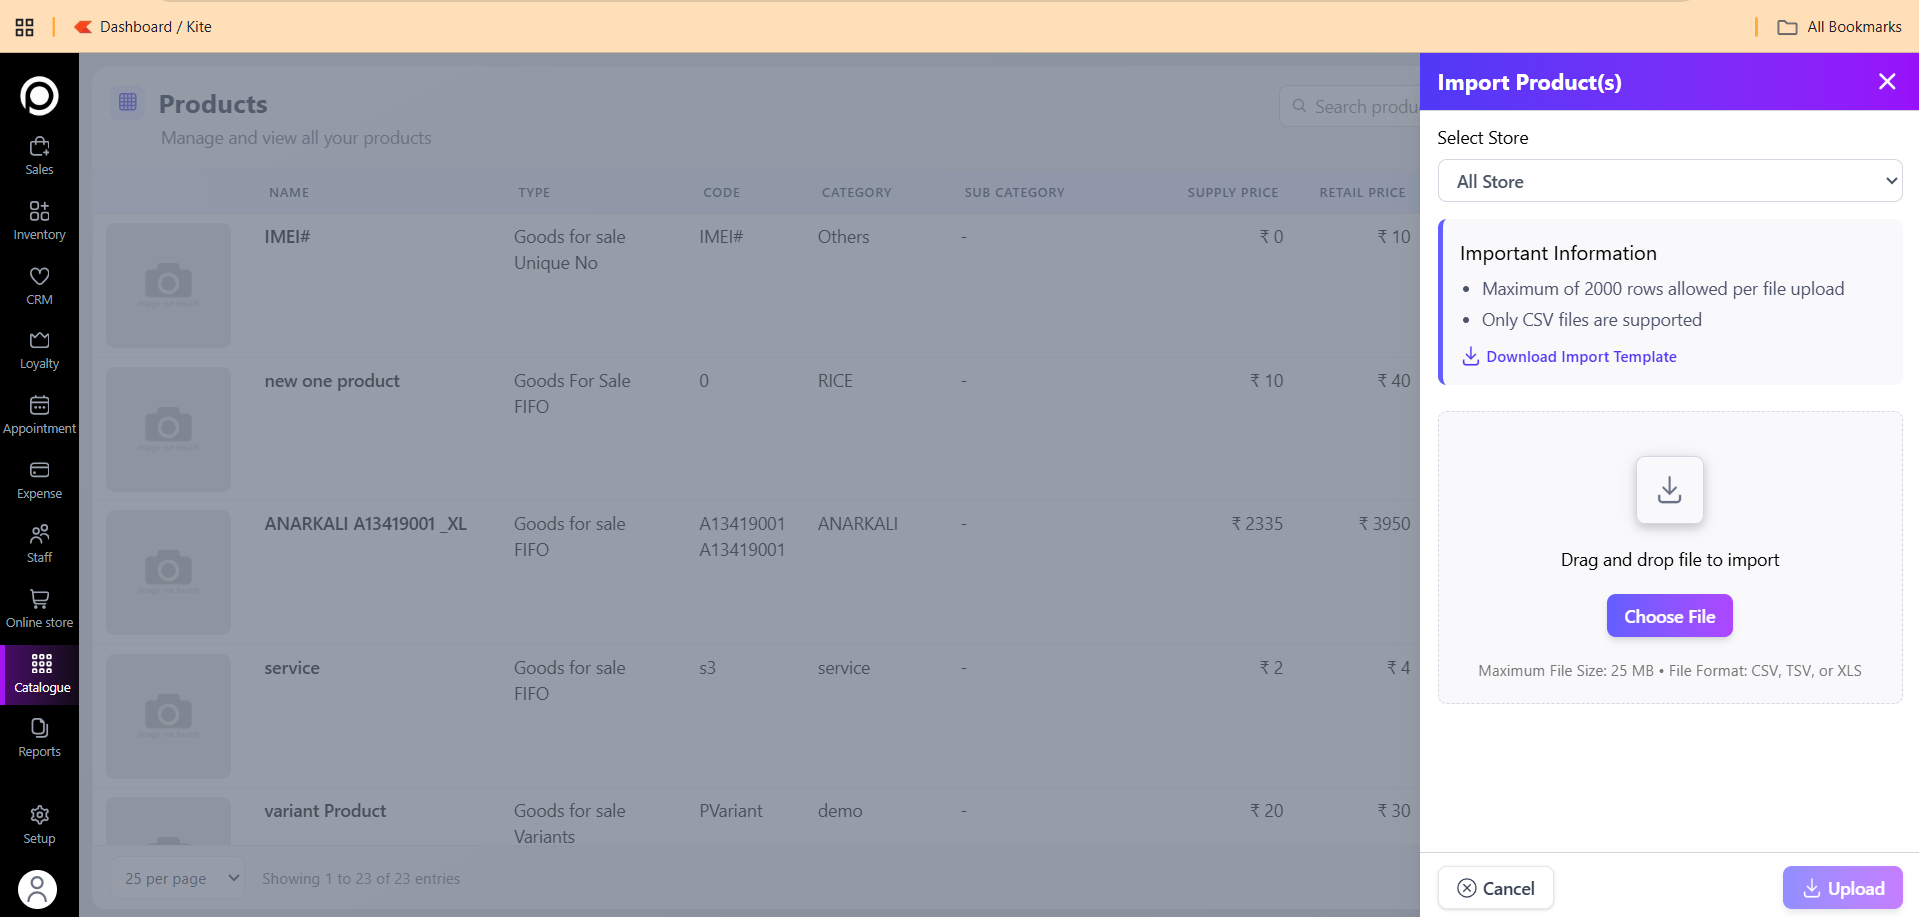
Note: If you want to update products in bulk, follow the same steps, but instead of clicking Create New Products, click Update Existing Products.
3. Add Category
Click on Category.
Categories help you group products together.
Example: Grocery, Electronics, Stationery.

4. Add Subcategory
Click on Subcategory.
Subcategories help you organize products within a category.
Example: Under Electronics → Mobile, Laptop, Accessories

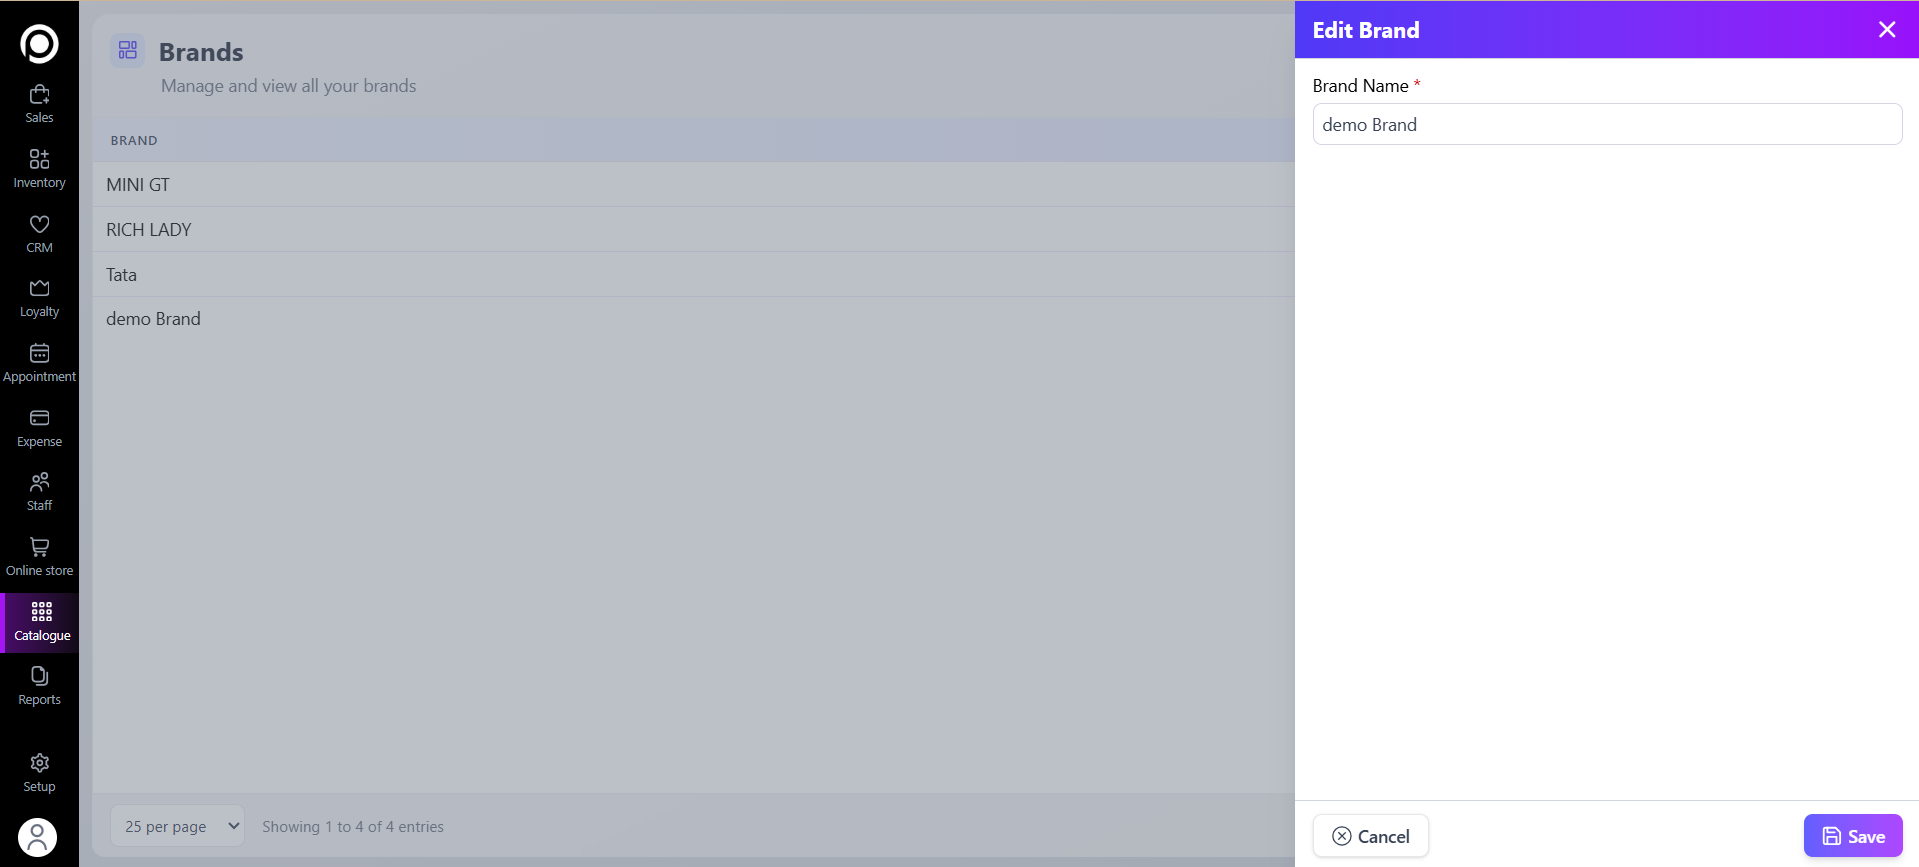
5. Add Brand
Click on Brand.
Add the company or brand name of your product.
Example: Tata, Samsung, Nestlé.
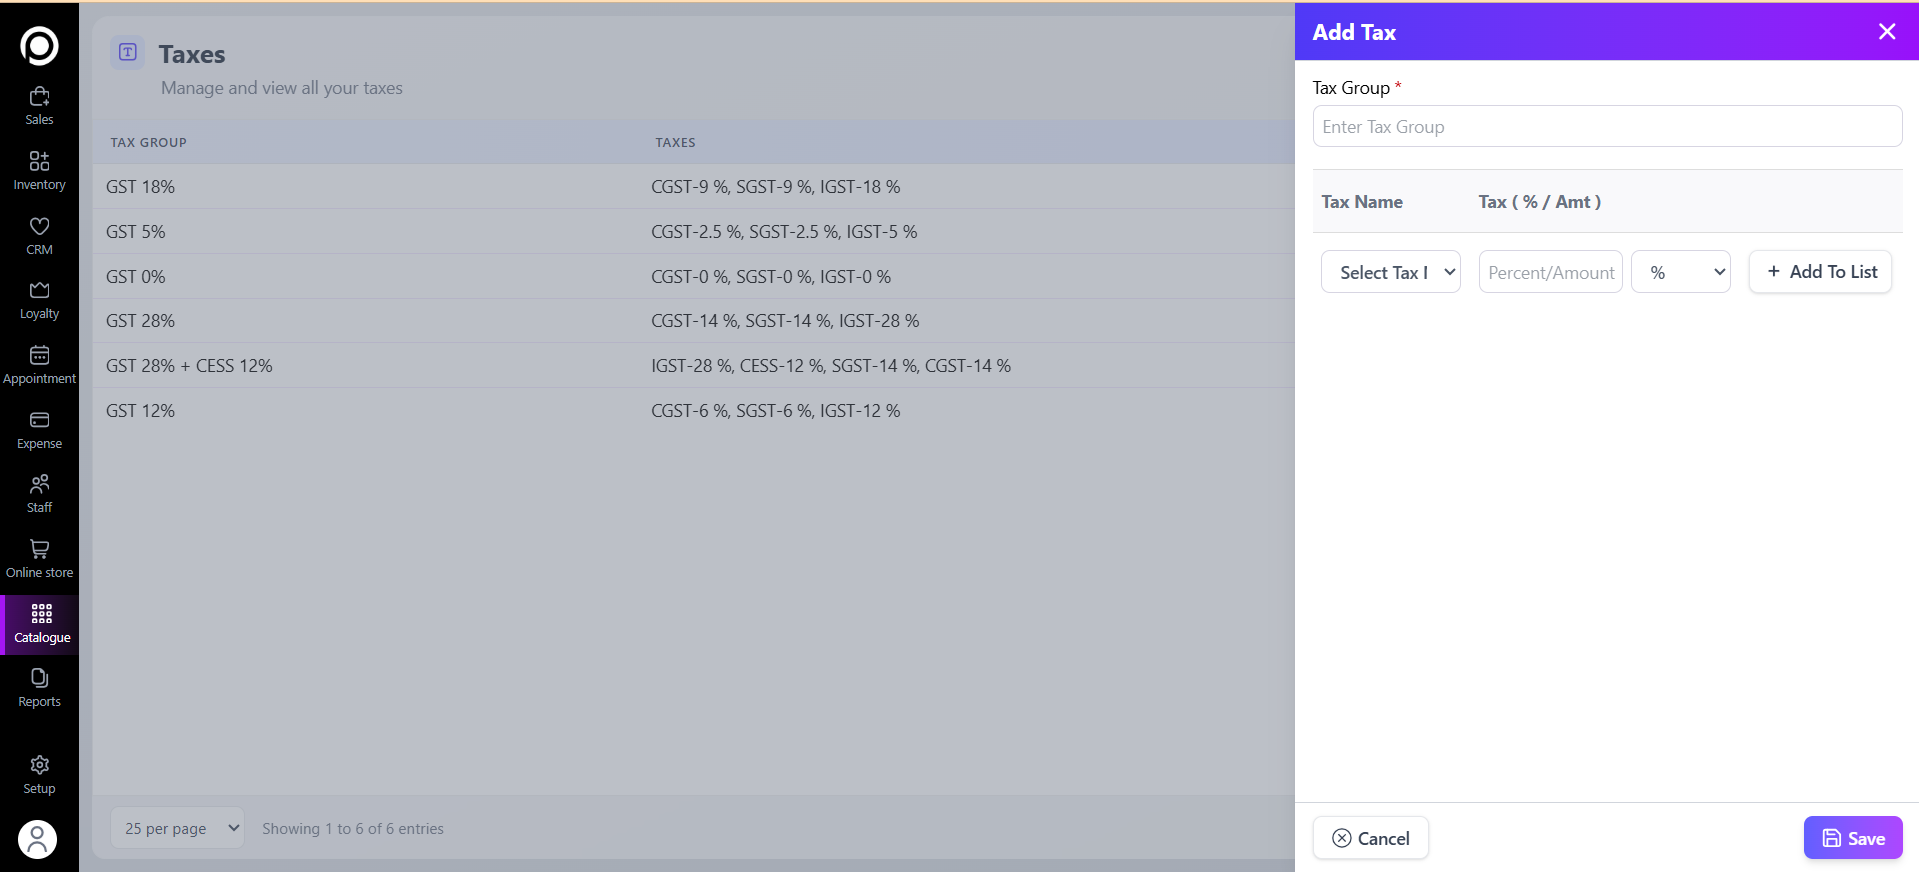
6. Add Taxes
Click on Taxes under the Catalogue module.
Enter the tax names and rates applicable to your products or services.
Example: GST 5%, GST 12%, GST 18%, GST 28%.
You can define multiple tax types based on product category or location (e.g., CGST + SGST or IGST).
Once saved, assign these tax rates to the relevant products — they will automatically apply during billing and purchase transactions.
You can also edit or deactivate tax entries later if tax rules or rates change.
💡 Tip: Make sure each tax rate matches your regional tax policy to avoid calculation errors during sales or invoice generation.
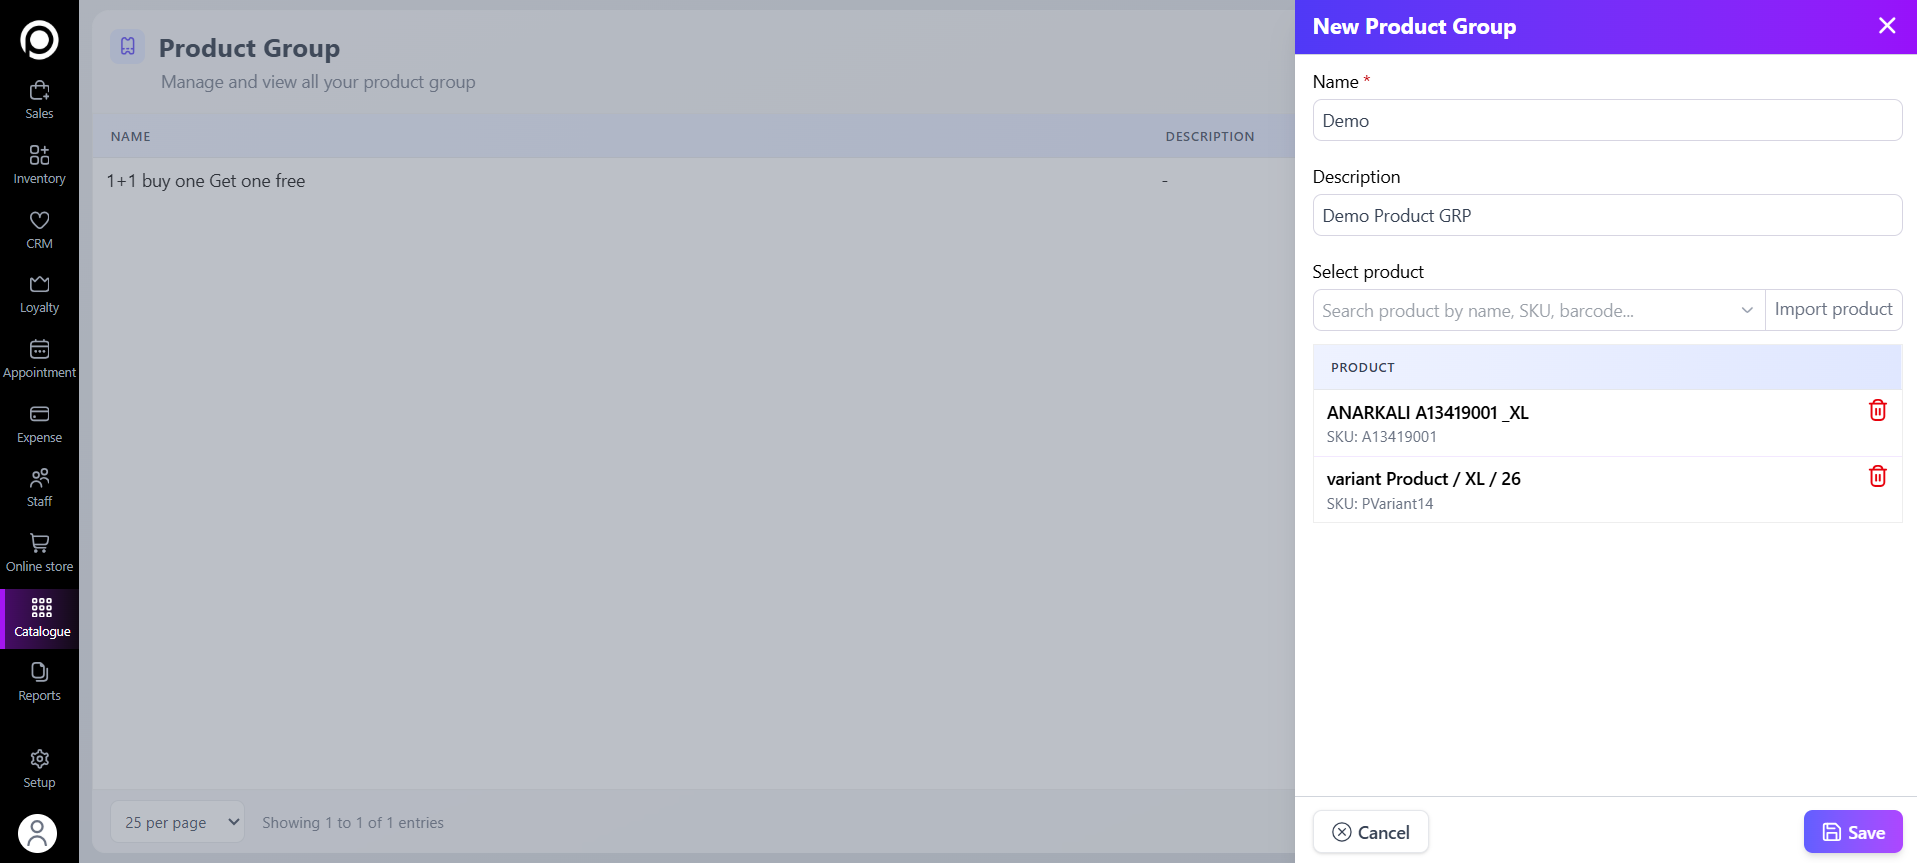
7. Add Product Group
Click on Product Group.
Product groups help you manage related products together.
Example: Summer Collection, Festive Offers.
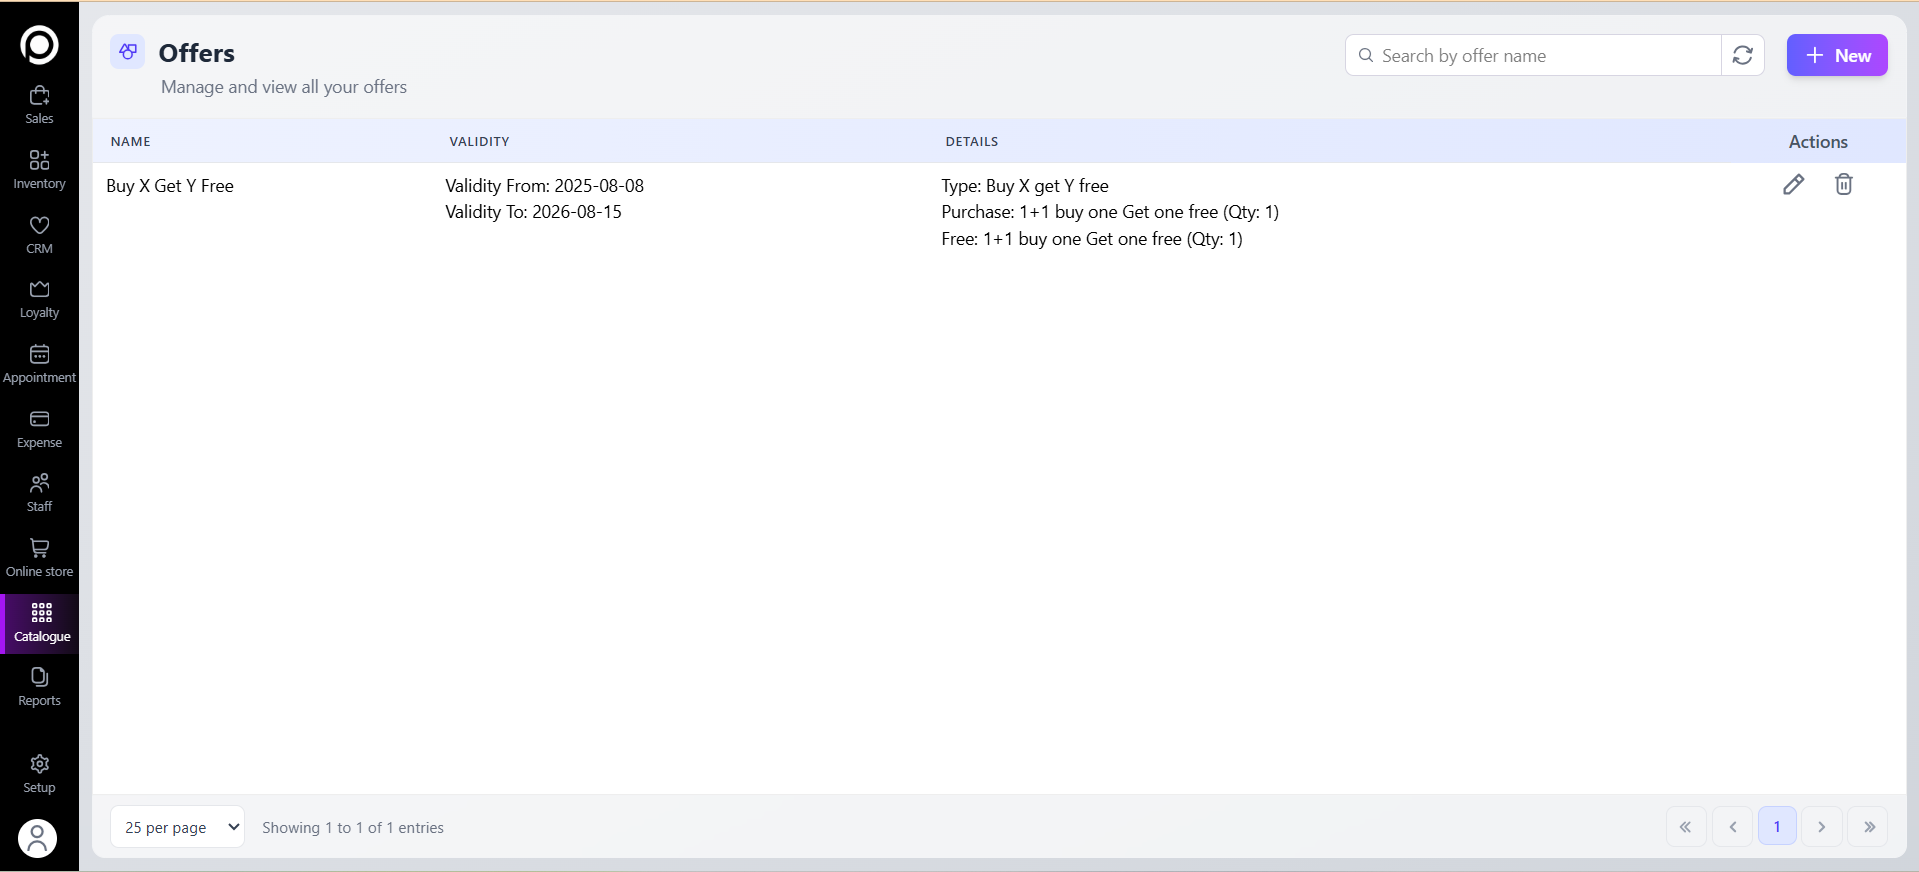
8. Add Offers
Click on Offers ➕.
Here you can create discounts or special deals.
Example: Buy 1 Get 1 Free, 10% Off.
✅ Final Note
Once you finish adding your catalogue, your system is ready for Inventory management and billing. Now you are able to select products in Inventory and Sales modules.
2.Inventory Module
The Inventory module helps you receive, track, move, adjust stock.
Add Vendor → Create Purchase Order → Receive (Purchase Entry) → Stock Update → Transfer Out / Transfer In / Returns / Corrections.
1) Vendors — set up seller/suppliers first
Why: Every purchase/return should link to a vendor so you know who supplied items and can track payments.
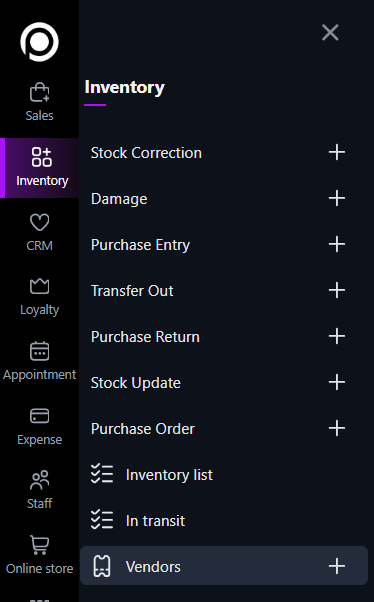
How to add a vendor:
Inventory-> Go to Vendors ➕.
- Fill Out the General Details Section
- Fill Out the Address Section
- Add Products from the Vendor
- Configure Store and Delivery Settings
- Enter Additional Information (Optional)
- Save the Vendor Profile
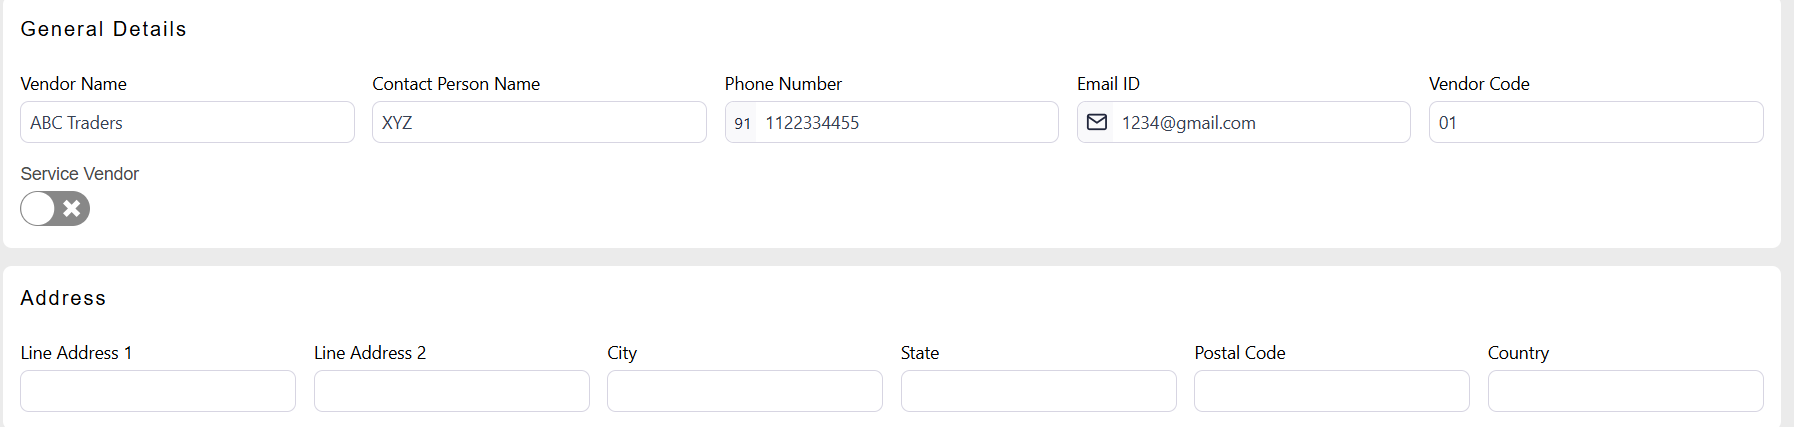
This section captures the primary contact information for the vendor.
Vendor Name*: Enter the official business name (e.g., ABC Traders).
Contact Person Name: Enter the name of your primary contact at the company (e.g., XYZ).
Phone Number: Enter the main contact phone number. The system often accepts formatted numbers
Email ID: Enter the main contact email address (e.g., 1234@gmail.com).
Vendor Code: A unique identifier for the vendor. (e.g., 01).
(*) indicates a required field.
Enter the physical location of the vendor.
Line Address 1: The street address, P.O. box, or company name.
Line Address 2: Apartment, suite, unit, building, floor, etc.
City, State, Postal Code, Country: Fill in the respective geographical details.
This crucial step links the products you buy to this specific vendor and sets their cost price.
Search Field: Use the "Search product by name, SKU, barcode..." field to find products already in your system.
Selecting a Product:
Type the product name (e.g., simple test1) or SKU (e.g., simpletest1).
Select the correct product from the search results.
Once selected, it will appear in the list below.
Supply Price: For each product added, you must specify the Supply Price (the cost at which you purchase the item from this vendor).
Import Products: For adding many products at once, use the "Import product" feature to upload a spreadsheet (CSV/Excel file) with product SKUs and their corresponding supply prices.

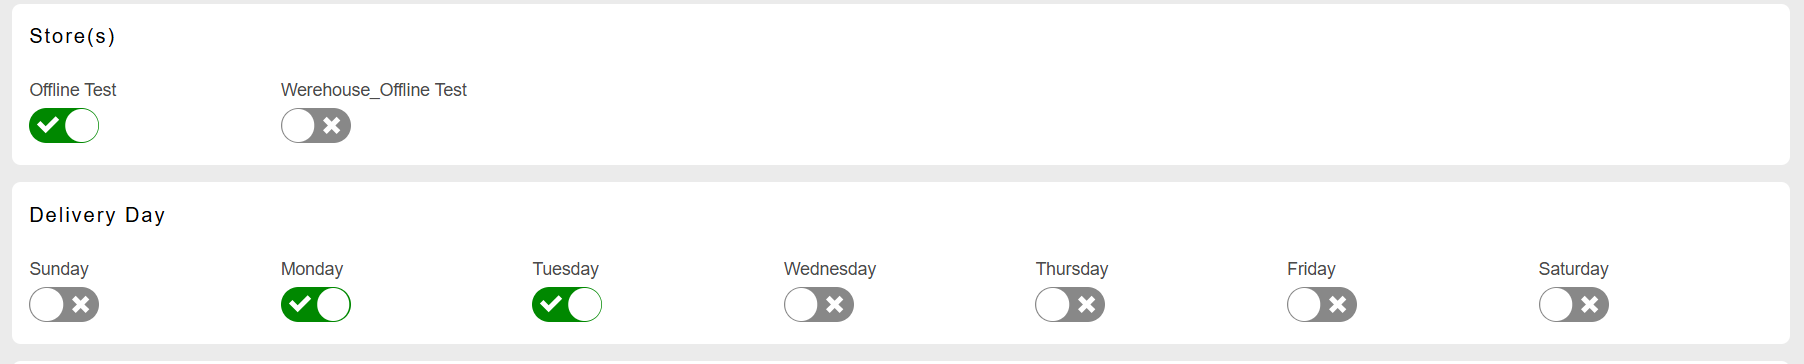
Define which of your locations this vendor supplies and their delivery schedule.
Store(s): Assign the vendor to the specific stores or warehouses they will deliver to. You can select one or multiple locations from the list (e.g., Offline Test, Warehouse_Offline Test).
Configure Stores & Delivery: Specify which of your locations this vendor supplies and set their weekly delivery schedule.
Some systems have custom fields for extra data specific to your vendor(eg. GSTIN)
Custom Fields 1-6: Use these fields to store any other relevant information not covered above (e.g., Tax ID,Account Number, Notes).
Review all the information you have entered for accuracy.
Click the [Save] button to finalize and create the vendor profile.
Tips:
You can edit vendor details later or deactivate a vendor if you no longer use them.
2) Purchase Order (PO) — place order with vendor
Why: A PO is your formal order. Use POs to plan incoming stock and budgets.
How to create a PO:
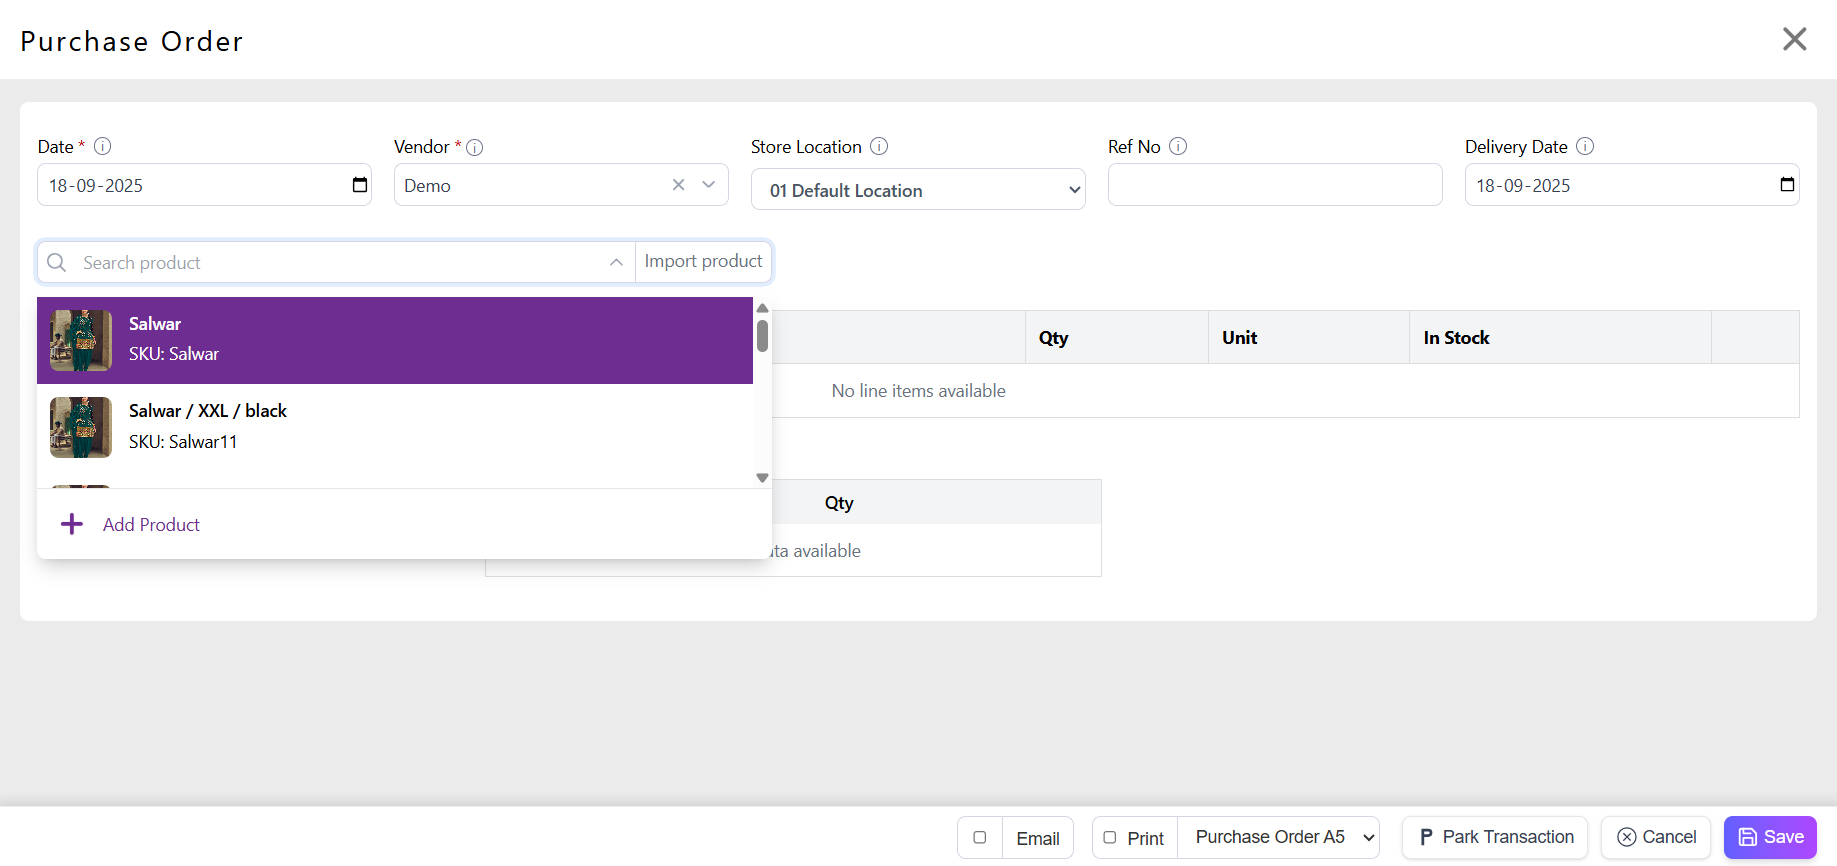
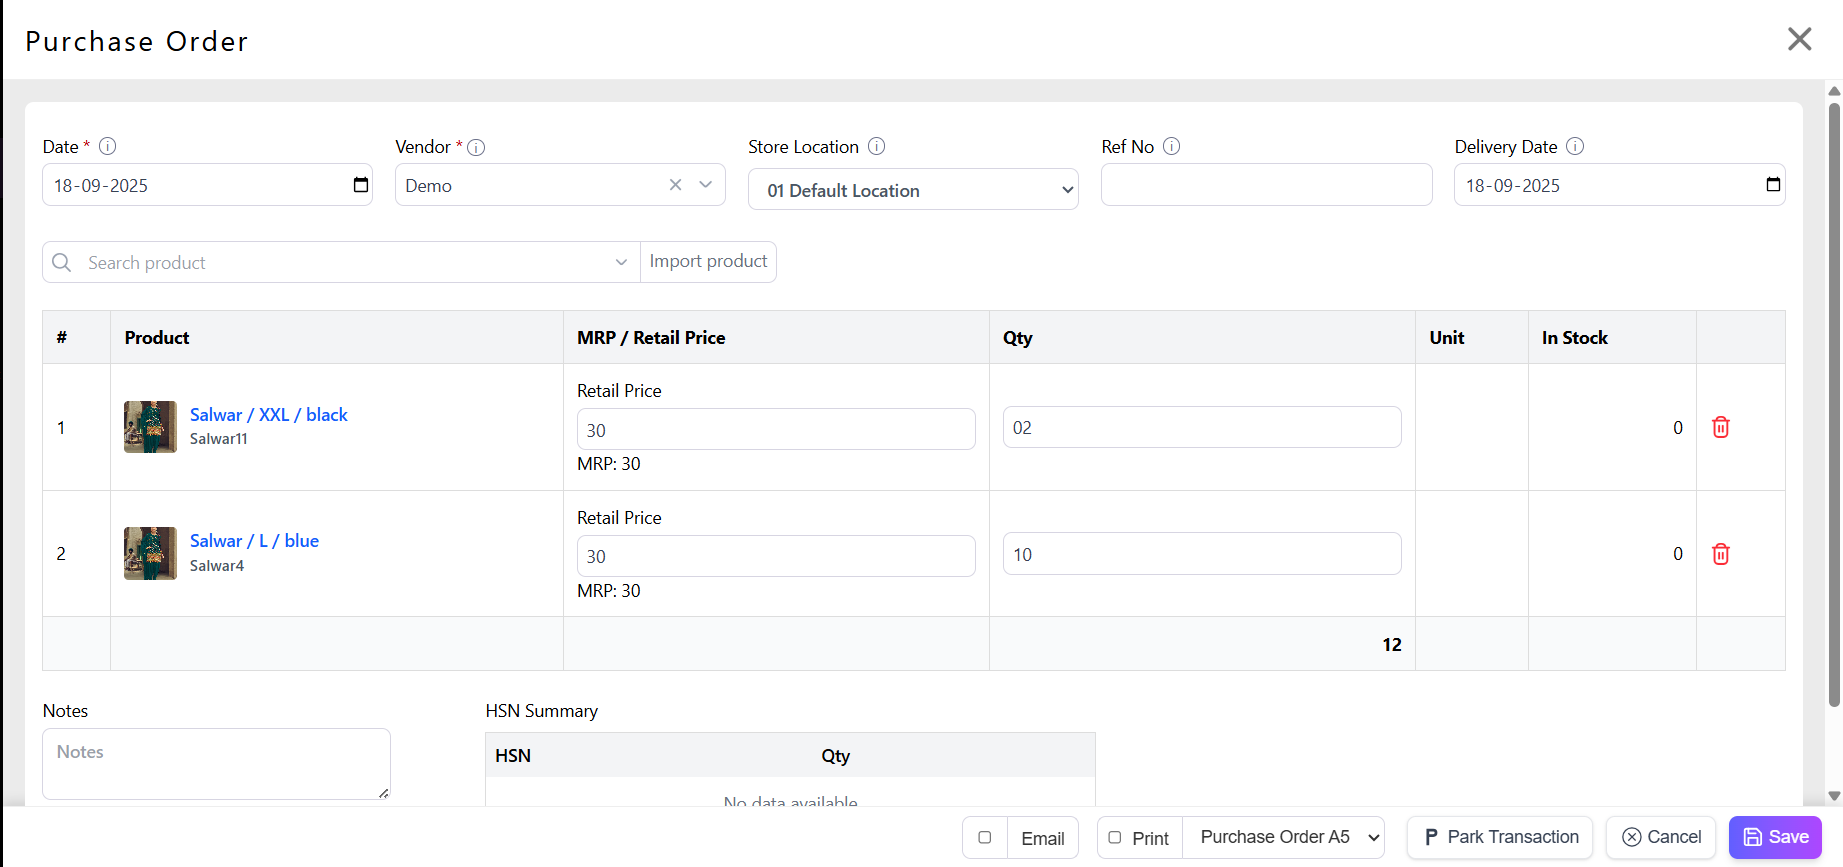
Go to Purchase Order ➕.
Choose Vendor from the drop-down.
Add line items: Product (SKU), Quantity, Unit Cost, Expected Delivery Date.
Save and optionally Send PO to the vendor (email/print).
Note: A Purchase Order (PO) can be converted into a Purchase Entry (PE) once the PO is received, so that the entry is updated in our stock..
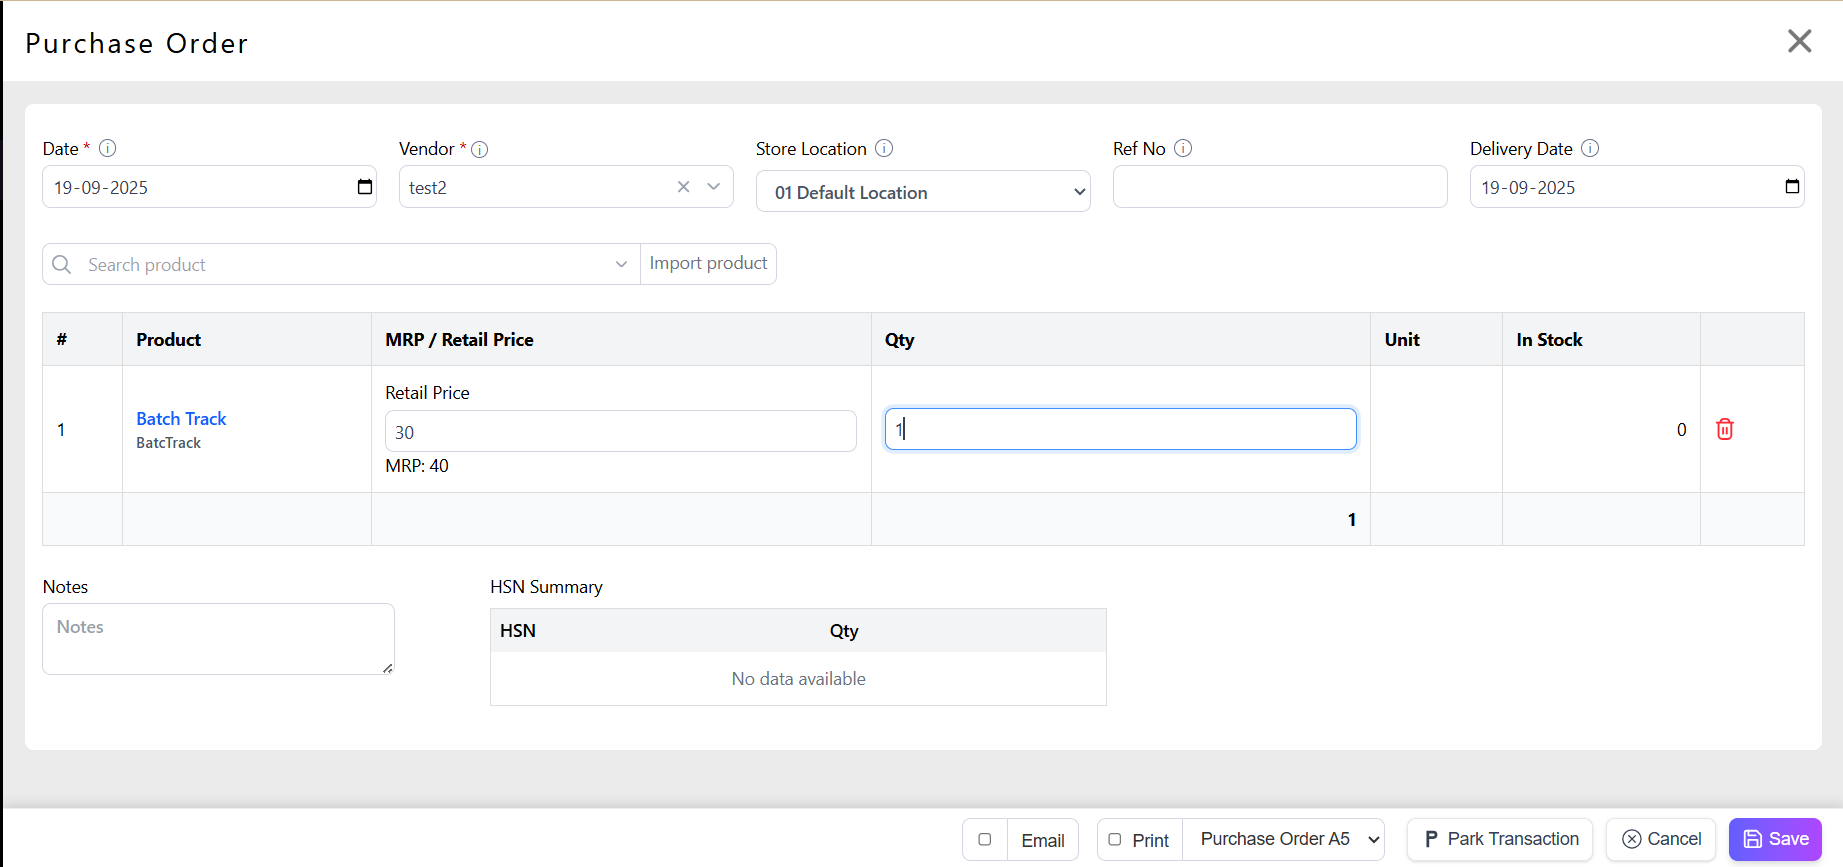
PO For FIFO Type:

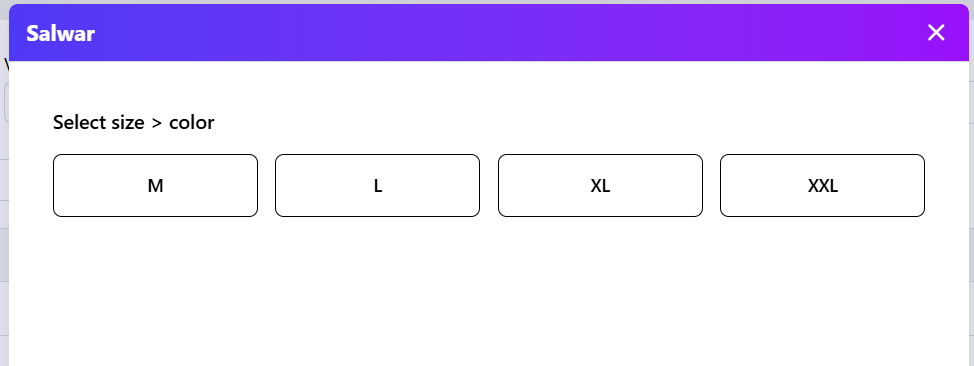
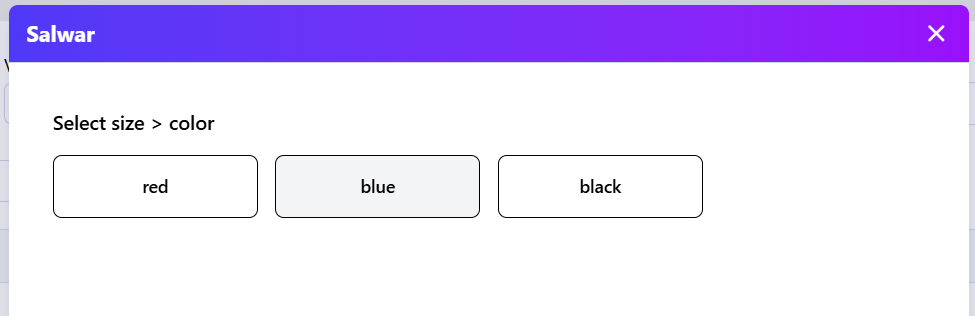
PO for Variant Type: If you select a variant product, it allows you to add from the list as well as from the popup window shown below.
PO for Batch Tracking Type:
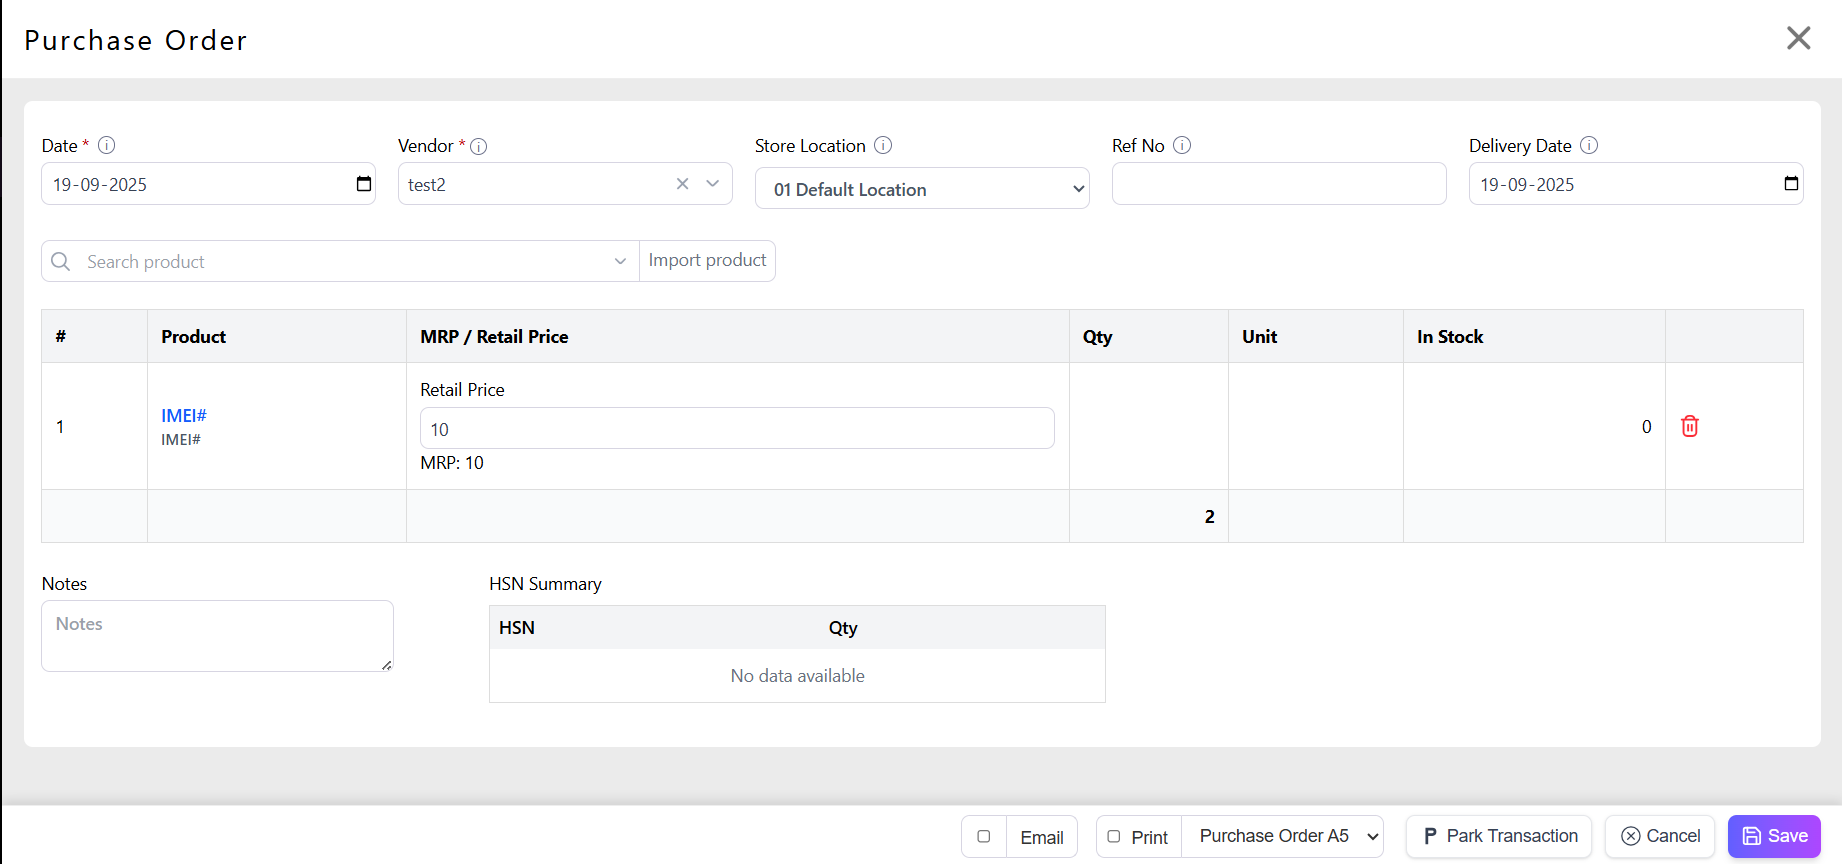
PO for Unique No:
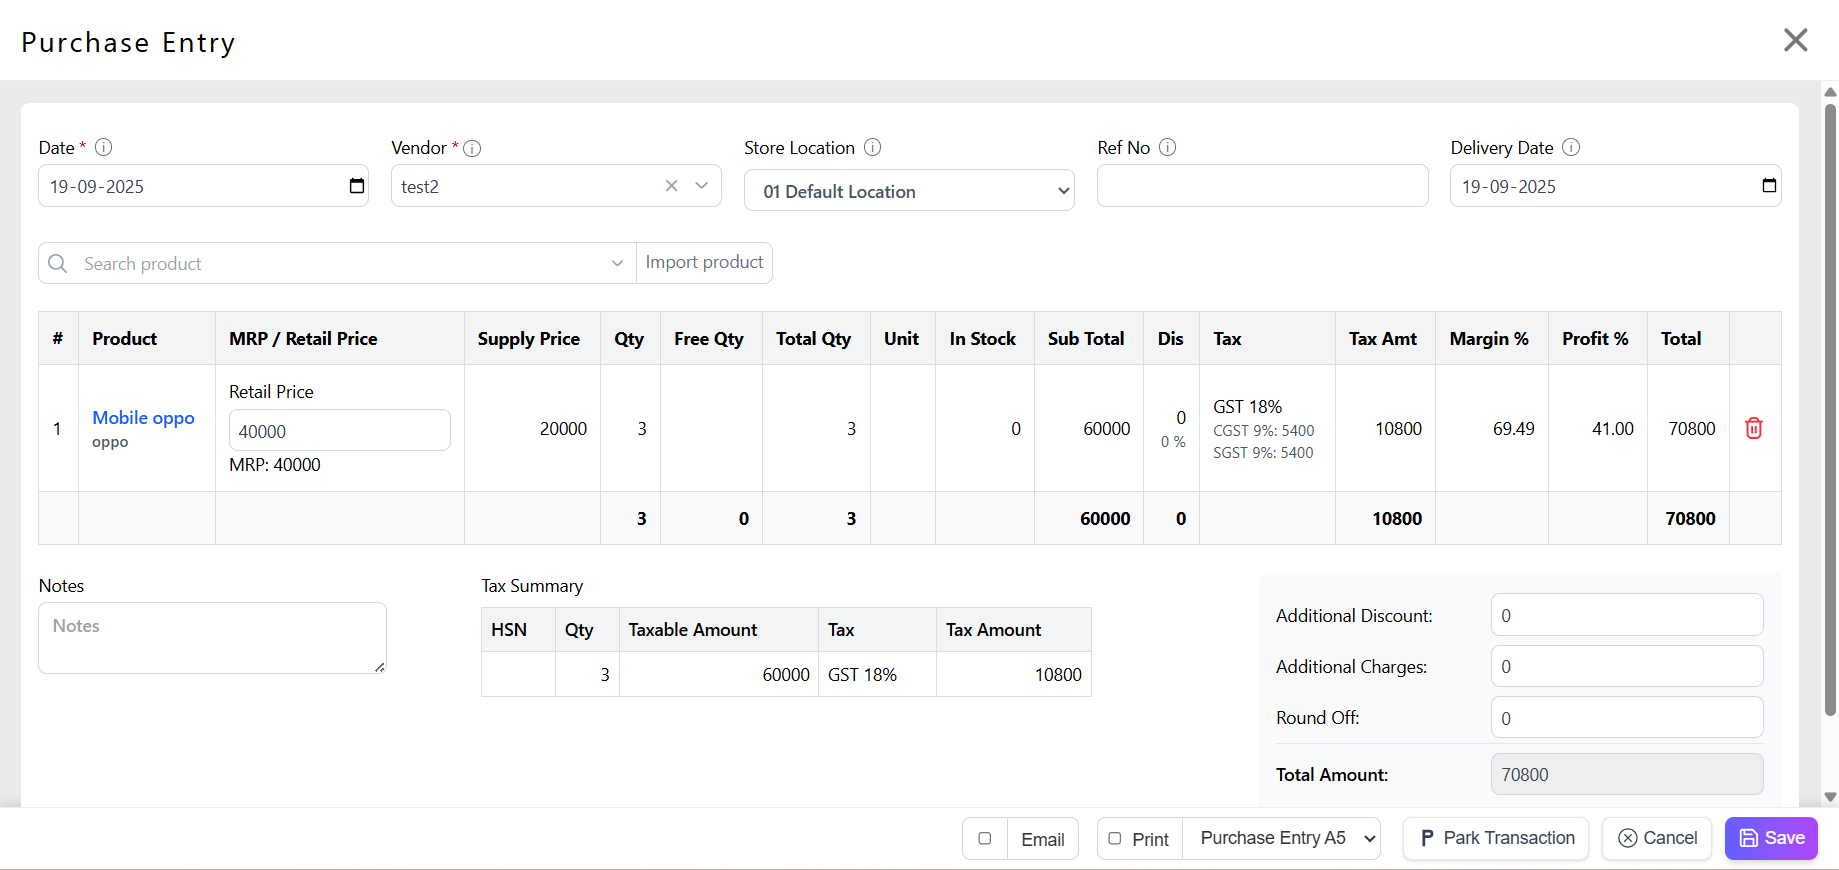
3) Purchase Entry (receive stock & update inventory)
Why: Record actual goods received against a PO and increase stock.
How to do a Purchase Entry:
Go to Purchase Entry ➕.
Select Vendor Name, Delivery Date, Store Location.
Enter Product (SKU), Quantity Discount .
Enter Invoice Number, Invoice Date, Vendor Invoice Attachment (scan).
Mark Location/Store where stock is added.
Click Save/Receive — stock numbers update.
Also add if there are any additional charges and additional discount.
If received quantity differs from PO:
Record the reason (partial delivery/damaged), and either:
Update PO status to “Partially Received” or “Completed”, or
Create Purchase Return for items returned to the vendor.
Checklist after receiving:
Attach supplier invoice (for accounting).
Verify unit cost and VAT/GST.
Update payment record if paying immediately.
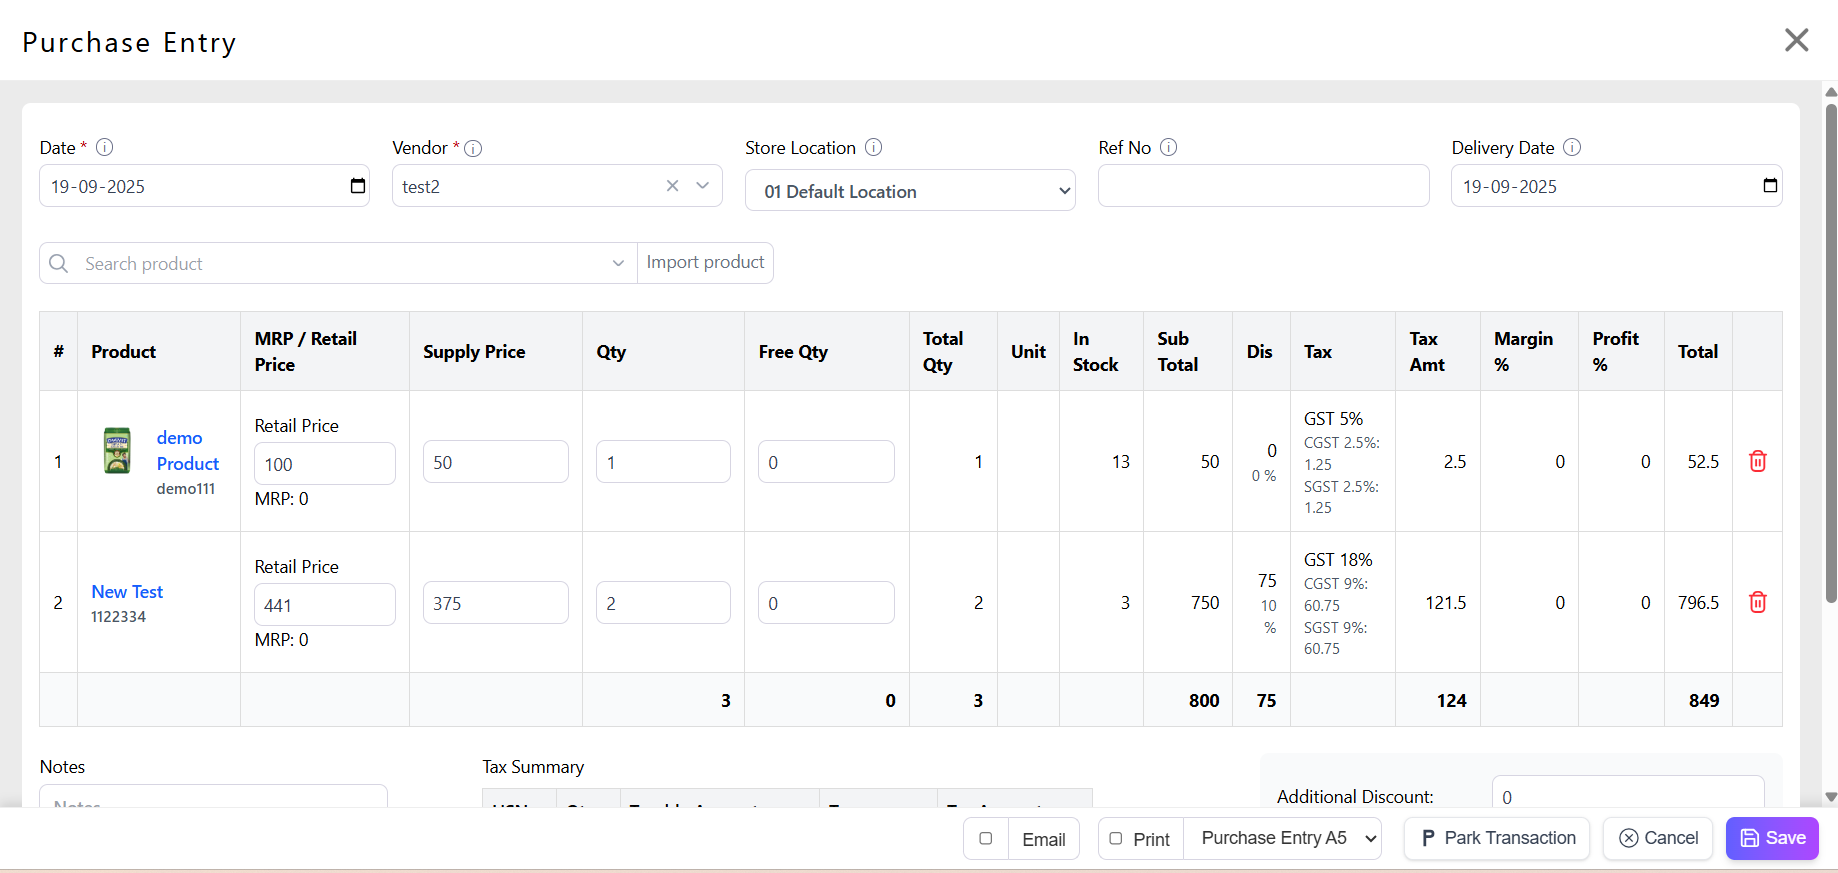
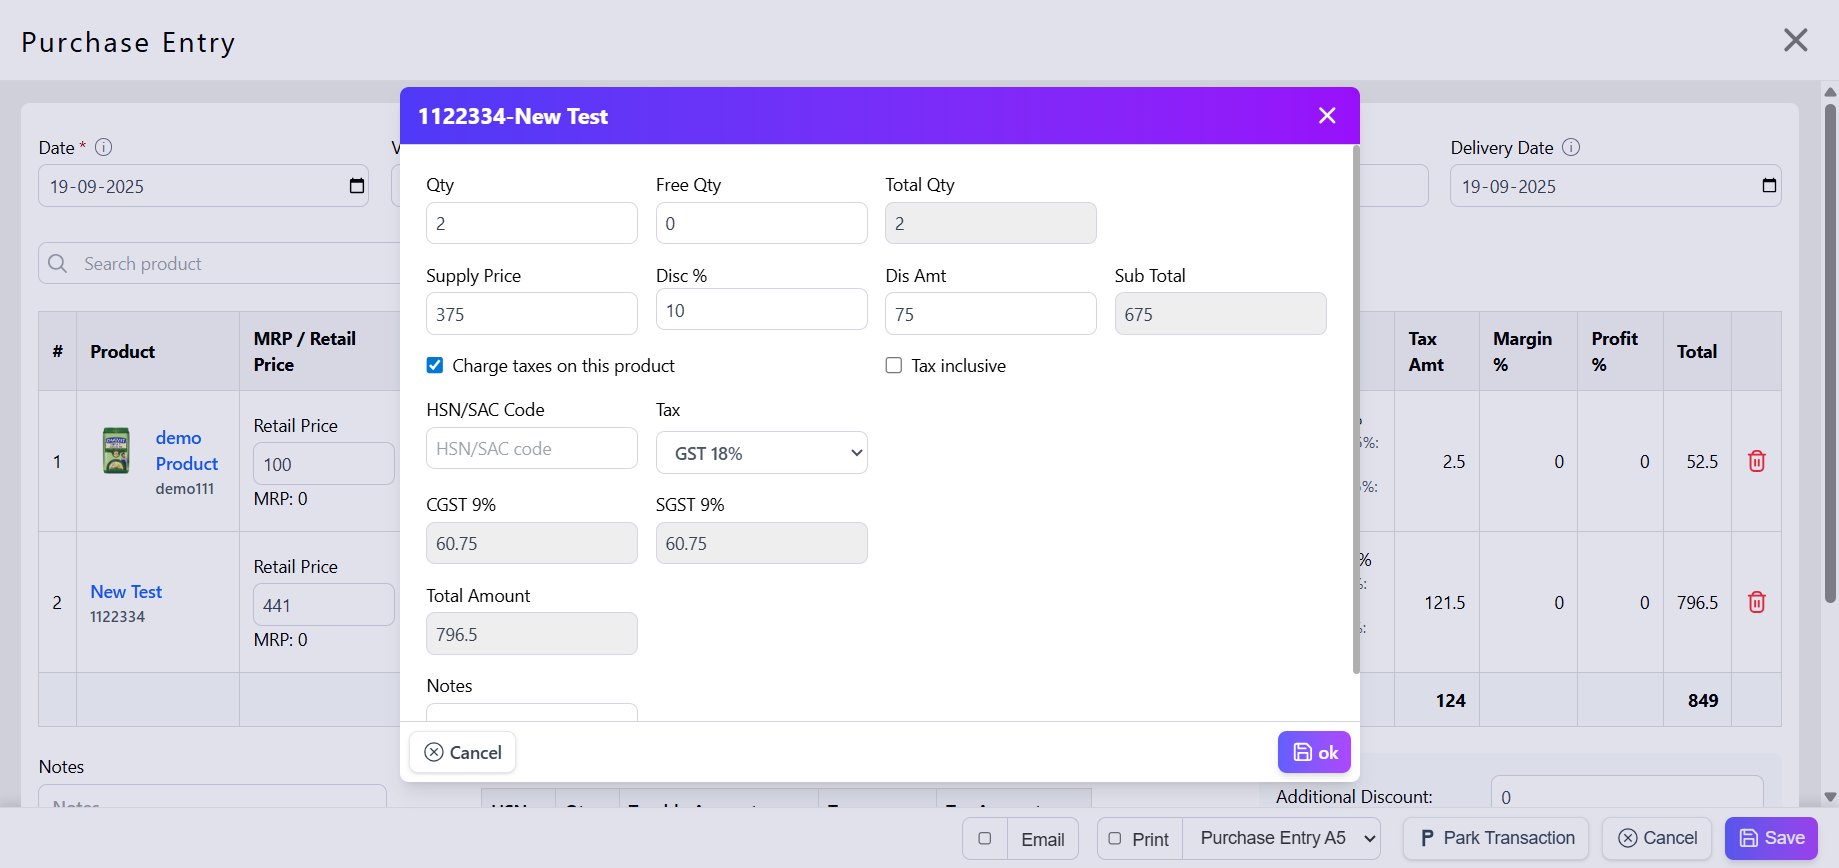
Note: If you want to change the price, Tax, you need to click on the product name. A popup window will appear, as shown below, where you can change the price and add a discount (if any) while purchasing. This can be done only if the ‘Allow Price Edit’,’Discontable’and ‘Allow Tax change ' toggle is enabled in the product settings.
⇒ If you select a variant product, it allows you to add from the list as well as from the popup window shown below.
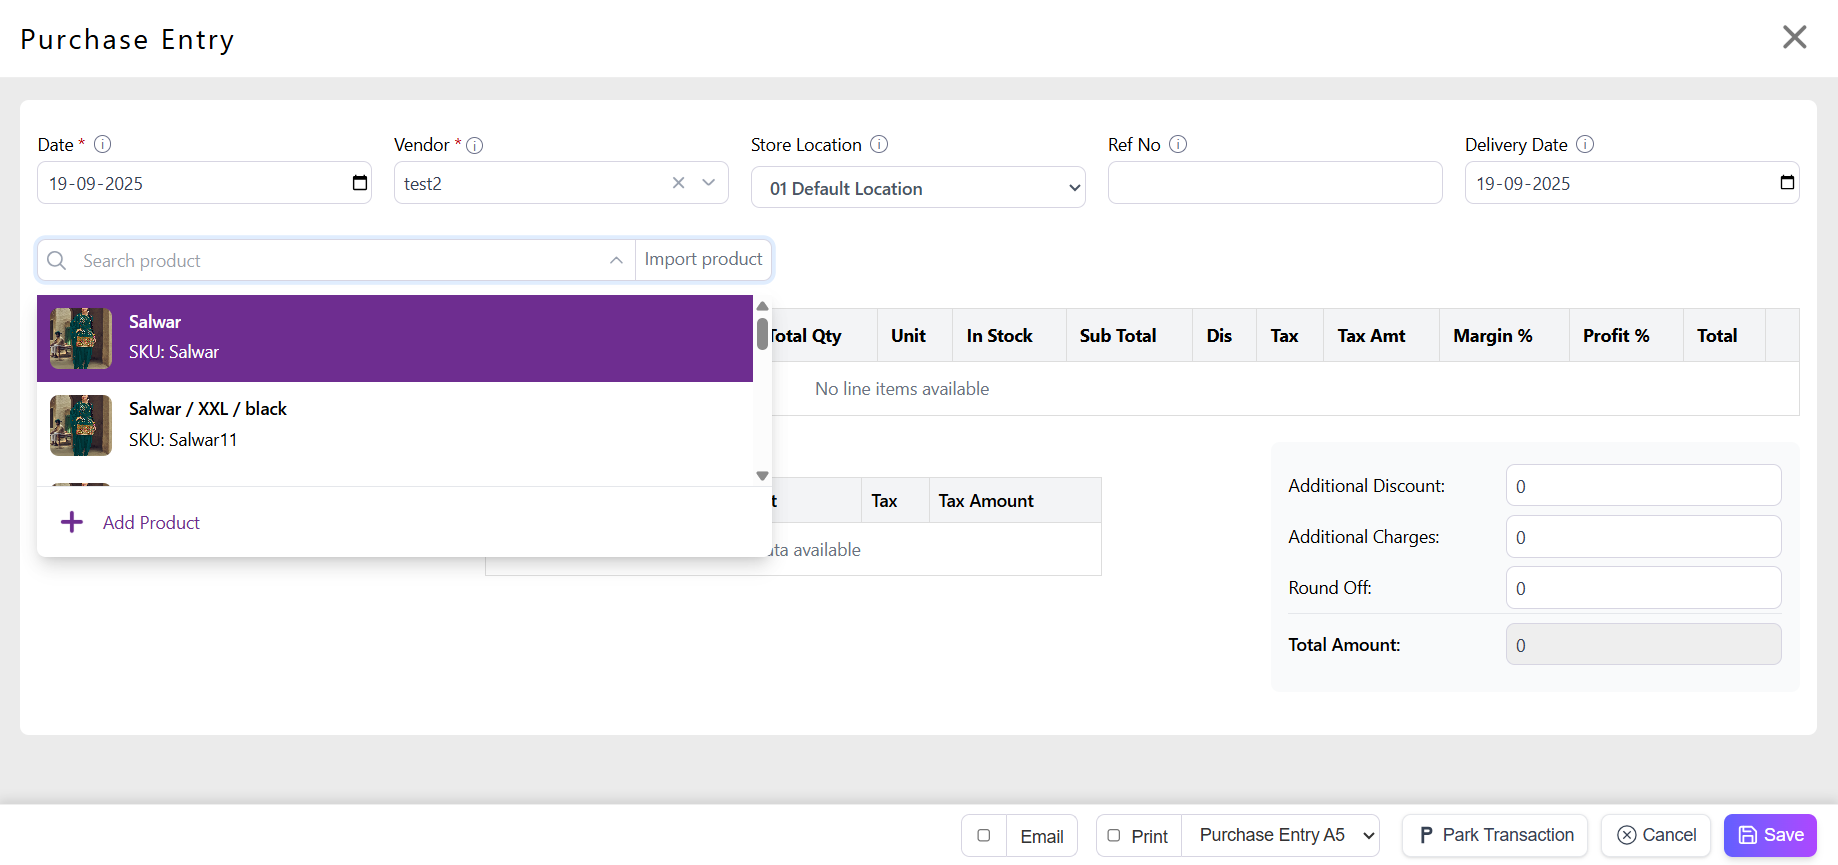

⇒ If you select a batch-tracking product for purchase, you must fill in all the details as shown below. (Note: These fields—Batch No, MRP, Manufacturing Date, and Expiry Date—will only be visible if the respective toggles are enabled in the product settings.)
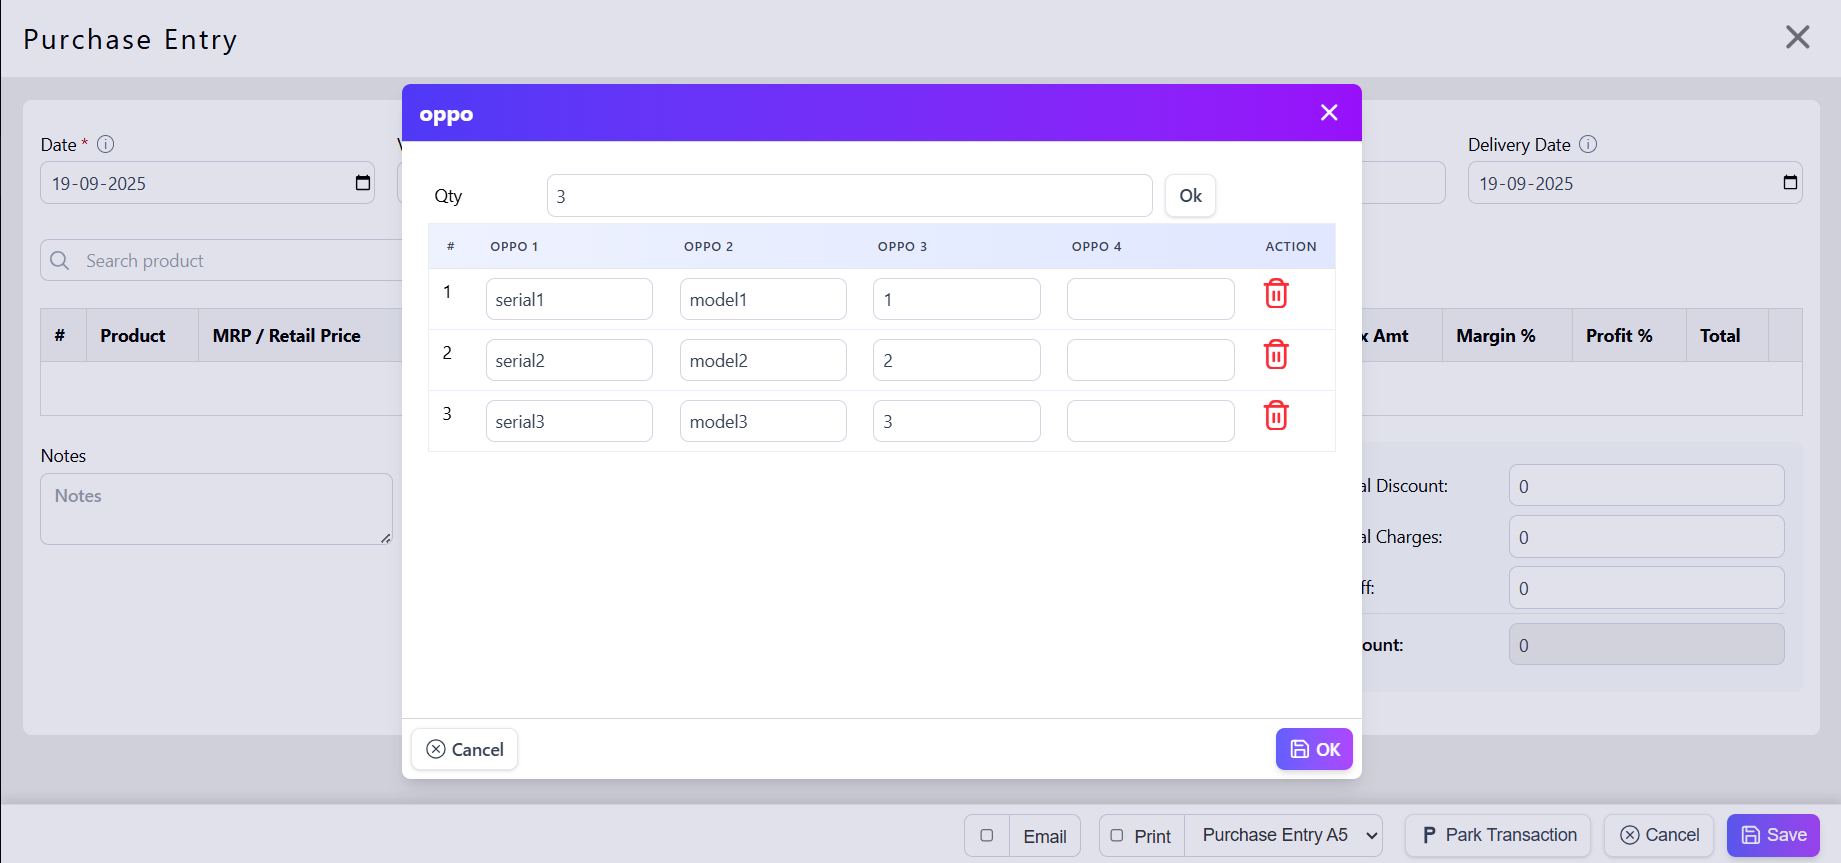
⇒ If you select a Unique No product for Purchase Entry, you first need to enter the quantity and click OK. After that, you will be required to enter the product details such as Serial No. and Model No.
4) Stock Update — manual changes & bulk updates
Why: When you need to correct stock counts without a PO (e.g., new stock from another system, bulk import).
How:
Go to Stock Update ➕.
Search product or upload CSV for many products.
SKU, ProductName, StoreID, Quantity, CostPrice, BatchNo, ExpiryDate
Enter the new stock quantity.
Save — stock adjusts.
Note: If you have 10 Qty but the system shows 4, then enter 10 to update, and the system will show 10 as the current Qty.
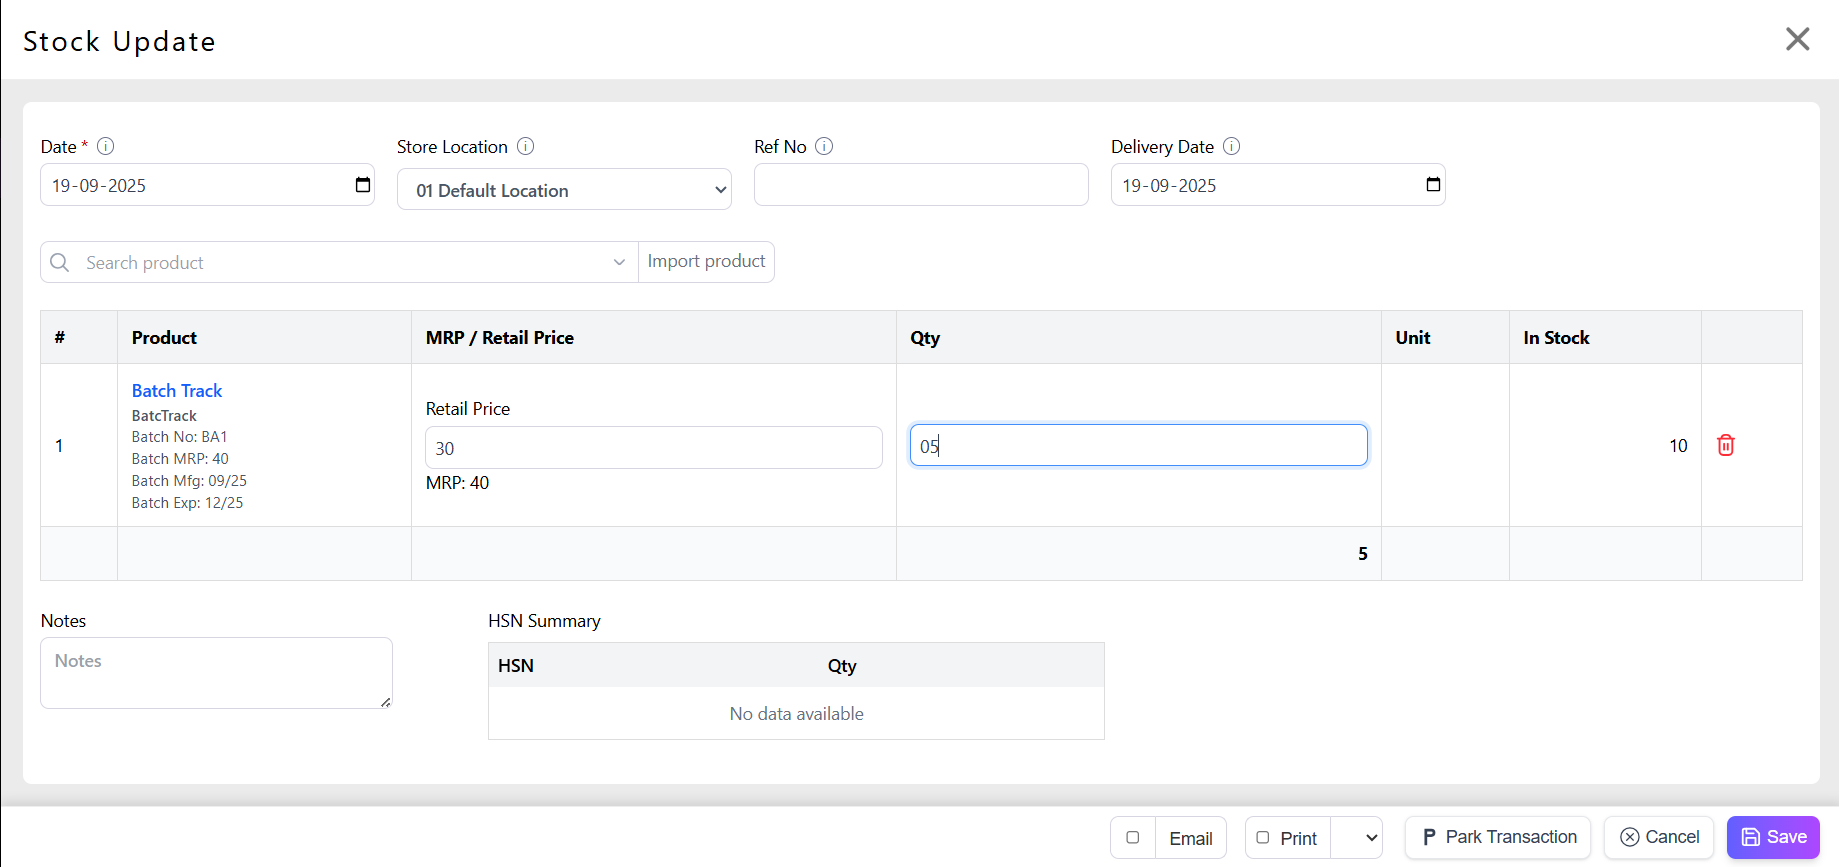
The system shows you the available stock quantity for all product types when you select that product for SU.
Use this carefully — prefer Purchase Entry for received purchases.
5) Stock Correction — adjust after stock count
Why: After a physical stocktake, you might find differences. Use Stock Correction to keep records.
How:
Go to Stock Correction ➕.
Select product and store.
Enter Current Count (what you counted) and System Count (auto-filled).
Correction = Current Count − System Count. Enter Reason (shrinkage, miscount, theft).
Save. The system will adjust stock and log the change
6) Damage — record damaged goods
Why: Damaged goods should be removed from sellable stock but tracked.
How:
Go to Damage ➕.
Select product, quantity damaged, date and reason.
Save — stock reduces and damage record is created.
Tip: If the vendor caused damage on delivery, link to the related Purchase Entry and create a Purchase Return or claim.
7) Purchase Return — send items back to vendor
Why: For returns due to defects, wrong items, over-supply.
How:
Go to Purchase Return ➕.
Choose Vendor and link to original Purchase Entry or PO.
Select items and quantities to return.
Generate Credit Note or attach vendor return acknowledgement.
Save — stock reduced and accounting entries updated.
8) Transfer Out / In & In Transit — move stock between stores
Why: If you have multiple stores/warehouses, items move from one location to another.
How to transfer:
From source store: Transfer Out ➕ → choose destination store, add items & quantity, expected arrival date, click Send. Stock at source optionally reduces and status becomes In Transit.
See details in In transit list (shows transfers not yet received).
At destination:At the destination store, you will see the ‘Transfer In’ entry. You need to view and then accept the transfer; once accepted, the status will change to ‘Completed’, and the stock will be updated accurately with the quantity sent from the other store.
Notes:
Use BatchNo and ExpiryDate for perishable items.
Keep transfer IDs for audit trail.
9) Inventory list & Reports — view and export stock
What you can do:
View current stock by Store / Category / SKU.
Export CSV/Excel for accounting or physical counts from Report⇒ Inventory Reports⇒ InStock. You are able to see the overall stock.
3.Sales Module
1. Accessing the Sales Module
Login to billing.posible.in for Sales billing.
Or, from web.posible.in, click on the Sales → Go to Billing button to switch directly.
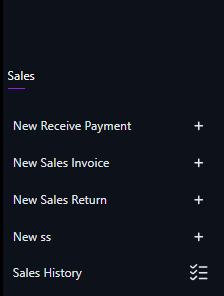
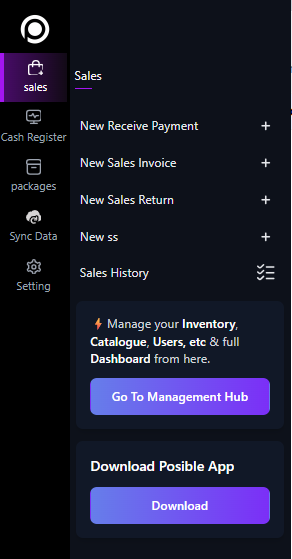
2. Sales Module Main Menu
Inside billing.posible.in, under Sales, you will see:
New Sales Invoice → Create a new sales bill.
New Receive Payment → Record payments from customers.
New Sales Return → Manage product returns.
Sales History → View and track past sales transactions.
We see one by one
1.Sales Invoice (Sell Products & Update Stock)
Why: Record sales transactions, generate invoices for customers, and reduce stock.
How to create a Sales Invoice:
Go to Sales → New Sales Invoice ➕.
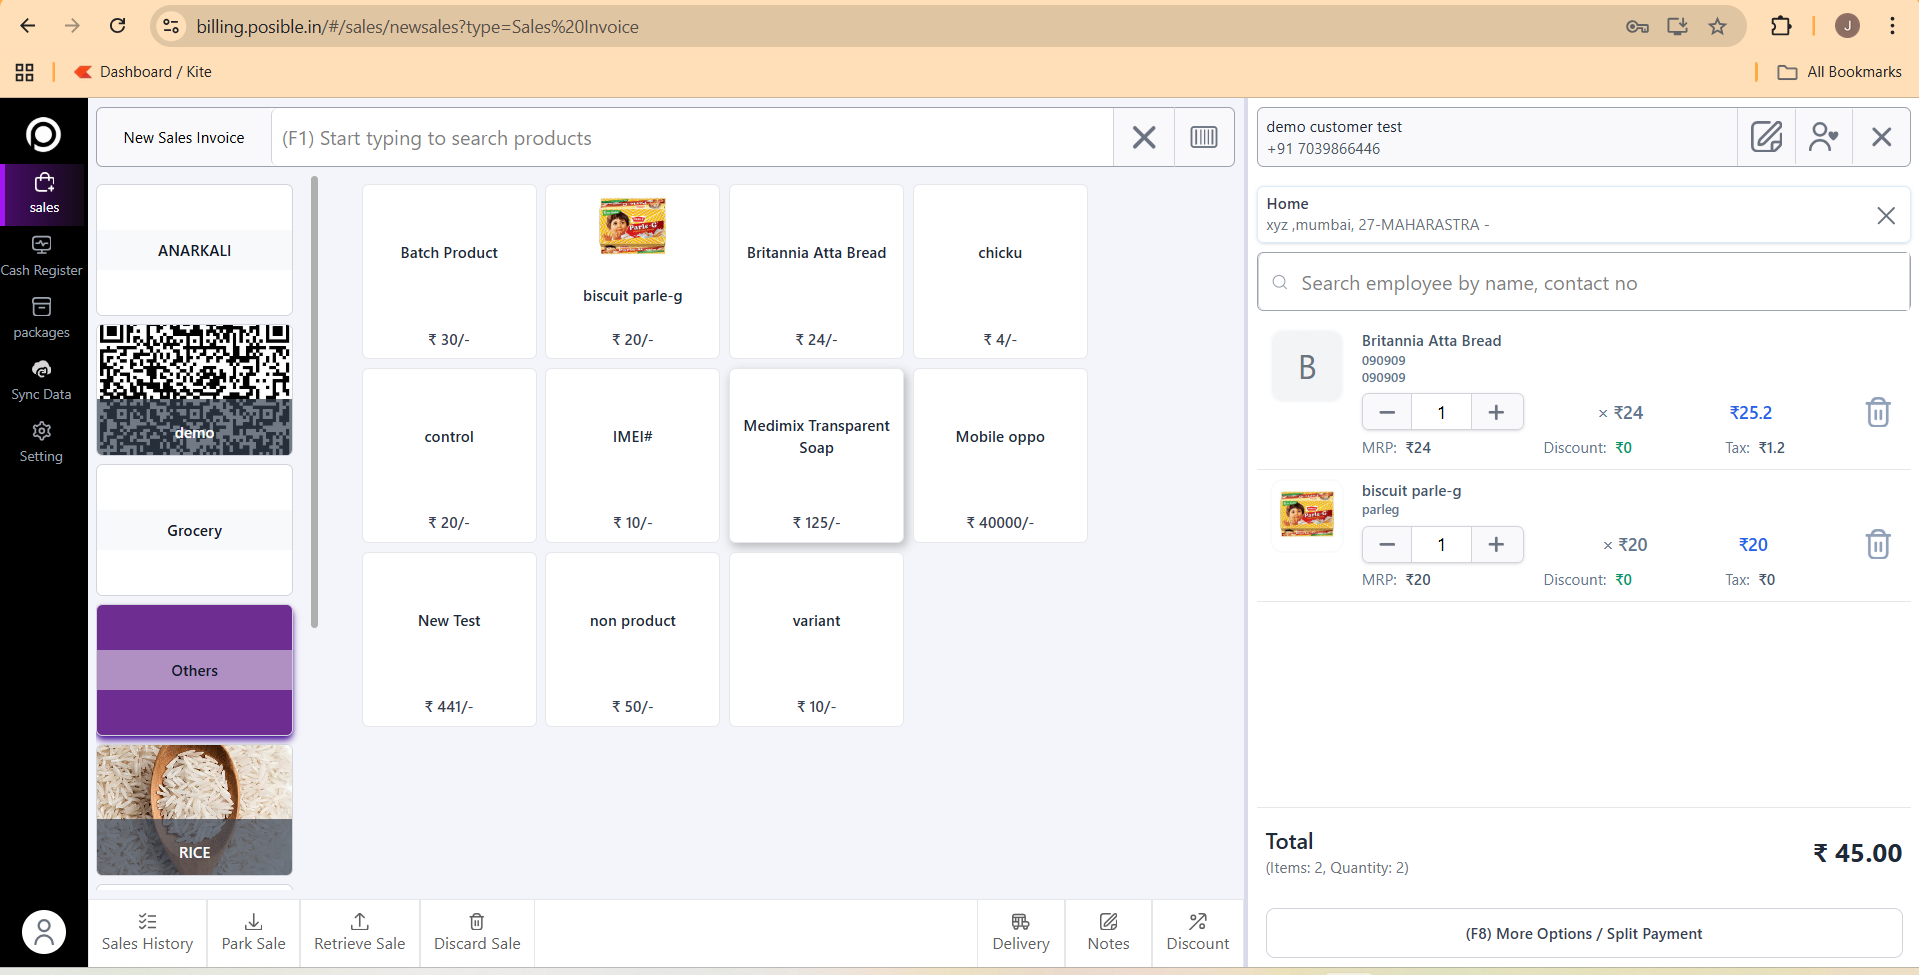
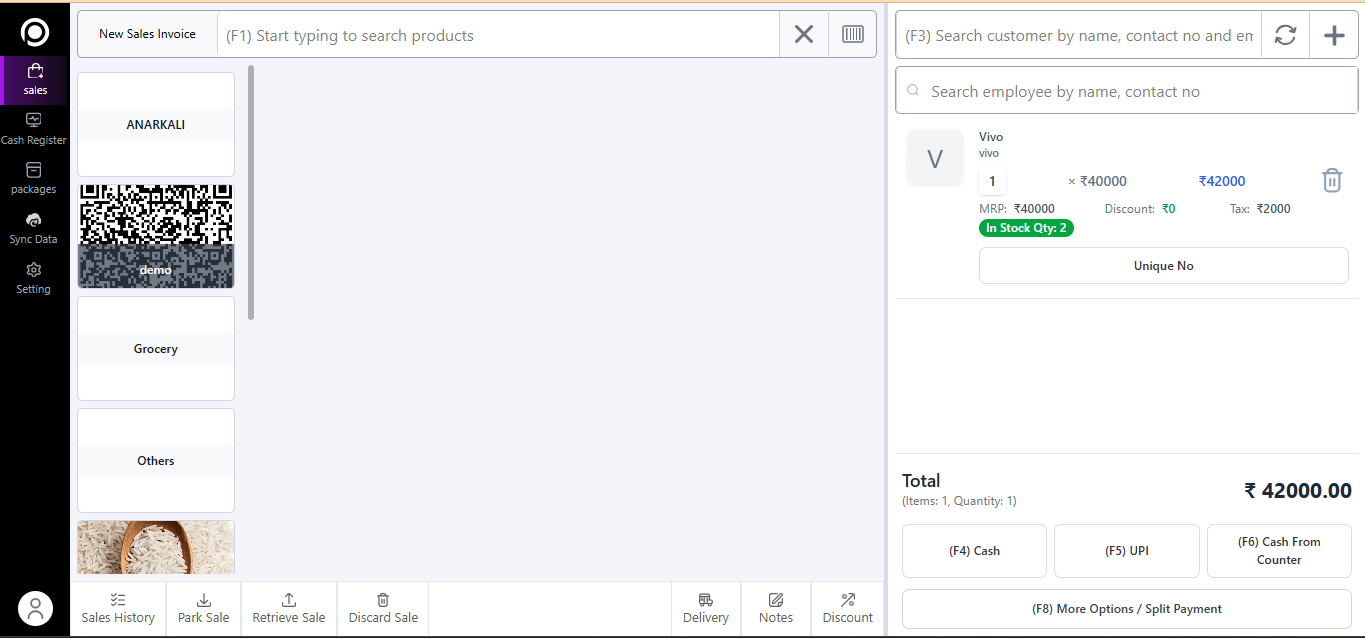
Customer Selection
On the top right, you can search and select a customer and add Employee(Seller Name)
Shows:
Customer Name
Phone Number
Address
Requirement: Helps link sales invoice to a specific customer (for records, credit sales, packages, loyalty points, etc.).
Note: You can add a customer from here by clicking on the + icon.
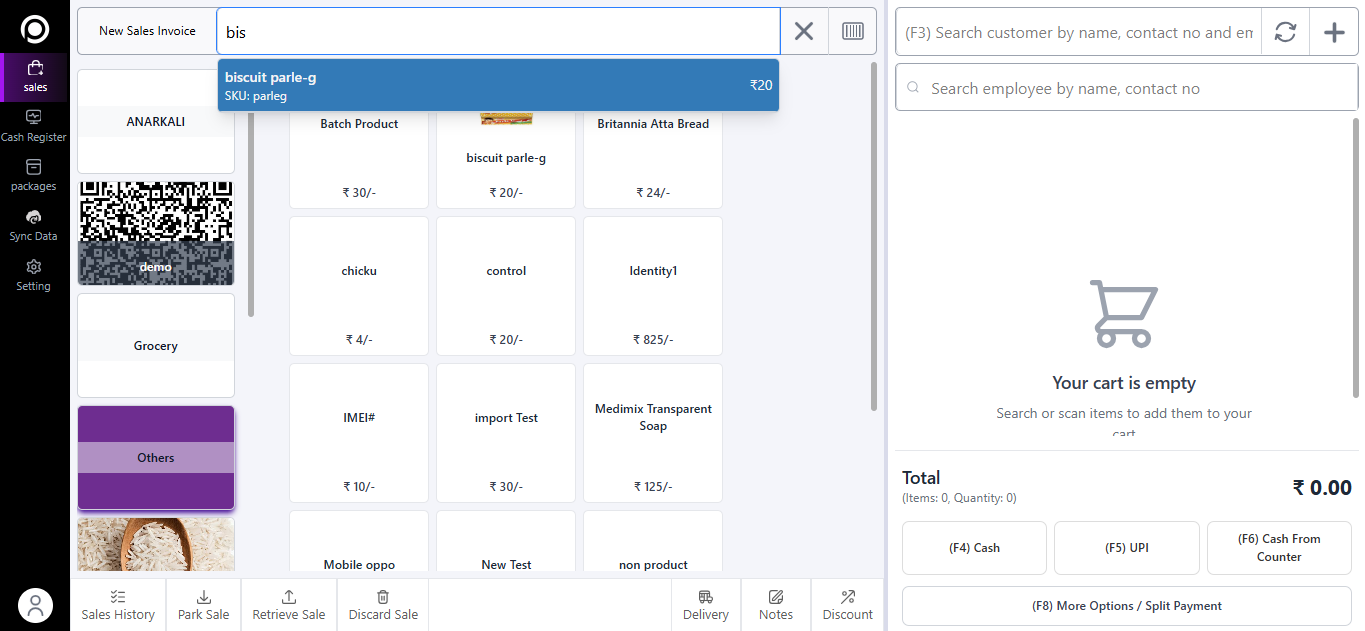
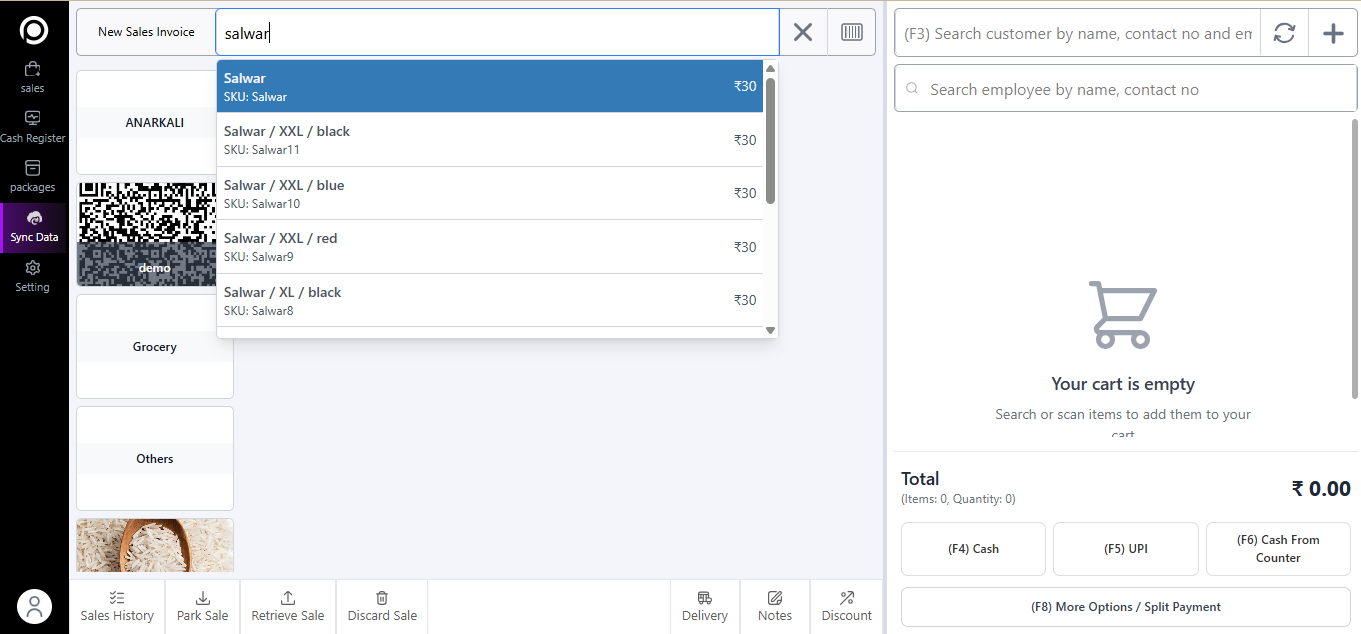
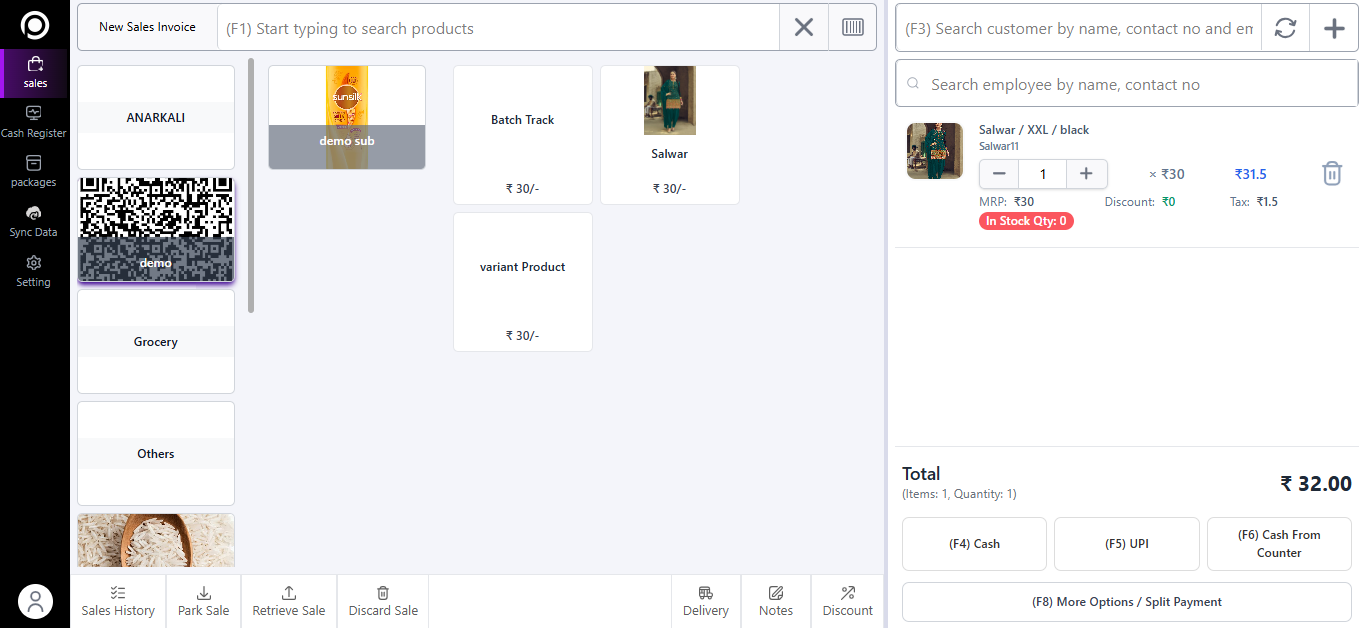
Product Search & Selection
At the top bar: “Start typing to search products (F1) and Start Scanning the product (F2)”.( button available to change the Mode)
You can search by:
Product Name
SKU / Barcode / Unique No.
Products are also visible in category tiles (e.g., Grocery, Rice, Others).
Requirement: Add items to the invoice quickly.
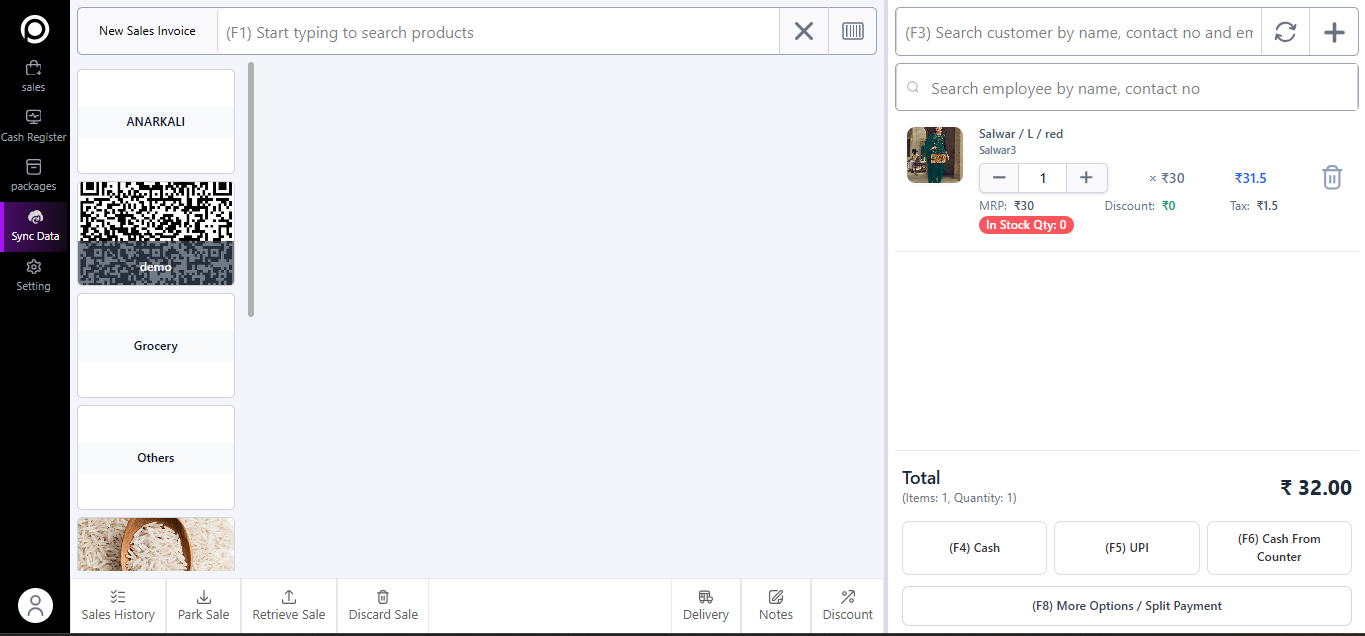
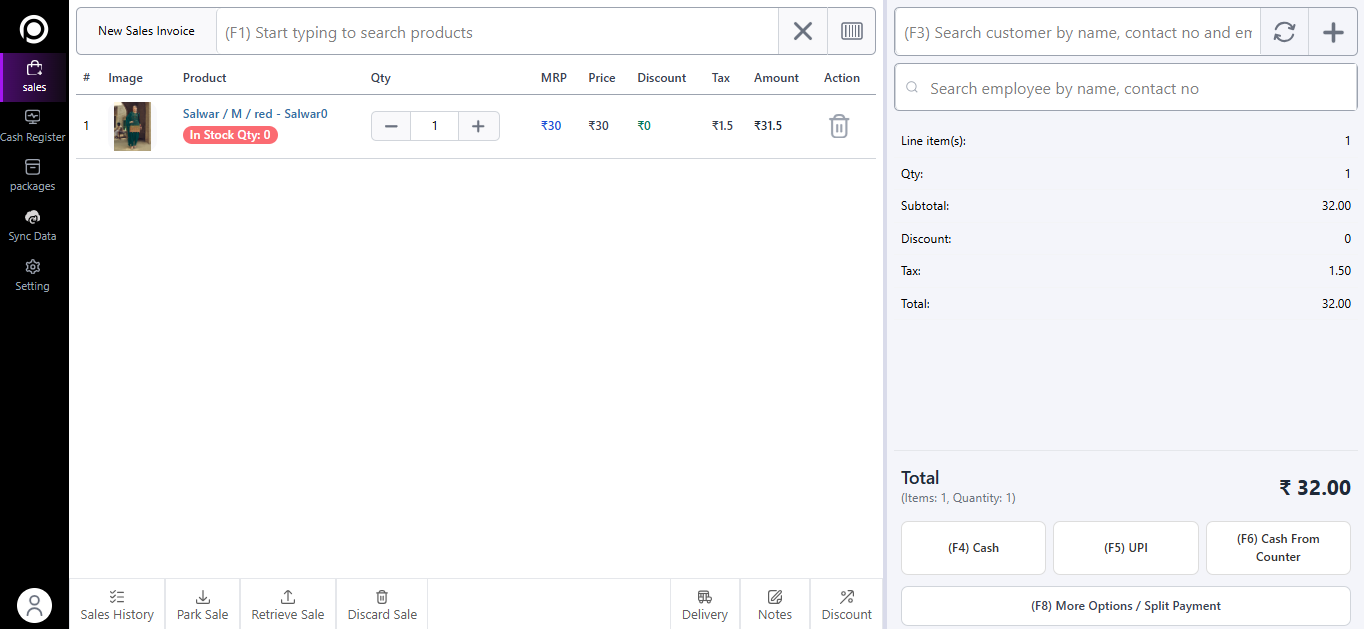
4. Invoice Item List (Right Side Panel)
Displays selected products with details:
Product Name
SKU
MRP
Quantity selector (+ / – buttons)
Discount (if applied)
Tax (calculated automatically)
Final Line Price
Requirement: Review/edit items before finalizing invoice.
5. Action Buttons (Bottom Bar)
Sales History → View previous invoices.
Park Sale → Save invoice temporarily (hold transaction, continue later).
Retrieve Sale → Get back a parked sale.
Discard Sale → Cancel current sale entry.
Delivery → Add delivery details for the order.
Notes → Add special notes (e.g., instructions, remarks).
Discount → Apply overall discount on the invoice.
(F8) More Options / Split Payment →
Record multiple payment modes in one invoice (Cash + Card, UPI + Wallet, etc.).
6. Total Section
Shows:
Total Items
Total Quantity
Total Bill Amount (after tax & discount).
Once you finish adding items, you can complete the billing by selecting a single payment type such as Cash, Card, etc. If you want to split the payment, click on More Options / Split Payment. From there, choose the payment type, click Add Payment, and then click Done to generate the invoice.
You can share the invoice via WhatsApp, SMS, Email, or print a physical copy.
For SMS and Email, make sure the customer’s phone number and email ID are valid.
For WhatsApp, ensure that WhatsApp Web is enabled.
For printing, verify that a printer is properly set up on your system.
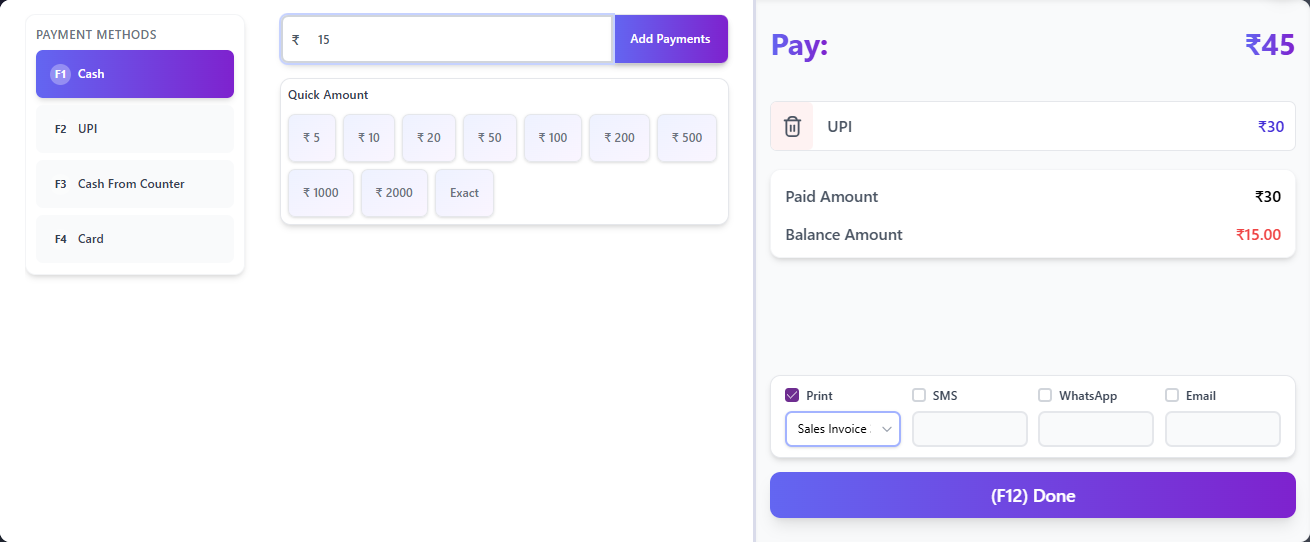
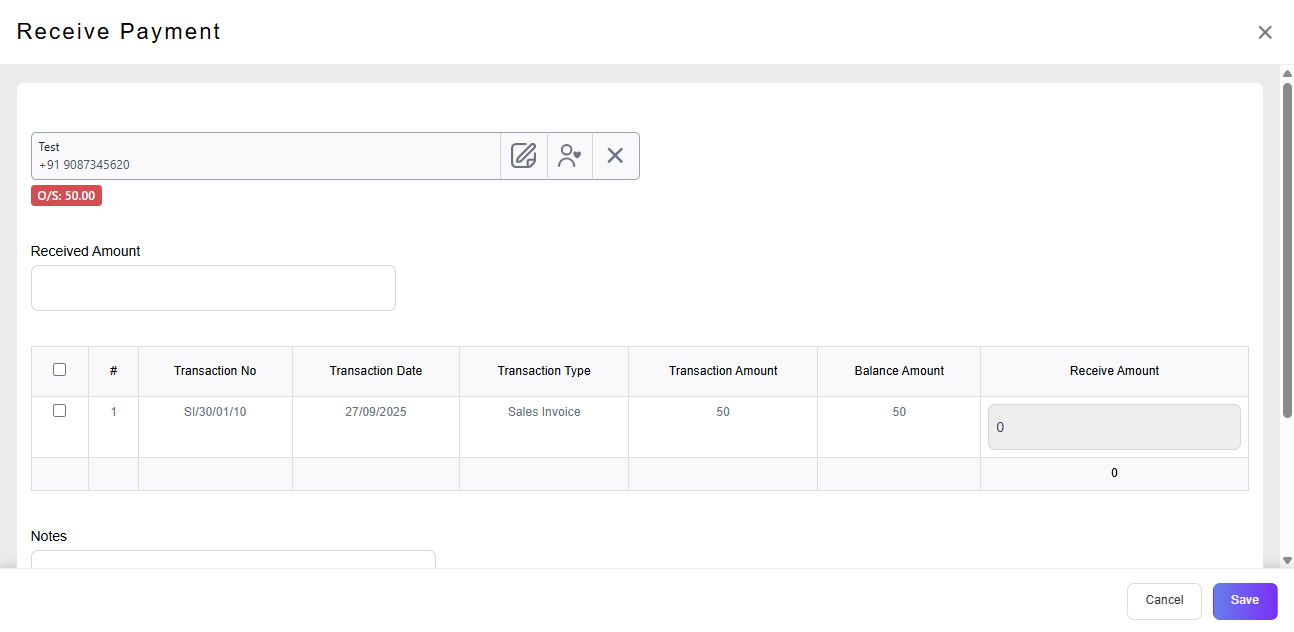
==> If you leave a balance for the customer, it will be recorded under the customer’s name along with the sales invoice number. Later, you can use the Receive Payment method to clear (nil) the balance amount. We will see how to use Receive Payment in the next section.
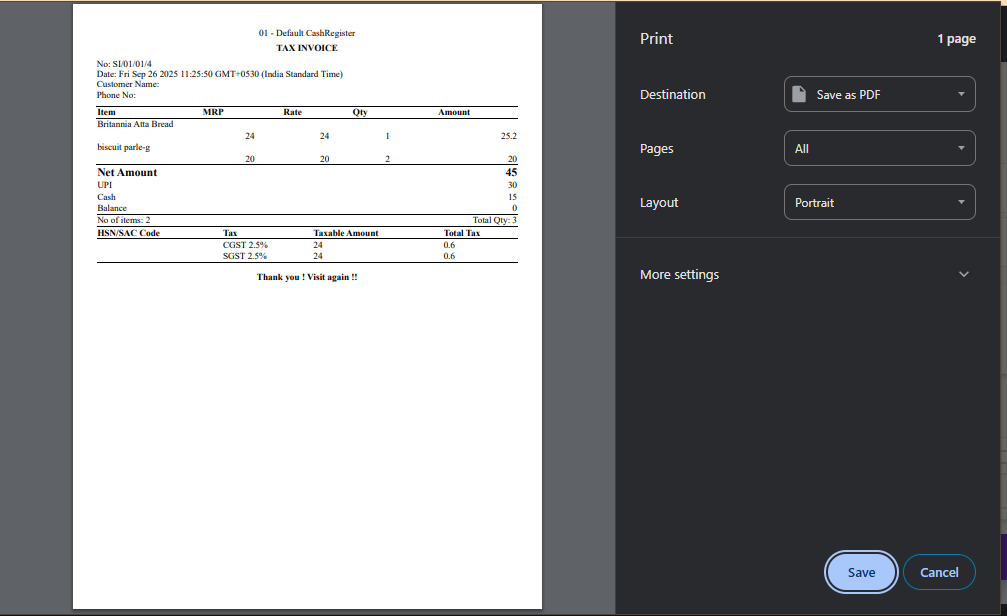
“You can customize the print template according to your needs.”
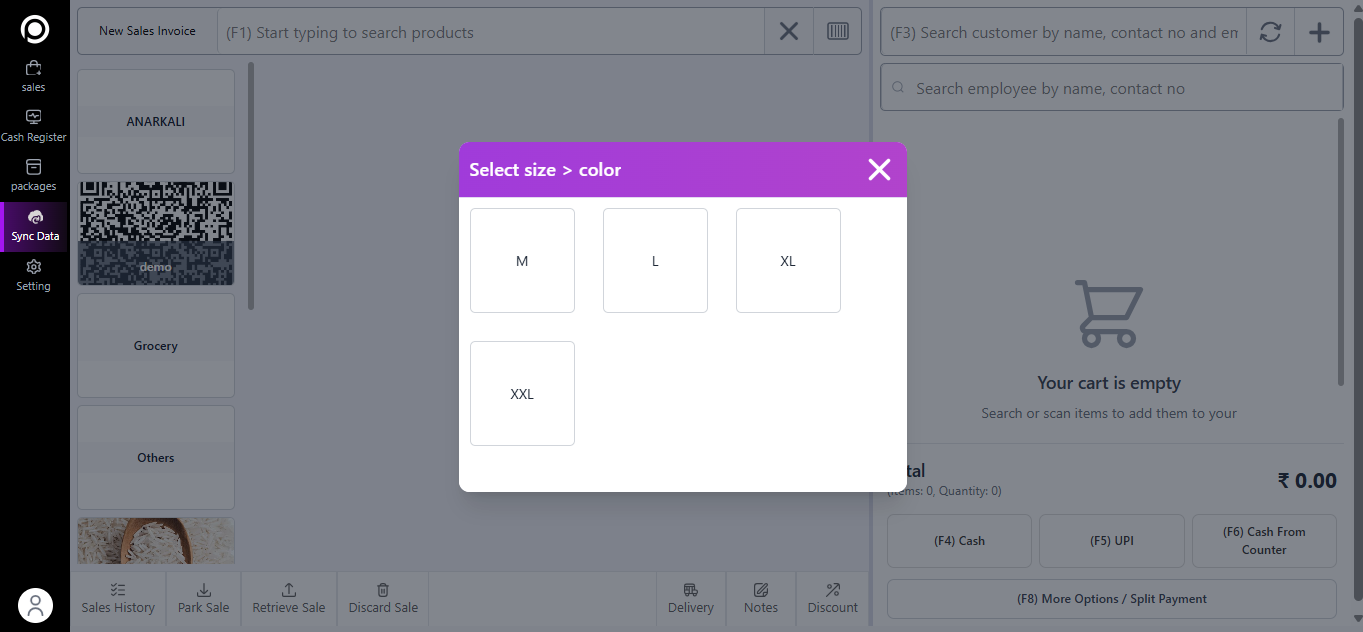
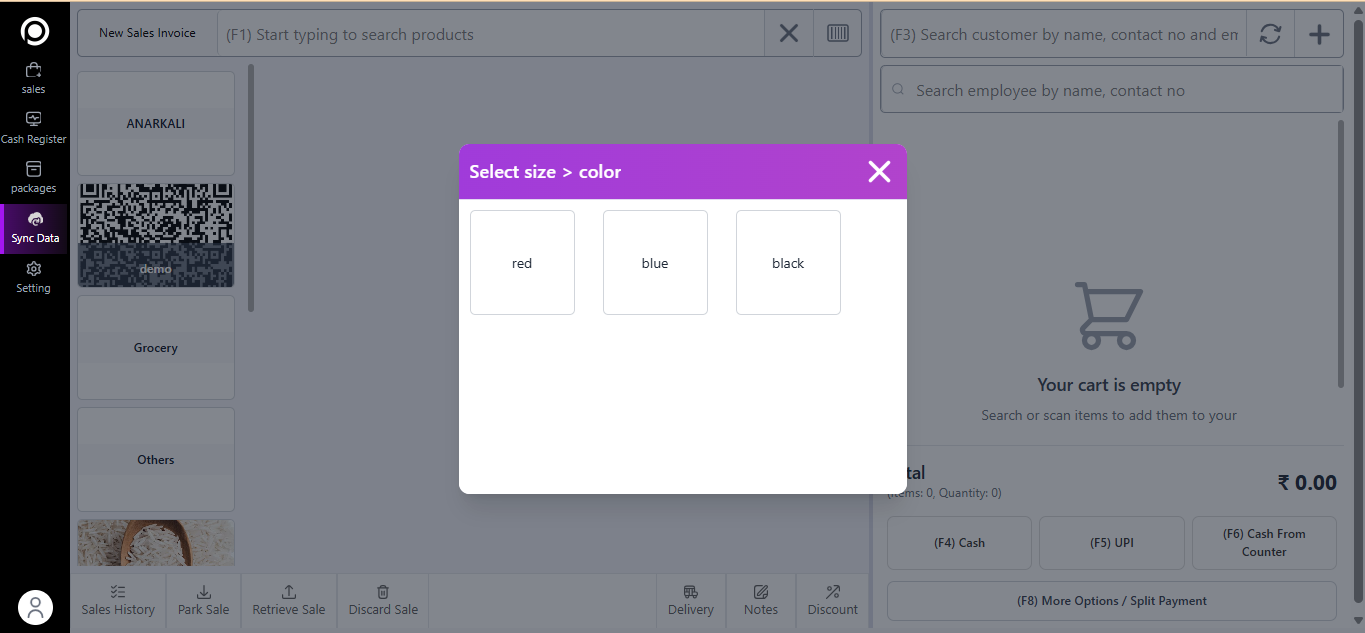
📌 Special Cases for Product Types in Sales Invoice:
⇒ If you select a Variant Product:
You can choose the required variant (e.g., size, color) from the list, or from the popup window (same as Purchase Entry).
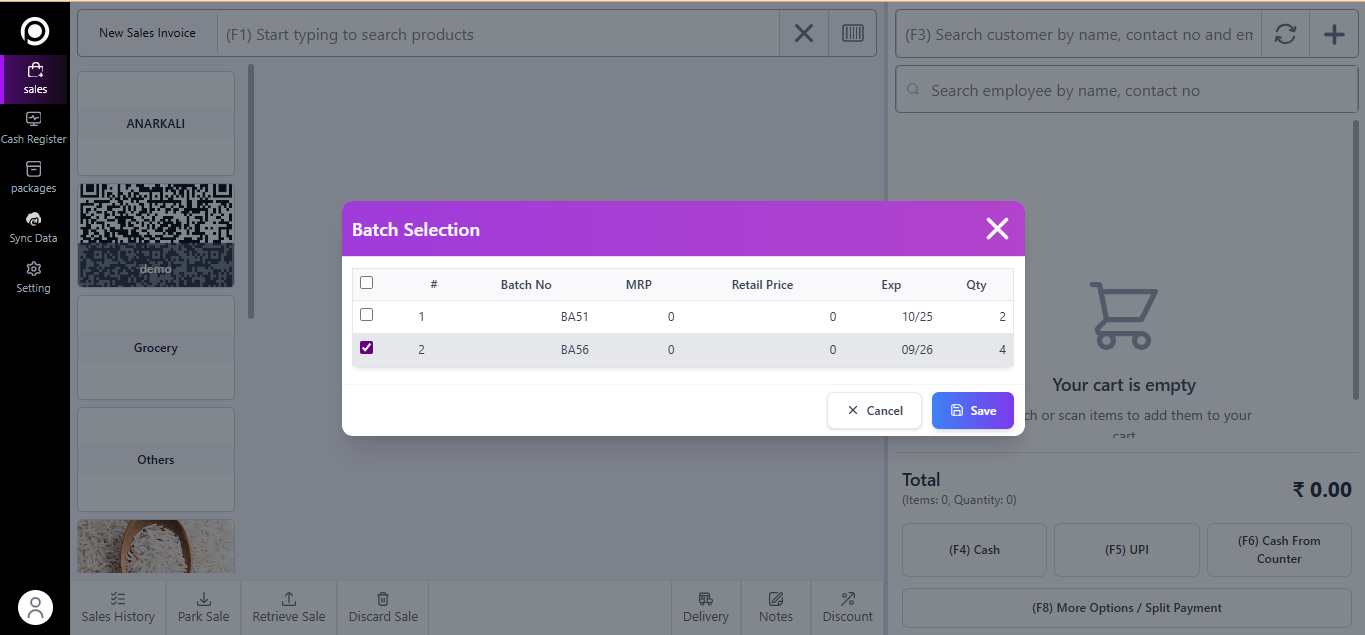
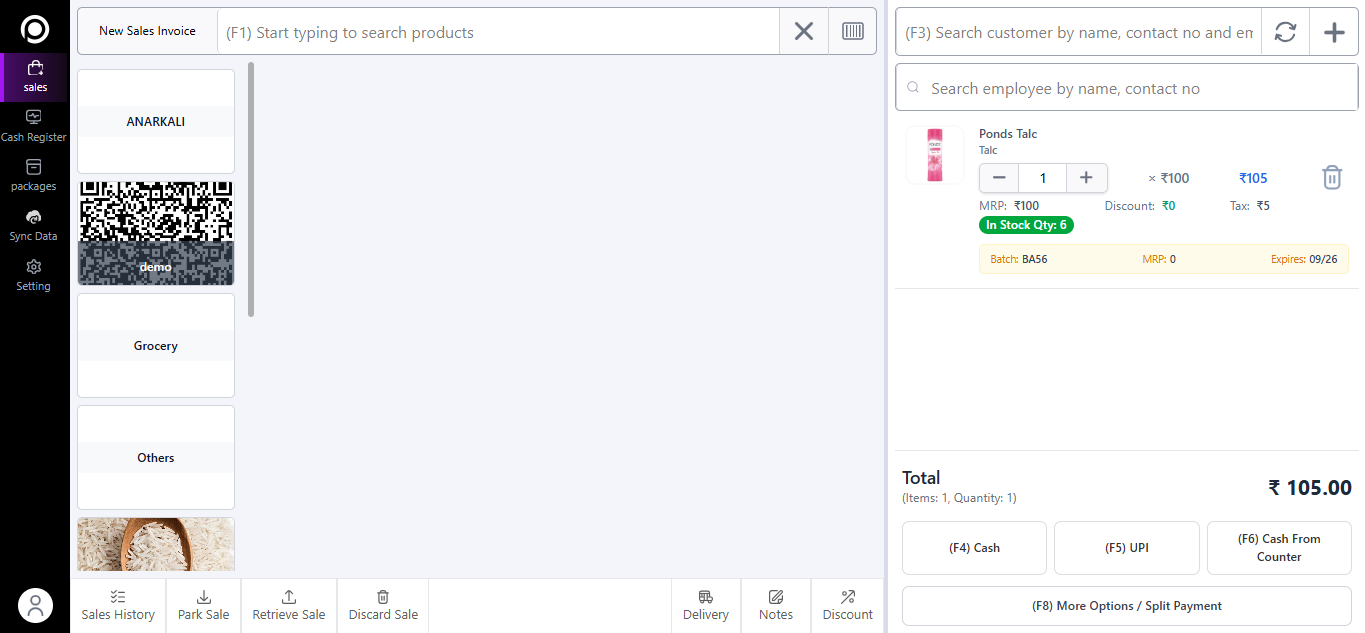
⇒ If you select a Batch Tracking Product:
You must select the correct Batch No before completing the invoice.
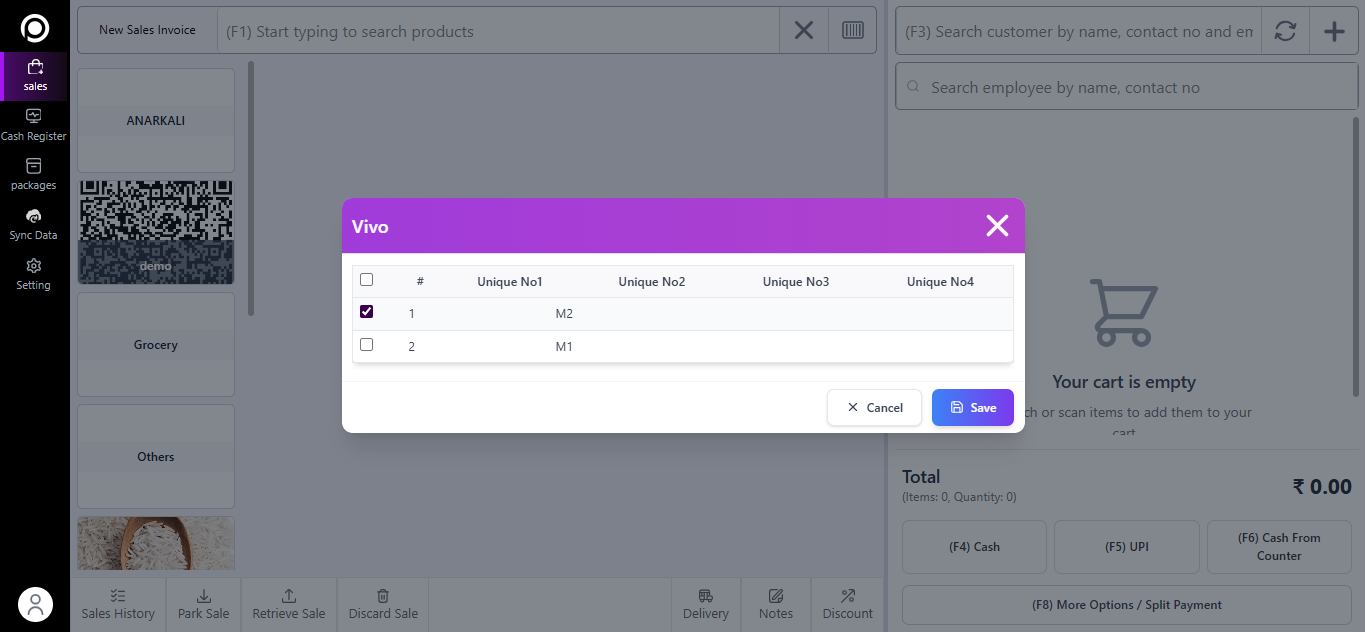
⇒ If you select a Unique No Product:
Select the Serial No. / Model No. you want to sell, and then complete the sale.
3. Packages in Sales
From the sidebar → Sales → Packages.
Here, you can track all packages linked with Sales invoices.
Statuses like Pending, Completed, Expired, Cancelled will help you manage packages easily.
(👉 Mention: “You can also track all active and completed packages in web.posible.in → Sales → Packages.” as explained in previous steps in Tracking Packages)
2. New Receive Payment
- Use this option to record payments received from
customers.
- Select the customer name to display their records, and then choose the transaction for which you want to receive the payment. Click on ‘Save’, and the screen will redirect to the payment mode. Once the process is completed, the outstanding amount will be reduced or cleared.
- This helps in keeping track of pending or completed payments efficiently.
3.New Sales Return
- Use this option to record any product returns from
customers.
- Select the original invoice from the History, return the
product(s), and process the refund or adjustment. Or Select from Sales⇒ New Sales Return and return
the product.
- Helps maintain accurate stock levels and financial records after returns.
4.Sales History
- View and track all your completed sales transactions from this
section.
- You can search, filter, and view invoices based on customer,
date,.
- Also allows editing or reprinting previous invoices when necessary.
- You can also download your history date-wise.
🔹 Additional Options
- Go to Management Hub
- This button redirects you to the Management Hub
(web.posible.in), where you can manage your complete system — including Inventory, Catalogue, Users, and Dashboard.
- It connects your billing system to the backend for full control
and reporting.
- Download Posible App
- Click here to download the Posible Mobile
Application for Android.
- The app allows you to access your sales and store data on the go, providing flexibility for store owners and managers.
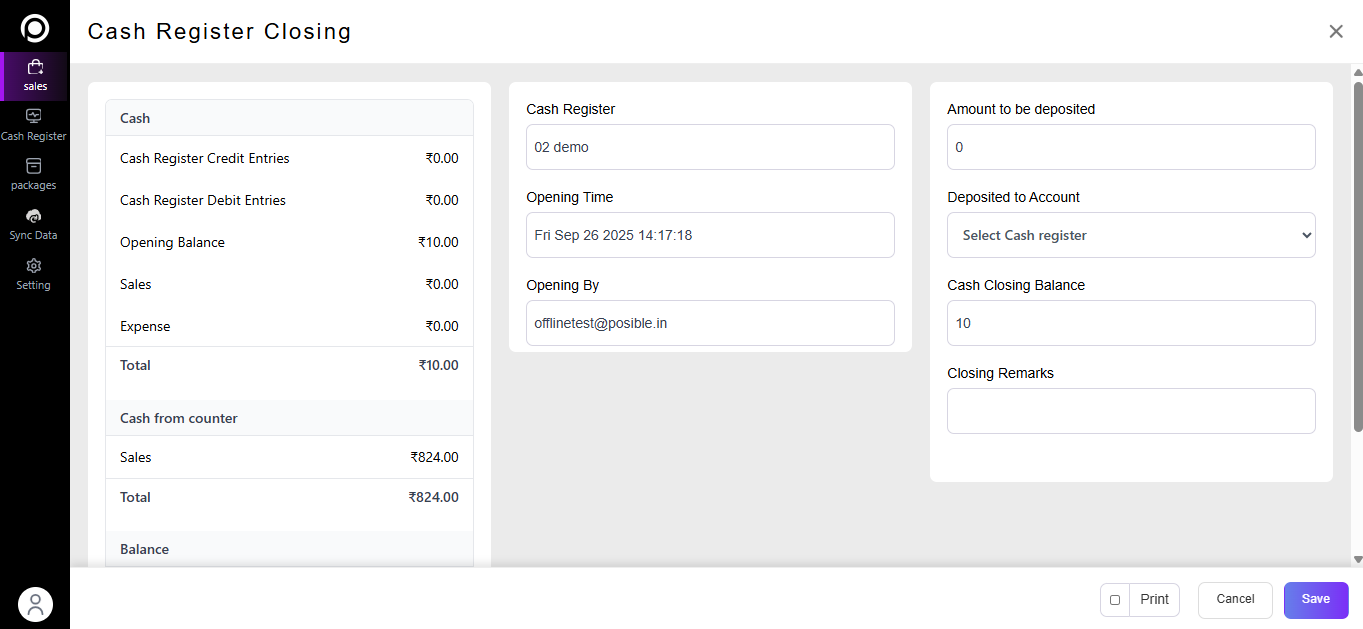
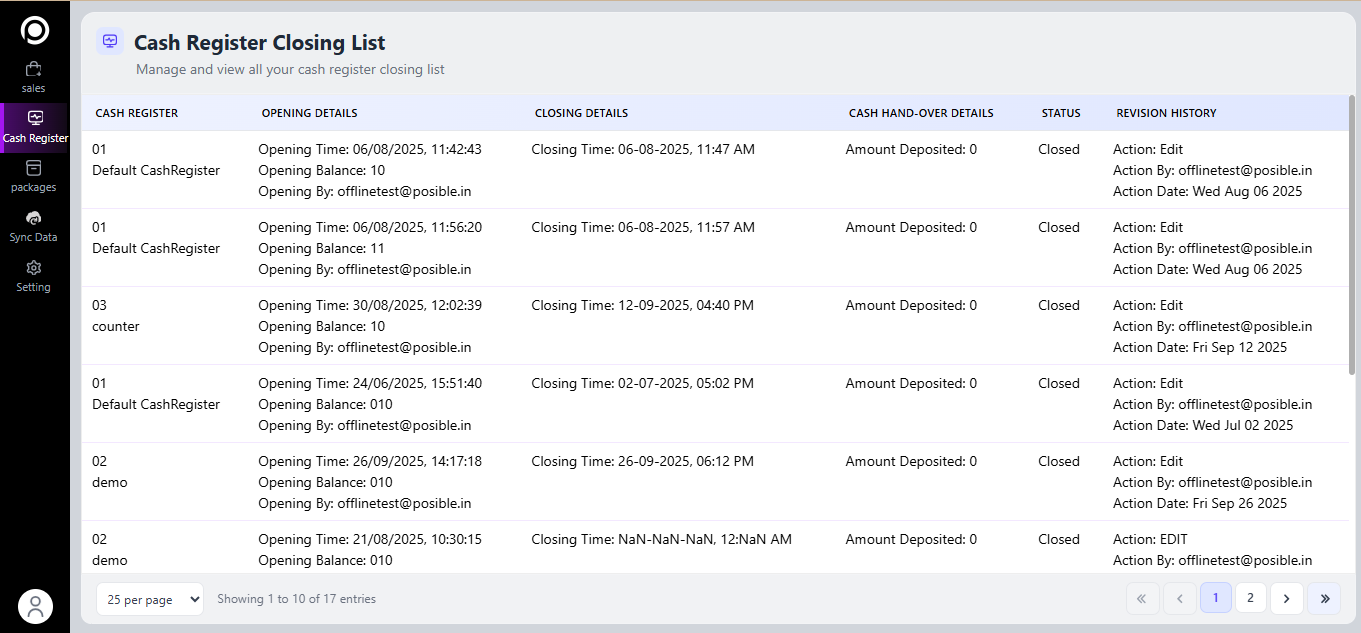
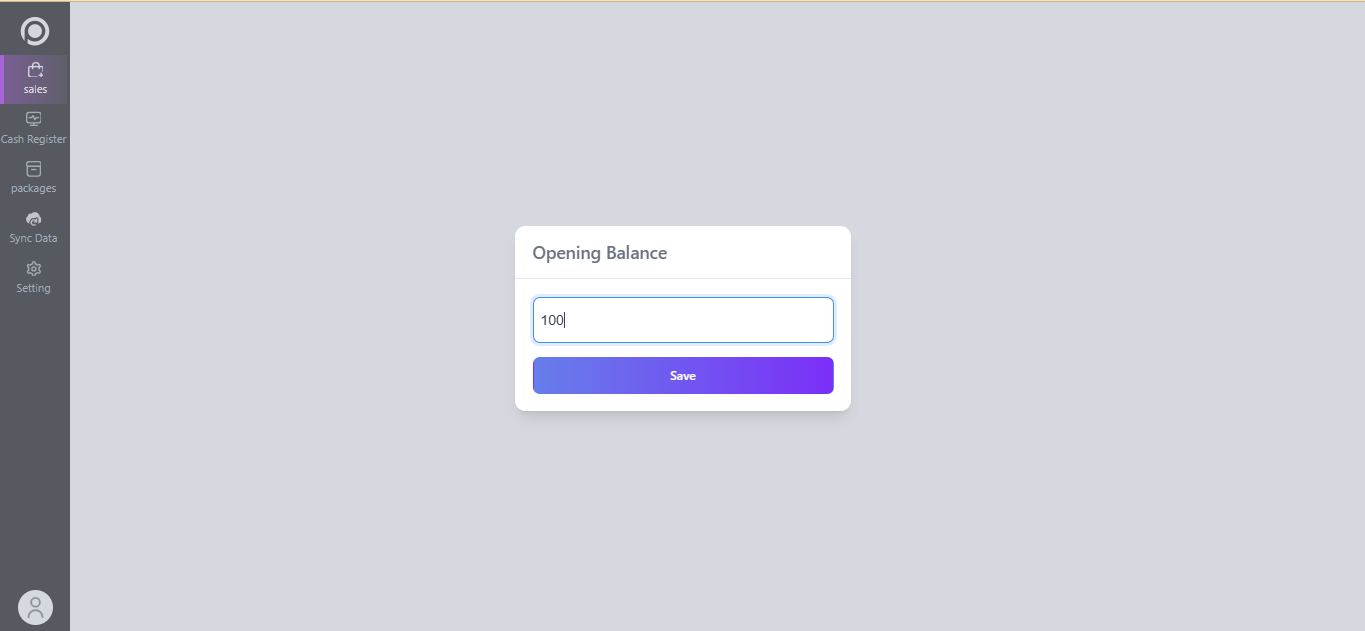
4. Cash Register
Cash Register Closing option helps you track and close daily sales.
Record cash inflows/outflows at the end of each day.

5. Extra Features
Delivery List → Manage pending deliveries from sales orders.
Offline Billing → Continue billing even without internet. (Bills will auto-sync once back online).
You also have the option to visit our main website (web.posible.in) and download our mobile application, as shown in the image above.
Now we see the Sync Data and Setting Section in billing.posible.in
Data Synchronization⇒
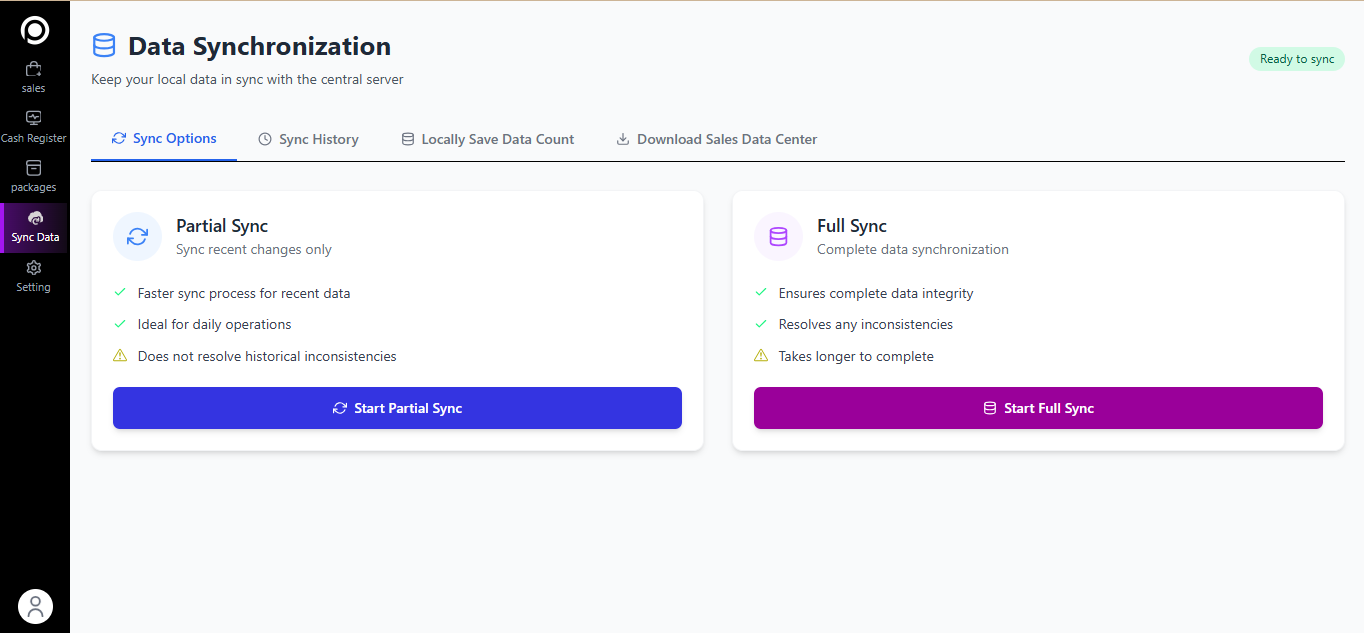
This feature allows you to keep your local data (sales, products, stock, etc.) updated with the central server.
You will see two options:
- Partial Sync
- Faster sync process.
- Saves time and bandwidth.
- Full Sync
- If you suspect data mismatches.
- If older records are missing or incorrect.
- Periodically, to ensure data integrity.
- Ensures all records are accurate.
- Resolves inconsistencies in historical data.
What it does: Syncs only the most recent changes (new sales, product updates, etc.).
When to use: Ideal for daily operations when you just need to update recent data.
Advantages:
Limitations:
Does not resolve historical inconsistencies (old missing/incorrect data may remain).
What it does: Performs a complete synchronization of all data between local system and central server.
When to use:
Advantages:
Limitations:
Takes longer to complete compared to Partial Sync.
Tip for users:
Use Partial Sync daily for regular operations.
Use Full Sync weekly or monthly, or whenever you notice mismatched data.
Settings
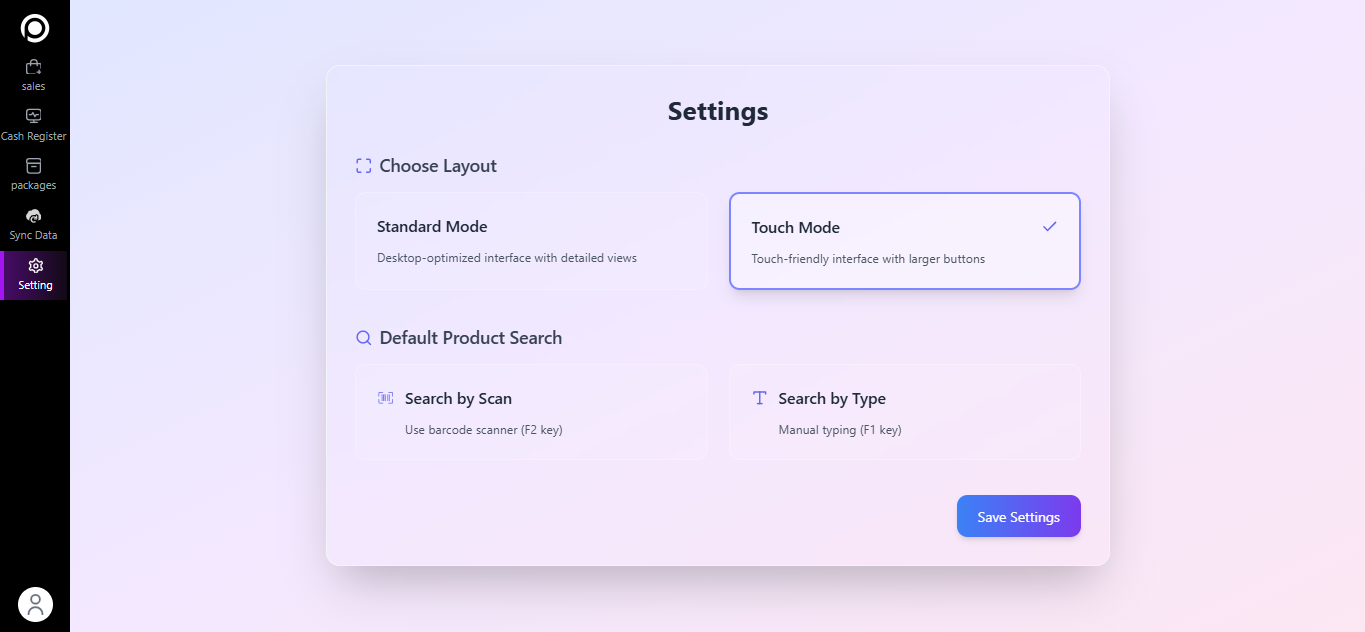
The Settings page allows you to customize the sales window according to your preferred layout and search method.
- Choose Layout
- Optimized for desktop/laptop users.
- Shows a detailed interface.
- Optimized for touch devices.
- Provides a touch-friendly interface with larger buttons.
- Easier to use for quick selections.
- Default Product Search
- Use a barcode scanner to quickly find products.
- Shortcut key: F2
- Best for retail stores with barcoded products.
- Manually type the product name or SKU to find products.
- Shortcut key: F1
- Best when barcodes are not available or for quick searches.
- Save Settings
Select how you want the billing window to appear:
Standard Mode
Touch Mode
👉 The sales screen will adjust its layout depending on the option you choose here.
Choose your default method for searching products during billing:
Search by Scan
Search by Type
Once you select your preferred layout and product search method, click Save Settings to apply changes.
4.CRM Module
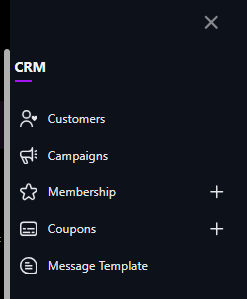
From the left menu, click CRM.
You will see the sections: Customers, Campaigns, Memberships, Coupons, SMS Templates.
Open the section you want to work on.
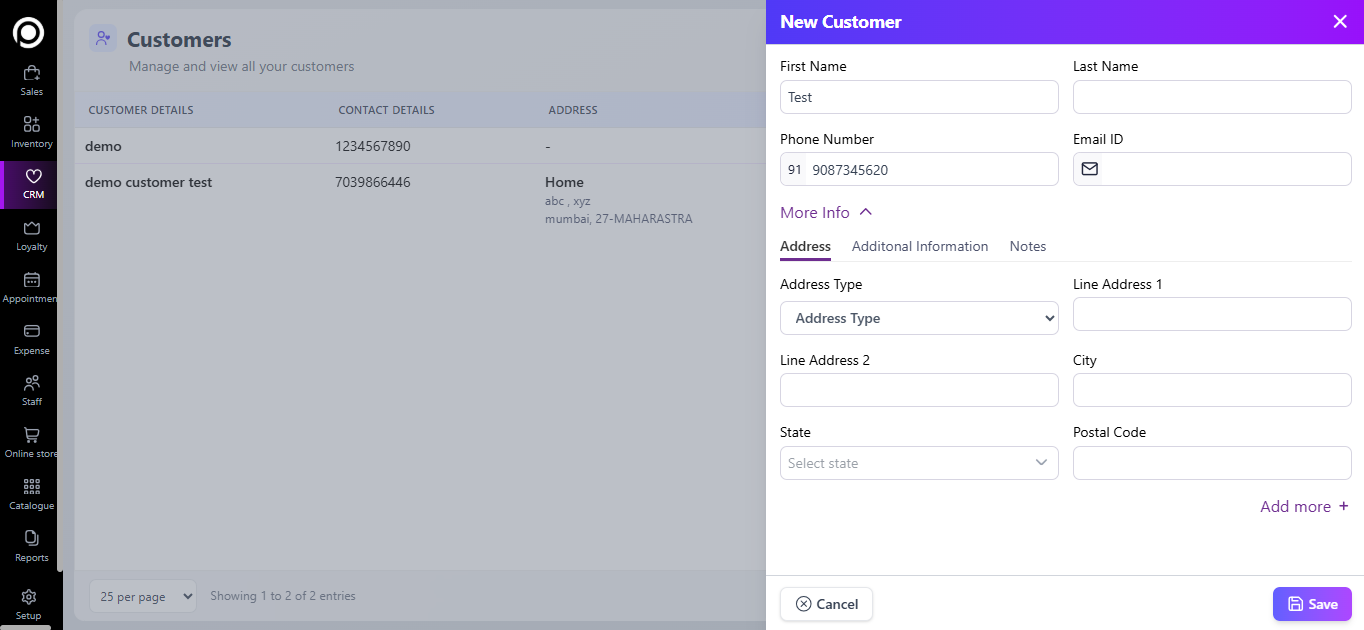
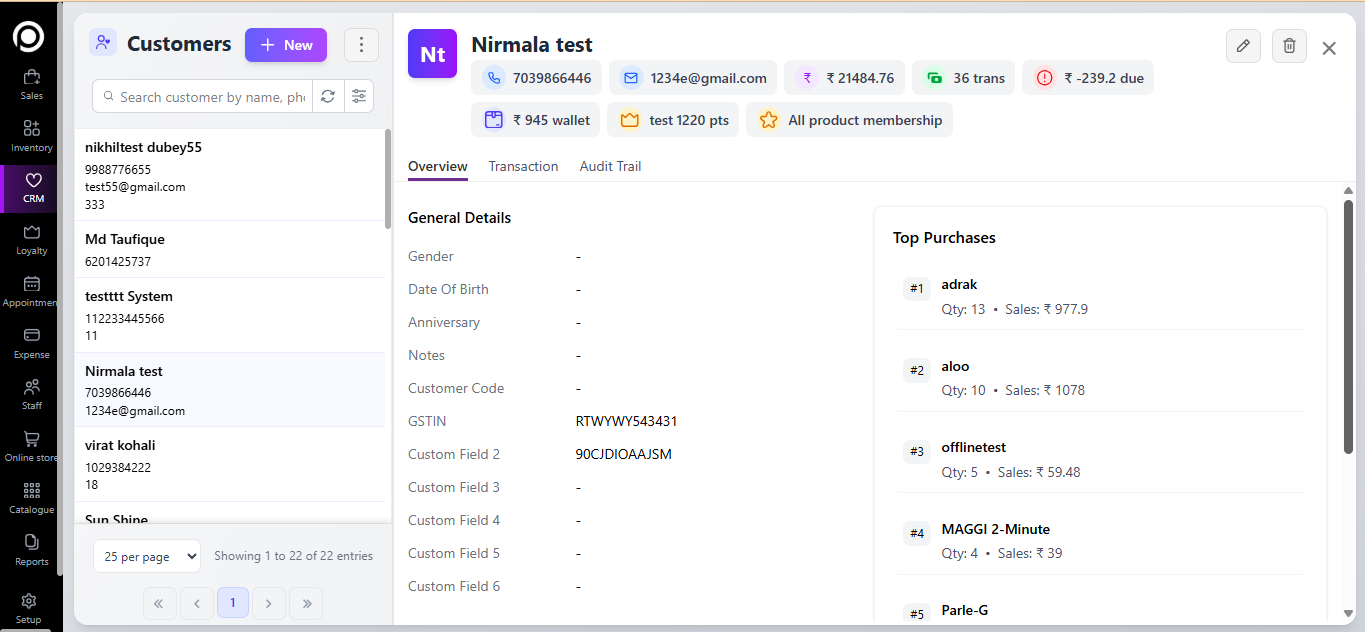
1) Customers — Add / Edit / Search / Import / Export
Purpose: Store and manage customer contact & profile data.
Add a new customer
Go to CRM → Customers.
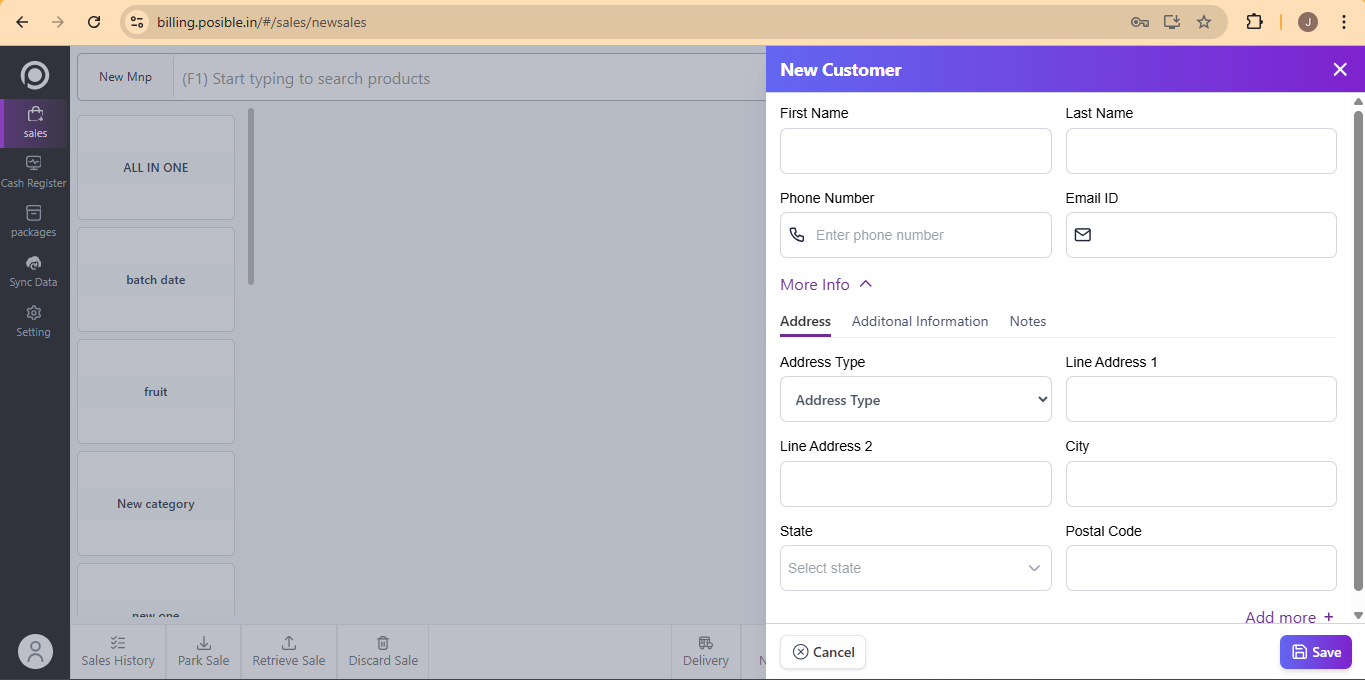
Click Add New Customer (or + New).

Fill the form:
First Name, Last Name
Phone Number (country code if required)
Email ID
Click More Info to add Address (Type, Line 1/2, City, State, Postal Code), Additional Information, Notes.
(Optional) Add membership or tags if available.
Click Save.
Verified customers appear in the list and can be searched by name, phone or email.
Edit / View
Click a customer row. Update fields and Save.
Import customers in bulk
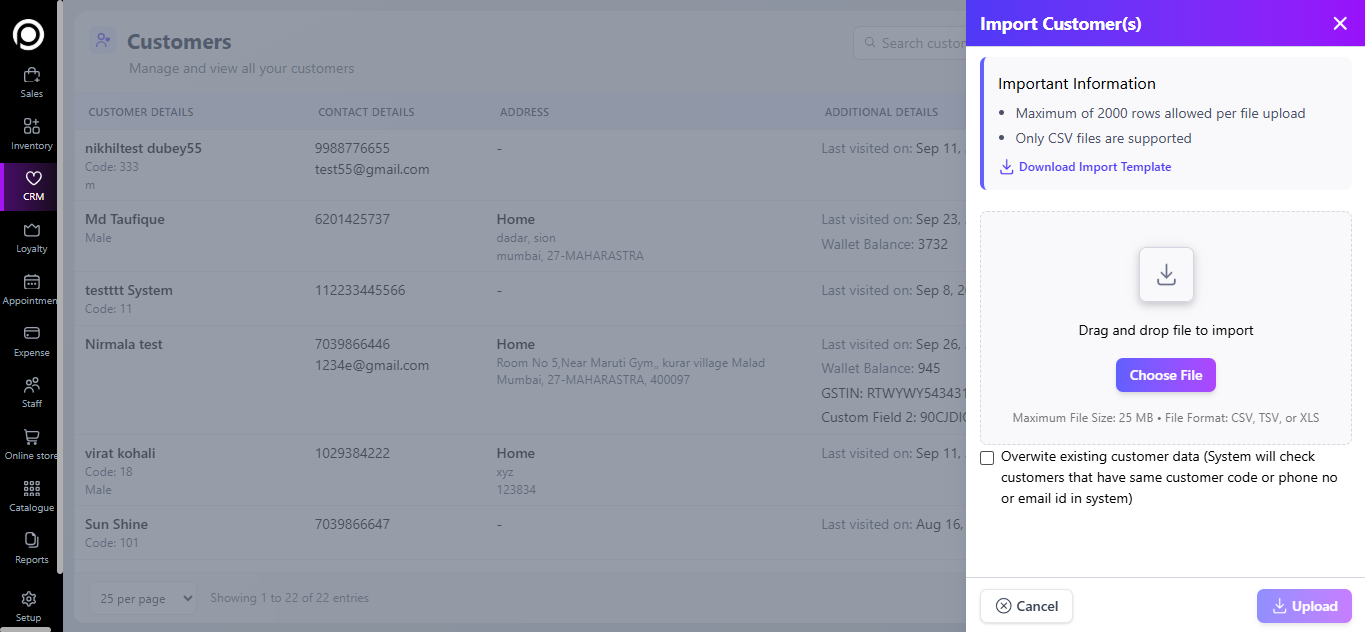
From the Customers page click the three-dot / options menu → Import.
Download the template, fill customer rows.
Upload, validate, fix errors and Confirm Import.
Spot-check a few records after import.
You can update the customer with the bulk.
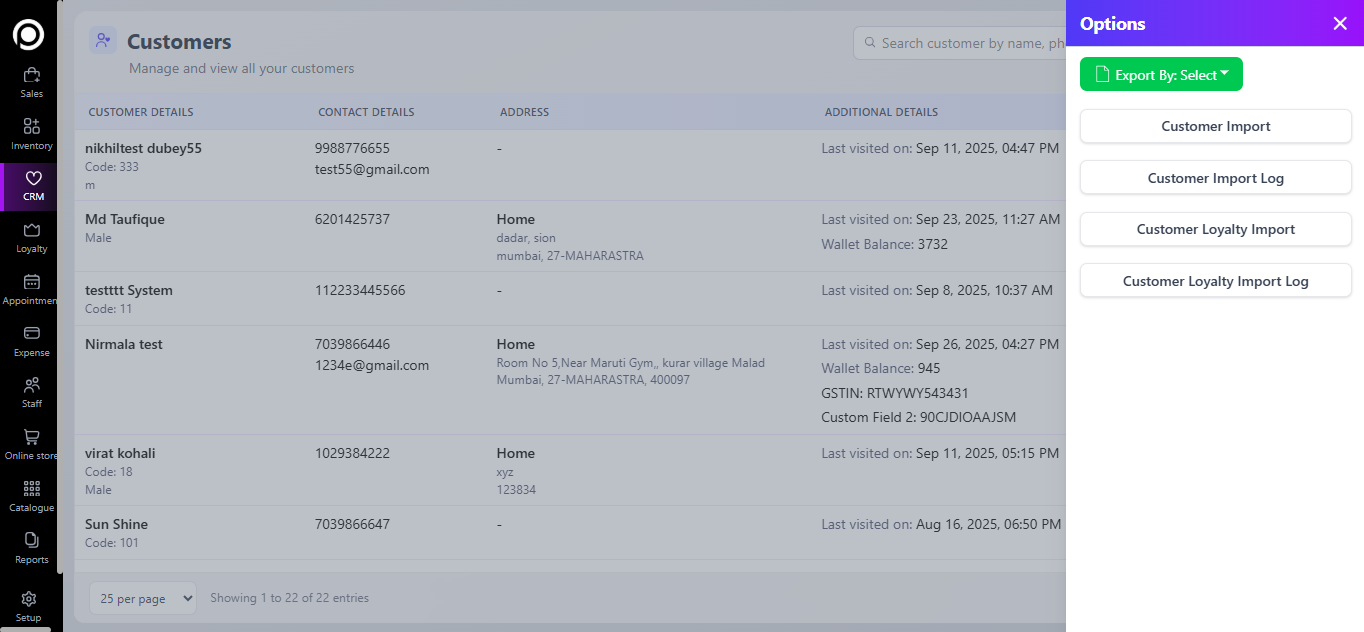
The Customer Import Log shows the status of previously uploaded files. If there were any errors while uploading, you can download the file from here, check and correct the errors in the main file, and re-upload it to easily track the updated records.
Tips & best practice
Use consistent formats for phone numbers and addresses.
Avoid duplicate customers — use search before adding.
2) Campaigns — Create, Target, Schedule.
Purpose: Send marketing messages (SMS / Email) or promotions to customers.
Create a new campaign
Go to CRM → Campaigns → New Campaign
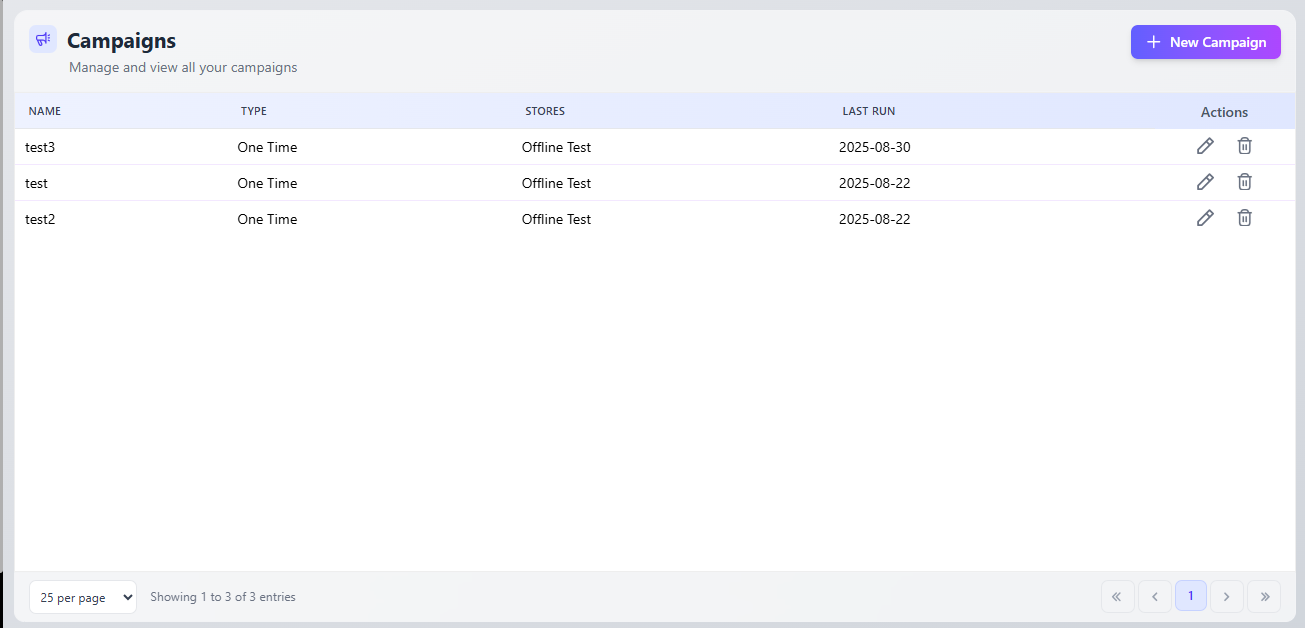
Enter Campaign Name and Type (SMS / Email) and Other information.
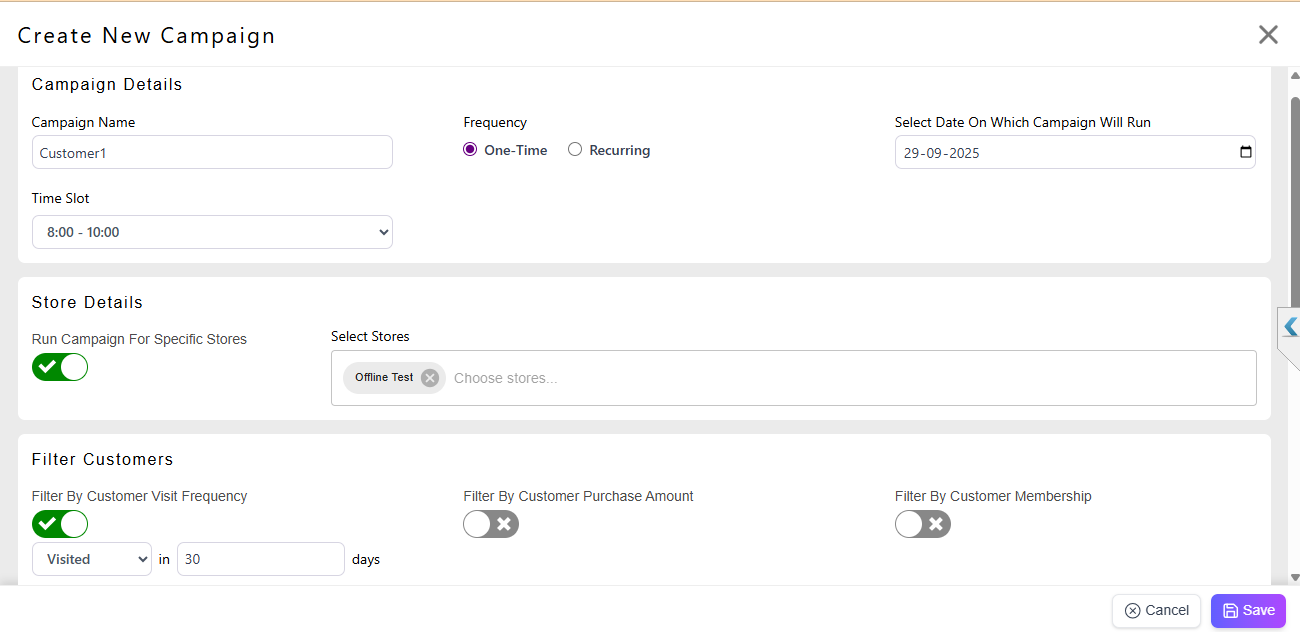
Target audience
All customers, or
Segment (create filters) — e.g., customers who purchased in the last 90 days, spent > ₹5,000, from membership holders, coupon users.
Message / Template
6. Choose an SMS Template.
Schedule & send
8. Choose Send Now or Schedule (date/time).
Also you can fetch the file for customers.
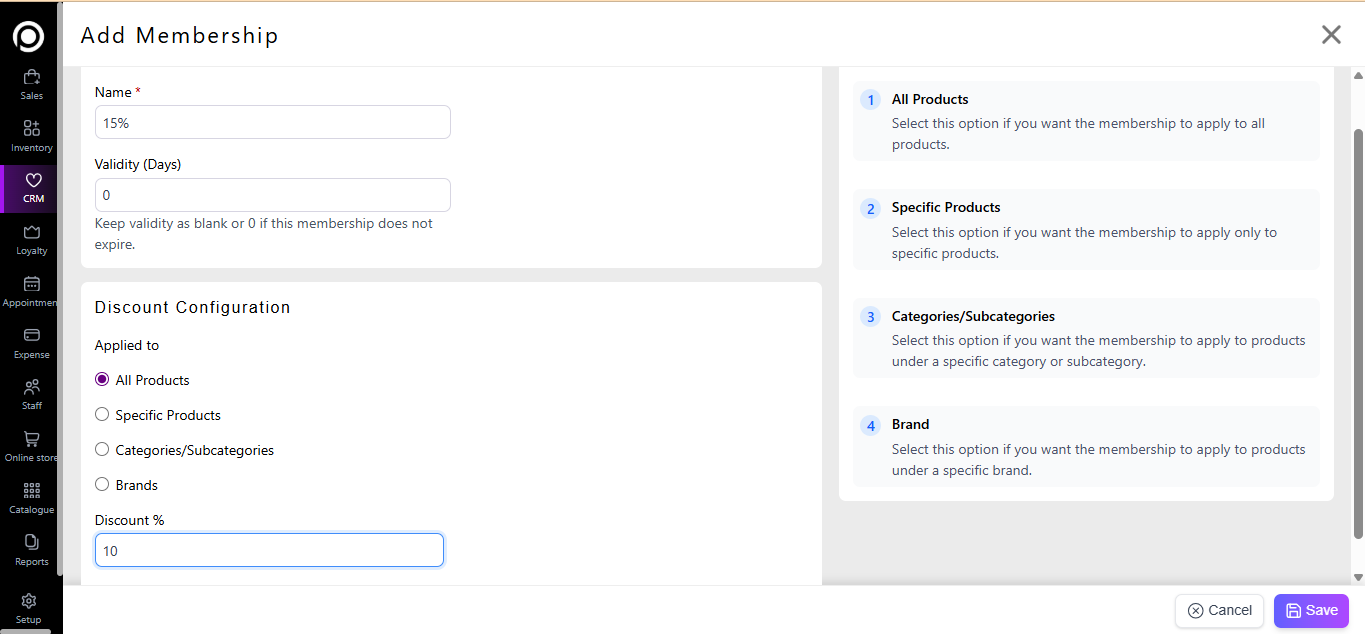
3) Memberships
Purpose: Create membership plans (recurring or one-time), track validity and benefits.
Create a membership plan
Go to CRM → Memberships → Create Membership.
Fill details:
Name
Validity (days / months)
Benefits (discount %)
You can add for specific products and Categories/SubCategories also
Save the plan.
Assign membership to a customer
Create a New Service
Go to the Product section of your system.
Create a new service and enter all the required details such as Service Name, Price, Duration, and Description.
Enable Membership Assignment
In the Additional Settings section, locate the option “Assign Membership.”
Turn ON (enable) the toggle for Assign Membership.
Select Membership
Once the toggle is enabled, a dropdown list of available memberships will appear.
Select the membership you want to assign for this service.
Save the Service
After filling in all details and selecting the membership, click on Save to create the service with the linked membership.
Sell the Service to a Customer
Go to the Sales or Billing section.
Select the customer who is purchasing the service.
Choose the service you created (which has the membership linked) and complete the sale or billing process.
Membership Assignment Confirmation
Once the service is sold, the selected membership will automatically be assigned to that customer.
Repeat for Other Memberships (If Needed)
You can repeat the same process for other memberships you want to assign through different services.
Tips
• Use clear naming conventions (e.g., “Silver – 6 Months”) for easy identification.
4) Coupons — Create & Apply
Purpose: Create promo codes customers can use at checkout.
Create a coupon
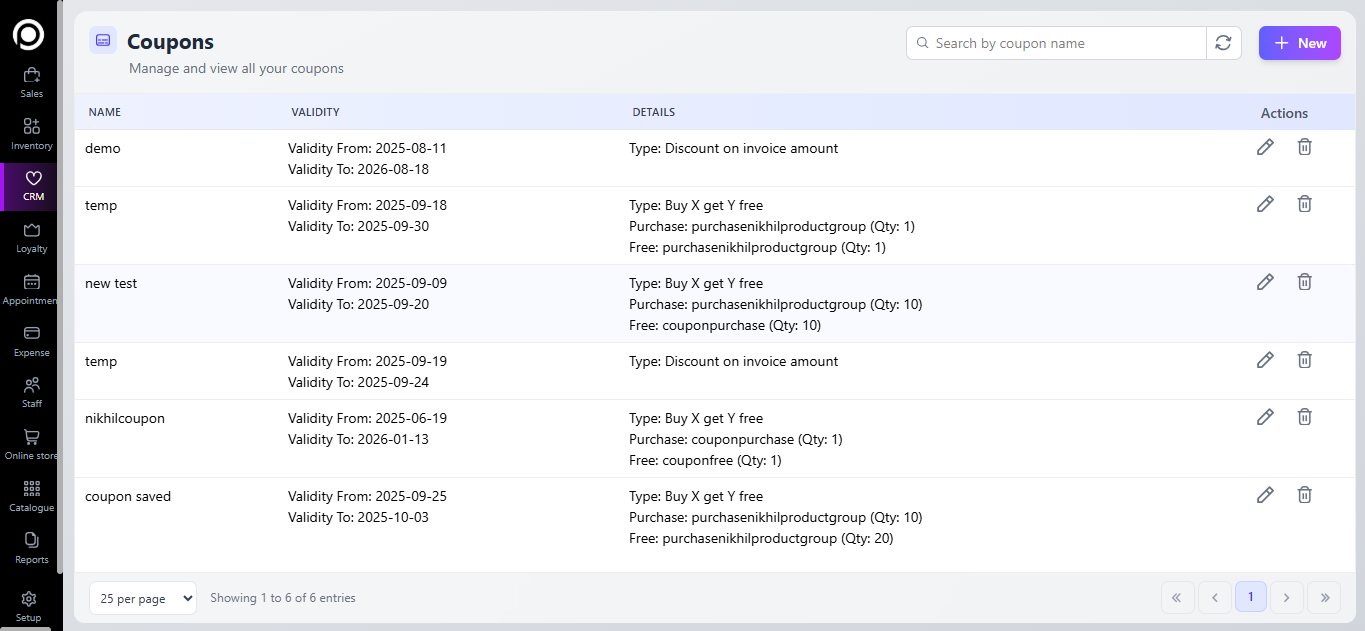
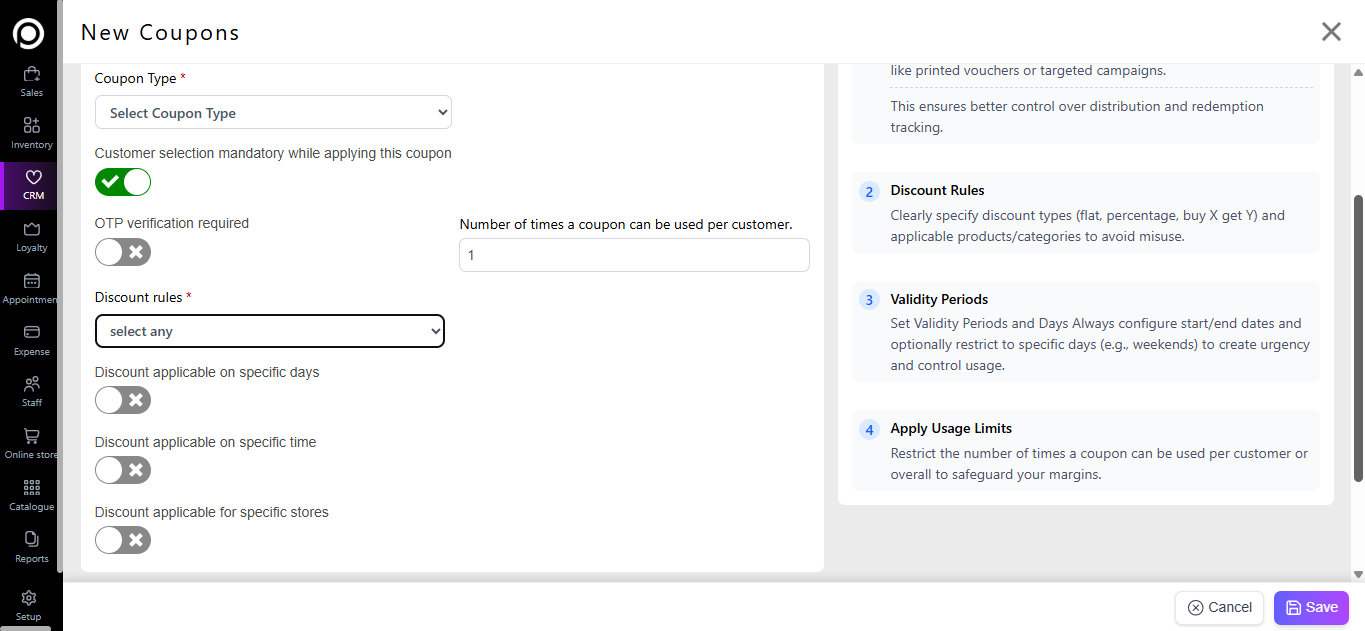
Go to CRM → Coupons → New Coupons.
Enter details:
Coupon Name
Coupon Configuration
Validity Period: Start & End dates
Usage Limits: Total uses, per-customer limit
Save coupon.
Distribute coupons
Use Campaigns to send coupon codes to segments.
Apply at billing
At Sales Invoice, enter a coupon code in the discount field or click coupon list to apply. The system should validate min order and usage limits.
5) SMS Templates — Create & Use
Purpose: Reusable message templates for campaigns and transactional SMS.
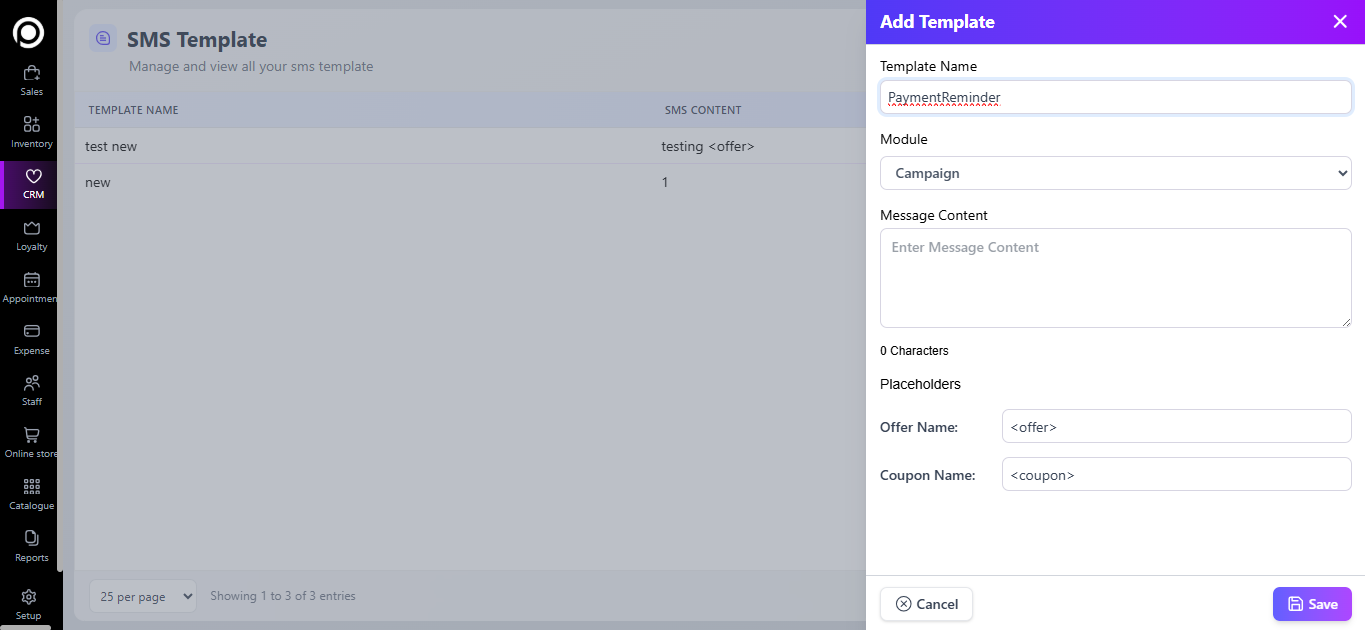
Create a template
Go to CRM → SMS Templates → New Template.
Enter:
Template Name (e.g., PaymentReminder)
Message Body, using placeholders like <first_name>,, <offer>
Save template.
Important points
Placeholders: Use exact variable names supported by the system (<offer>).
Character count: SMS standard ~160 characters per segment; long SMS may split and cost extra. Keep important info in the first 160 chars.
Test: Always send a test SMS to confirm dynamic values are rendered correctly.
Approval: If your SMS provider requires pre-approval for templates, get templates approved before large campaigns.
Use template
When creating a Campaign, select the template.
For transactional events (payment, invoice), link the template to the event in Settings if supported.
5. Loyalty Module
- — Open Loyalty module
- — Create a Loyalty Tier (Loyalty Type)
- — Global Setup (Loyalty Settings)
- Assign Tier to Customers
- How Points are Earned (at Purchase)
- Birthday / Anniversary Points
- Redeeming Points (at Sales)
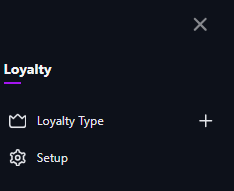
From the left menu click Loyalty.
You will see Loyalty Type and Setup.
Click Loyalty Type to create/edit tiers, or Setup to configure global rules.
Click + (Add Loyalty Type).
Fill Basic Loyalty Information:
Tier Name (e.g., Silver, Gold, Platinum)
Min Total Loyalty Points — the points threshold to reach this tier (e.g., 100 for Silver).
Spend Amount per 1 Point — how much a customer must spend to earn 1 point (e.g., ₹100 → 1 point).
Min Order Value to Earn Points — minimum invoice value that qualifies for earning points (e.g., ₹50).
Max Points per Transaction — safety cap to avoid accidental huge points.
Purchase Points Validity (days) — how long earned points remain valid (e.g., 365).
Birthday/Anniversary Points Configuration (optional):
Birthday/Anniversary Points (points to credit on birthday),
Credit Before Days (credit points X days before birthday if desired),
Birthday/Anniversary Points Validity (days).
Quick Tips panel (right side) contains helpful suggestions — review them.
Click Save.

Example: Silver = 1 point per ₹100, Min Points 100. Gold = 1.5 points per ₹100, Min Points 500.
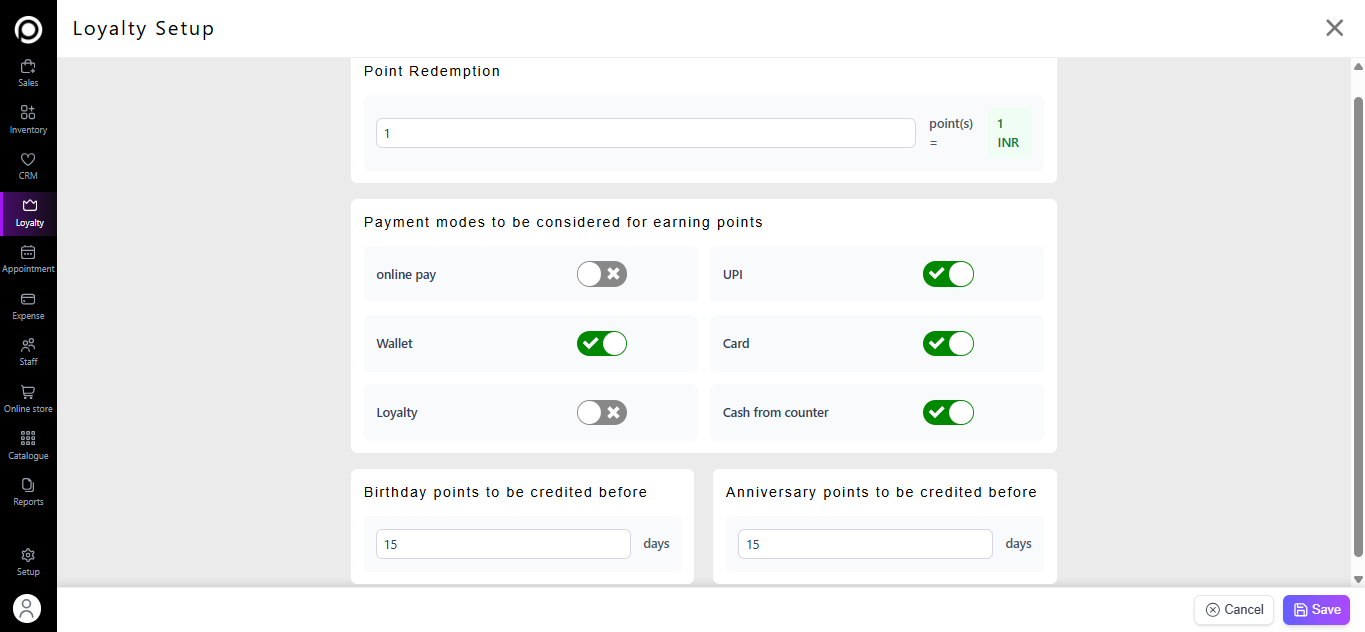
Go to Loyalty → Setup.
Configure global rules:
Redemption Rate / Value (e.g., 1 point = ₹1 or ₹0.5).
Select payment modes to be considered for earning points. And Birthday / Anniversary points to be created before.
Save settings.
Automatically
customers move tiers automatically once their total points cross the threshold.
And you can see the loyalty name and point of view of the customer.
At POS, when you create a Sales Invoice with a customer selected:
The system calculates points using the customer’s current tier rules (Spend per point and Min Order Value).
Points credited automatically after sale.
Examples:
Spend ₹450, Spend Amount per 1 Point = ₹100 → Earn 4 points (floor division).
If Min Order Value = ₹500 and invoice ₹450 → 0 points (doesn’t qualify).
Variant / Batch / Unique No products: same rules apply; earning is based on invoice totals unless you set product-level exclusions.
If Birthday Points are configured, the system will credit points to customers on (or before) their birthday according to Credit Before Days and Validity.
Use SMS Templates to notify customers about credited birthday points.
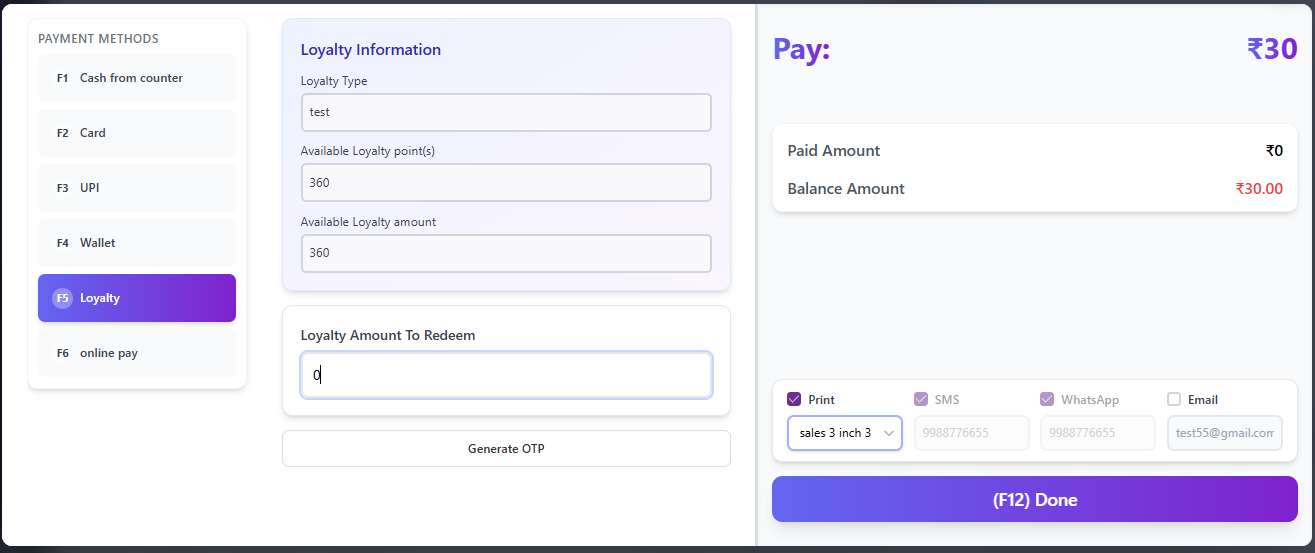
At POS (Sales Invoice), select the customer.
Click the payment option and then Loyalty .
The system shows available points and equivalent money value (per conversion rate).
Enter how many points to redeem (or choose full).
Confirm — discount is applied and invoice total reduced.
Points balance reduces accordingly; records are saved in customer history.
Note: If you want to redeem points with OTP verification, go to Setup → Payment Type → Edit → enable ‘OTP verification required’. We will see this in detail in the Setup Module.
6. Appointment
- Open the Appointment screen
- Create a new appointment
- View & navigate appointments
- Edit, reschedule or cancel
- Mark arrival and complete service
- Search, filters and reports
From the left menu click Appointment.
You’ll see the calendar view with counters on top (Total Appointment(s), Booked, Guest Arrived, Service Done, Completed, Cancelled) and buttons Today / Back.
Change calendar view with the Day / Week / Month buttons.
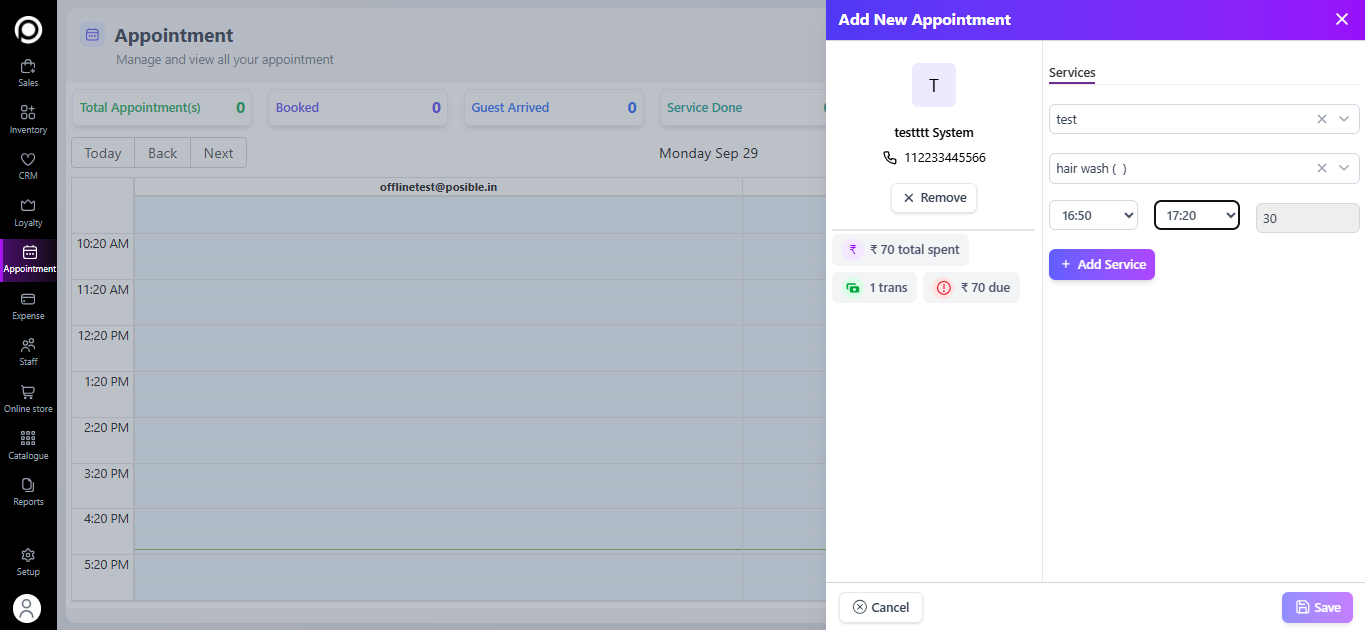
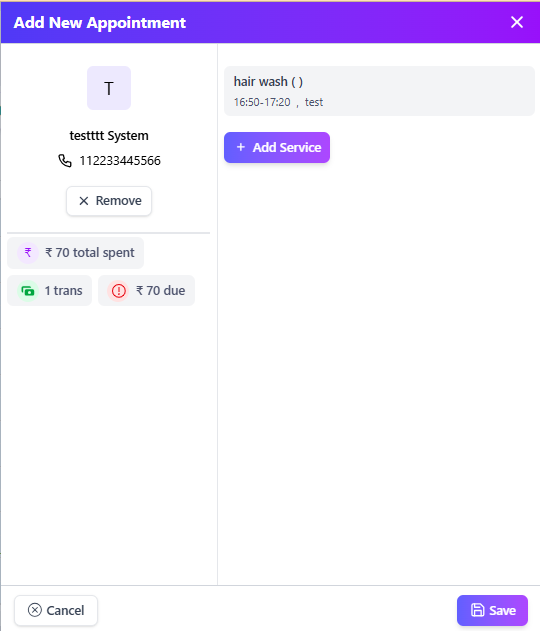
Click + Create Appointment (top-right).
Fill the form fields:
Customer — search existing customer or click Add New to quickly create (name, phone, email, address).
Service — choose the service to book (duration and price come from the service setup).
Staff / Provider — pick which staff member will do the service (shows availability).
Time — pick appointment start time .
Duration — usually auto-filled from the service; edit if needed.
Location / Store — select if you have multiple stores.
Status — typically Booked at creation (you can change later).
Click Save. The appointment will appear on the calendar at the selected slot.

over any appointment on the calendar to view details.
Use the counters or status filters (Booked / Completed / Cancelled) to quickly find types of appointments.
Open the appointment → click Edit / Reschedule → change time/staff/location → Save.
To cancel: open appointment → choose Cancel (provide reason if requested). Status will change to Cancelled.
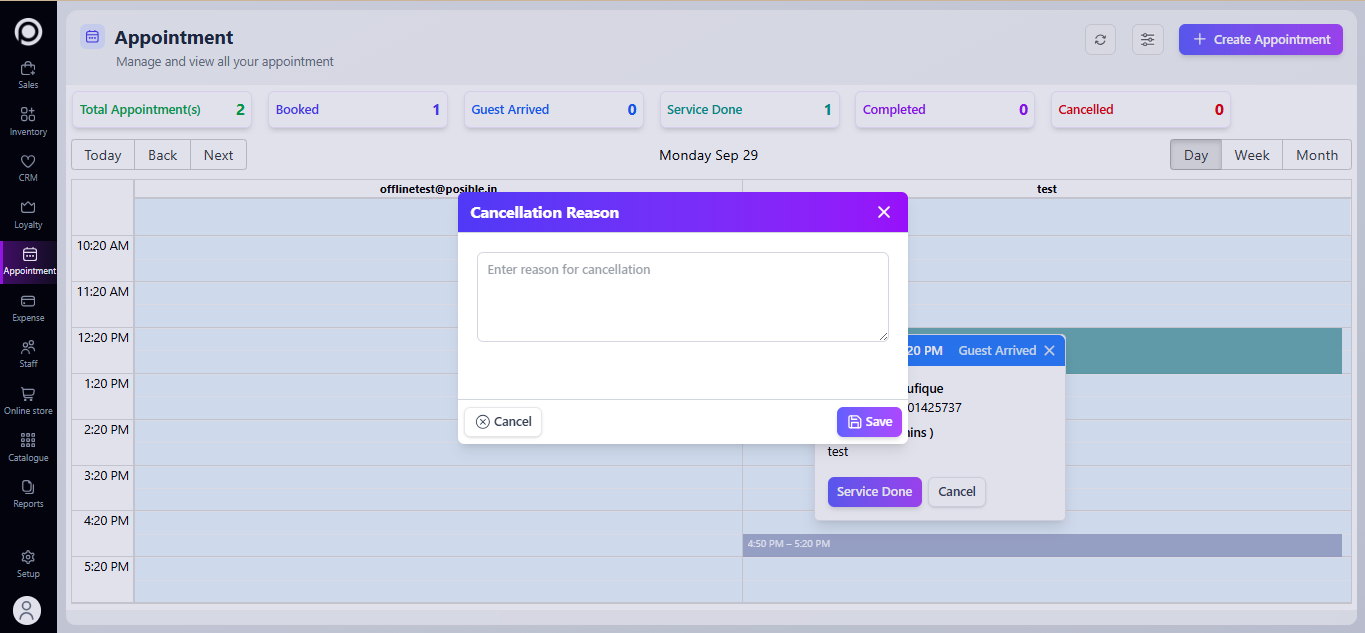
When the customer arrives: hover over the appointment and click Guest Arrived.
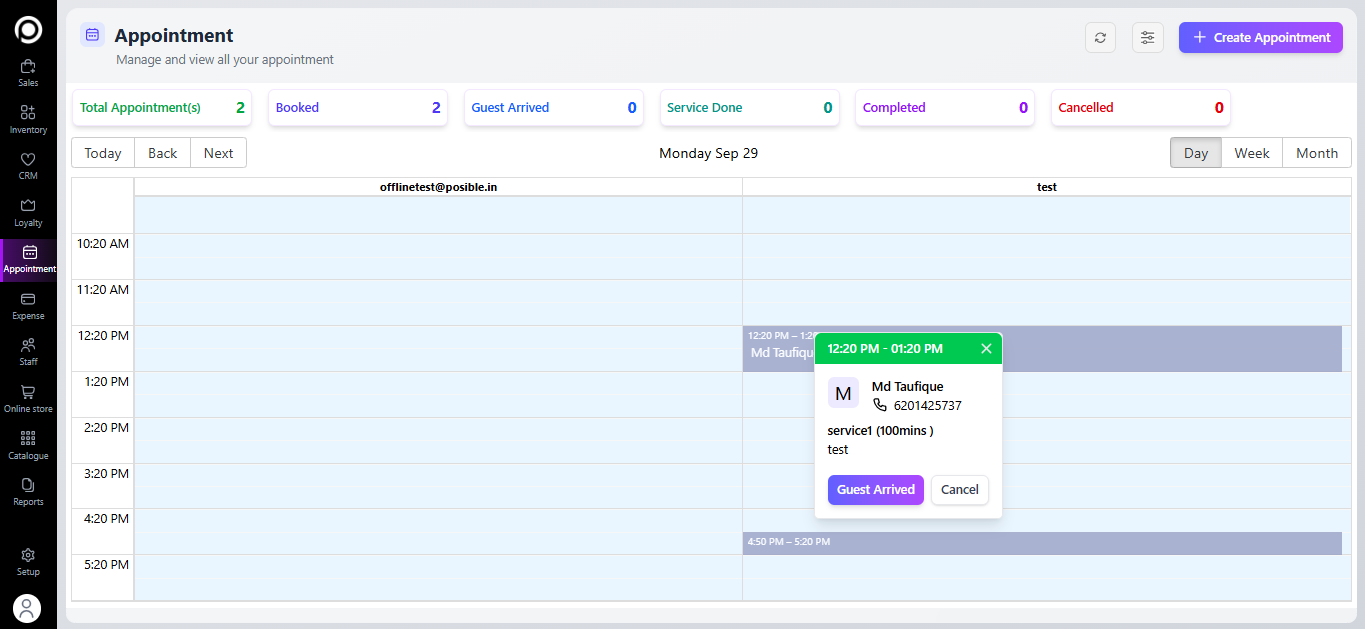
After service is done: click Service Done to mark it finished (this may trigger points, invoices, or history logging).
Use the search box or filters to find appointments by customer name, date range, status, staff.
Export or run appointment reports for daily bookings, no-shows, completed appointments, and staff utilization.
7. Expense
The Expense module helps you track business spending, organize it into categories, and manage accounts (like Cash, Bank, UPI, Credit Card). This ensures accurate expense recording and easy reporting for the vendor.
Open Expense Module
From the left menu, click Expense.
You’ll see four main sections:
Expense List
Accounts
Expense Categories
Account Management / Account Section
1. Expense List
- Add a New Expense
- Edit or Delete Expense
- Search and Filter
- Export Expense List
Click + Add Expense ( New).
A side panel will open.
Fill in the details:
Party → Select the vendor or supplier from the dropdown.
Expense Category → Choose the category (e.g., Rent, Travel, Utilities).
Expense Date → Select the date of expense.
Reference No → Enter a reference number (optional).
Transaction → when you select the vendor or party name then related transactions will display. Select which you have to pay.
Amount → Enter the amount spent.
Payment Type → Select mode of payment (Cash, UPI, Card, Bank).
Notes → Add any remarks (optional).
Click Save to record the expense.
Note: If you have not made the payment to the party, the list will show it as Pending. You can pay anytime, and once paid, it will be converted to Paid.
To Edit, click on an existing expense entry → Update details → Save.
To Delete, use the delete option (if enabled) to remove an entry.
Use the Search bar (top-right) to quickly find an expense by Party, Category, or Reference number.
Use filters to view expenses by date, amount, or payment type.
You can export the expense list to Excel for accounting and reporting purposes.
2. Expense Categories
Categories help you group and analyze expenses.
Examples: Rent, Utilities, Travel, Marketing, Salary, Miscellaneous.
You can add as many categories as needed.
To manage categories:
Go to the Expense List ⇒New⇒ Expense Categories.
Select Category.
Edit or delete categories anytime (but note: if a category is linked to existing expenses, you may not be able to delete it).
3. Accounts
To add a new account:
Go to the Accounts tab.
Click + Add Account.
Fill details:
Account Name (Cash, Bank of Baroda, PayTM, etc.).
Click Save.
You can Edit / Delete accounts as needed.
Balance updates automatically as you add expenses linked to that account.
4. Account Management
This section helps you transfer funds, adjust balances, and view account summaries.
Fund Transfer → Move money from one account to another (e.g., Bank to Cash).
Adjust Balance → Correct opening balance or update current balance.
8.Staff Module
The Staff Module allows you to manage employees and track their daily attendance. It has two key sections:
Staff Details → Create and manage employees, assign roles and access.
Attendance → Track daily in/out timings and attendance status of employees.
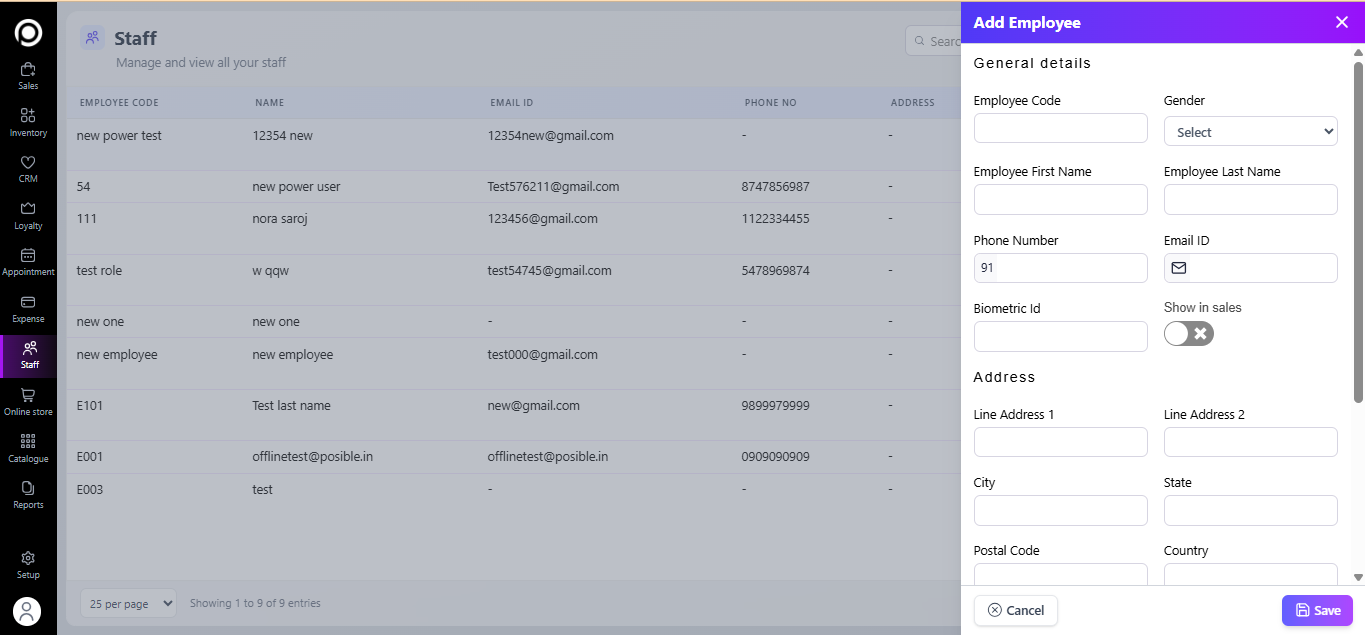
1. Staff Details
This section helps you create and manage employees.
Steps to Create New Employee:
Go to Staff → Staff Details.
Click on + New.
Fill in the employee details:
Full Name
Email ID / Phone Number
Fill Other Details
Once you create an employee, you will see it in the list. Click on the employee row to view the details, where you will find the Edit, System Access, Delete, and Service Mapping buttons as shown in the image below.
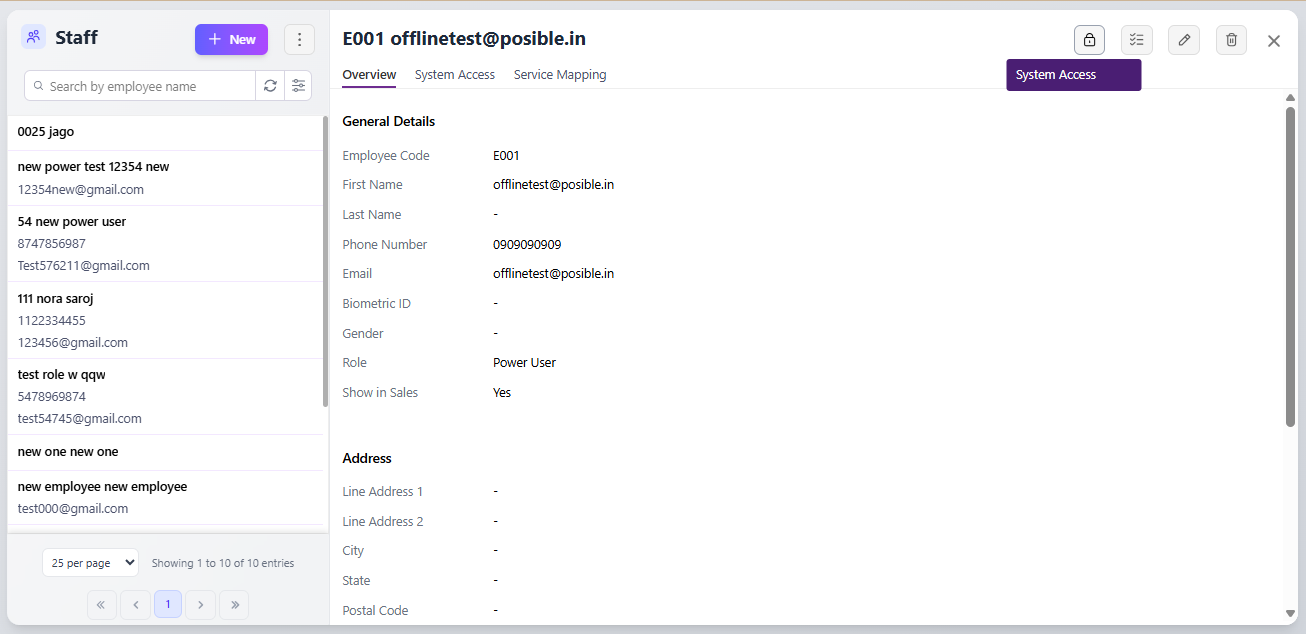
⇒ To give system access to an employee, click on System Access and then fill in the details such as password and role.
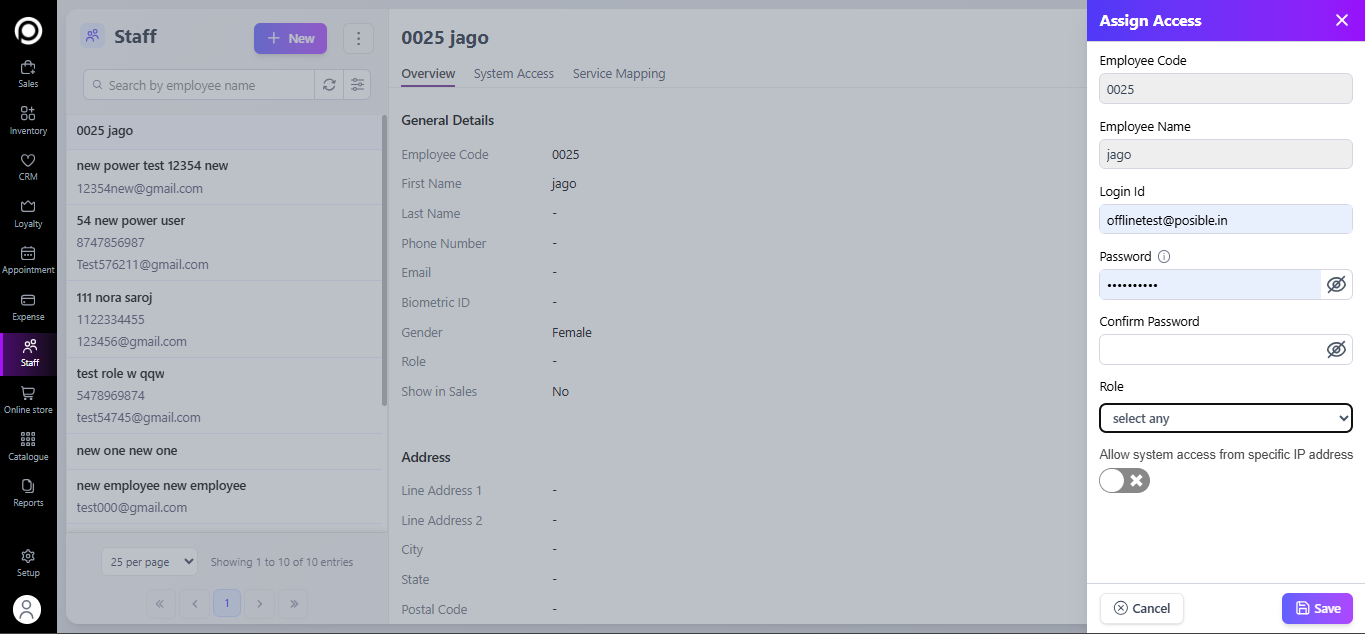
Role / Access Level:
Power User → Has extended permissions across modules.
Store Manager → Can manage store-level operations.
Store Owner → Has complete access to the system.
Assign access rights (Sales, Inventory, CRM, Loyalty, Reports, etc.) based on role.
Click Save.
Manage Staff:
Edit → Update details like role, contact, or permissions.
Delete → Permanently remove employee details (if needed).
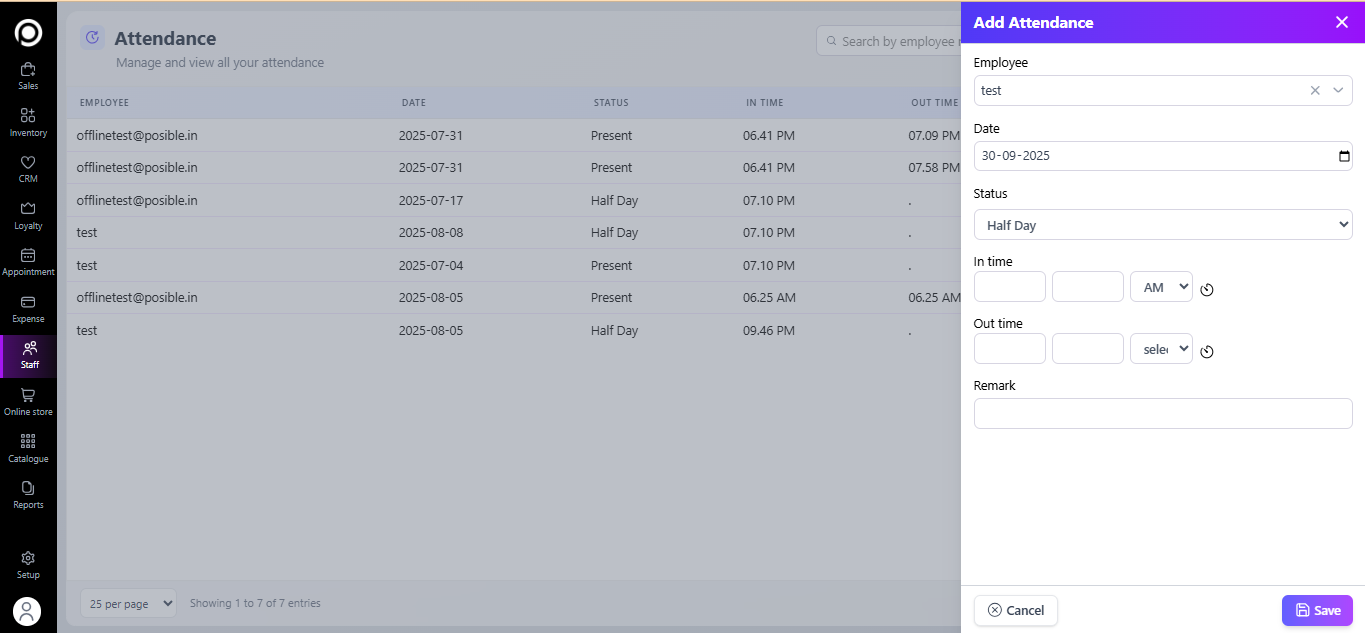
2. Attendance
This section allows you to track employee attendance.
Steps to Record/Track Attendance:
Go to Staff → Attendance.
Click Capture Attendance.
Mark attendance status:
Present
Absent
Late / Half Day
The system records the check-in and check-out time.
You can view attendance history for each staff member by date.
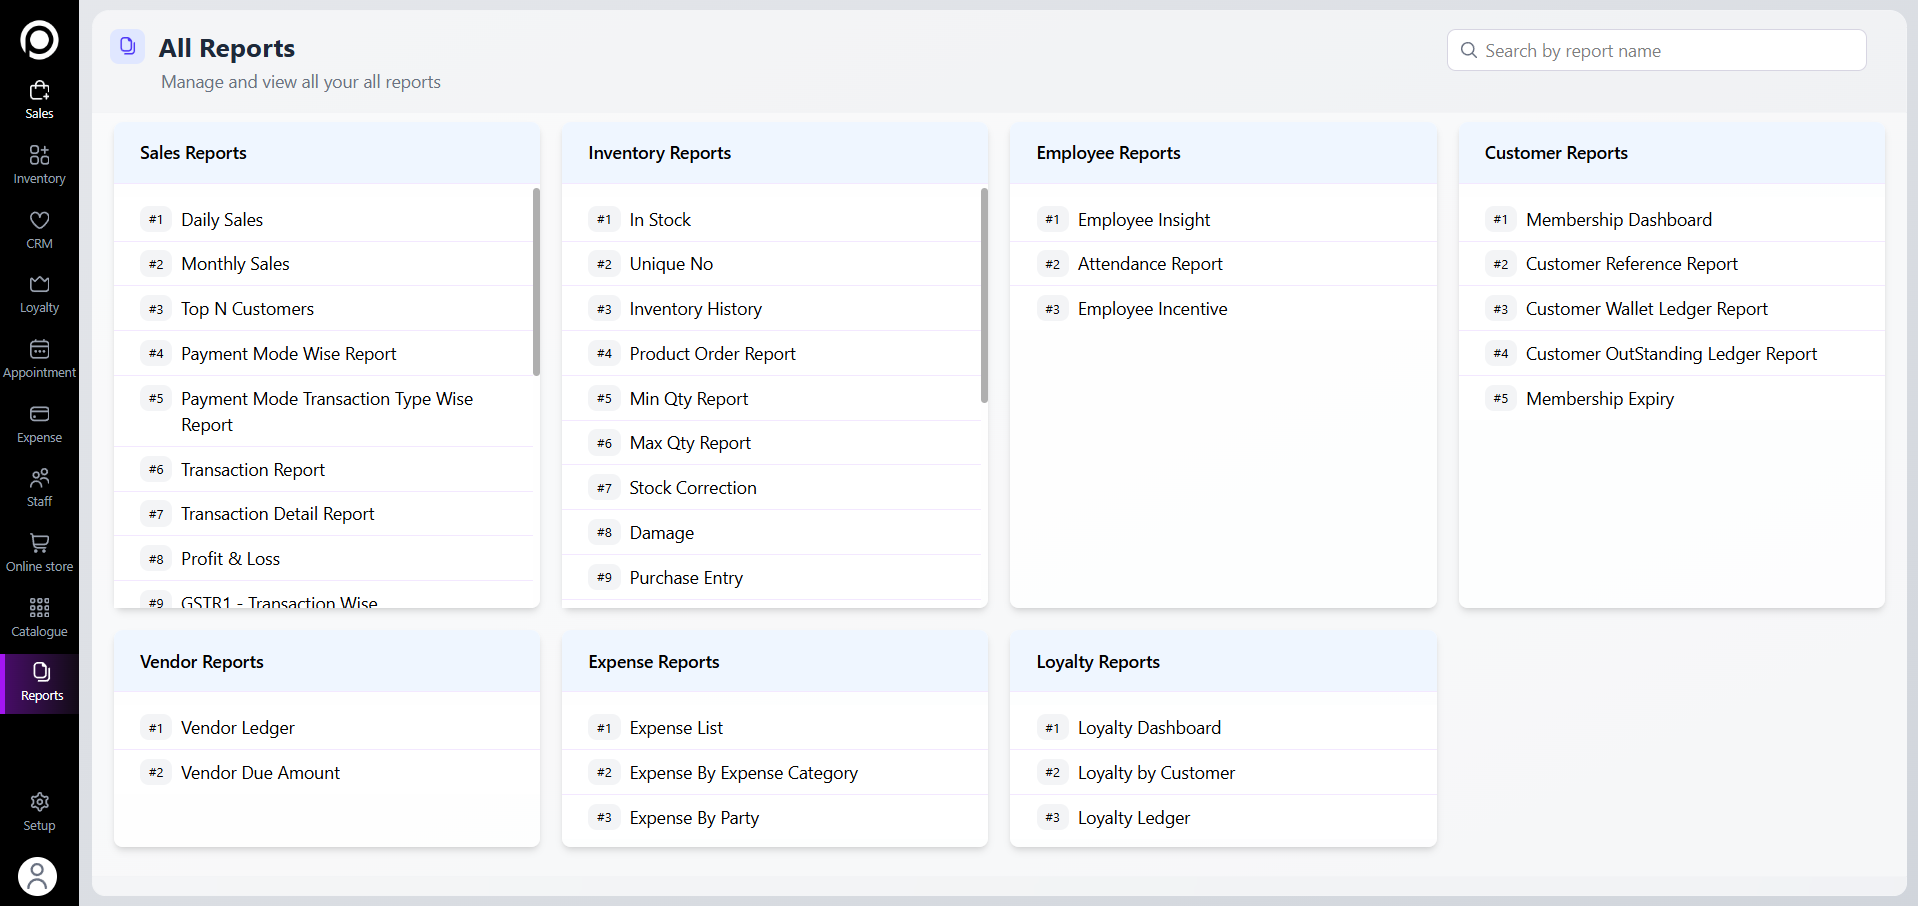
9. Report Module
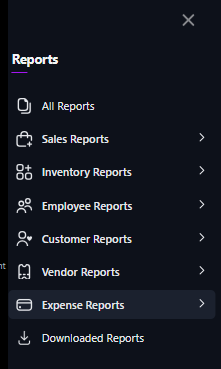
The Reports Module provides detailed insights across different business areas such as sales, inventory, employees, customers, vendors, expenses, and loyalty. It helps in analyzing performance, tracking activities, and making data-driven decisions.
Types of Reports Available:
Sales Reports
- Daily Sales, Monthly Sales, Top Customers, Payment Mode-wise reports, GST reports, etc.
- Helps track sales performance and revenue trends.
Inventory Reports
- Stock availability, Unique product numbers, Inventory history, Product order reports, Min/Max quantity, Damage, and Purchase entry.
- Useful for managing stock levels and avoiding shortages or excess inventory.
Employee Reports
- Employee Insights, Attendance Reports, Incentives.
- Tracks employee performance, attendance, and rewards.
Customer Reports
- Membership Dashboard, Customer Reference, Wallet Ledger, Outstanding Ledger, Membership Expiry.
- Helps in monitoring customer loyalty, payments, and memberships.
Vendor Reports
- Vendor Ledger, Vendor Due Amount.
- Manages vendor balances and pending payments.
Expense Reports
- Expense List, Expense by Category, Expense by Party.
- Helps track spending patterns and financial outflow.
Loyalty Reports
- Loyalty insights based on points and rewards.
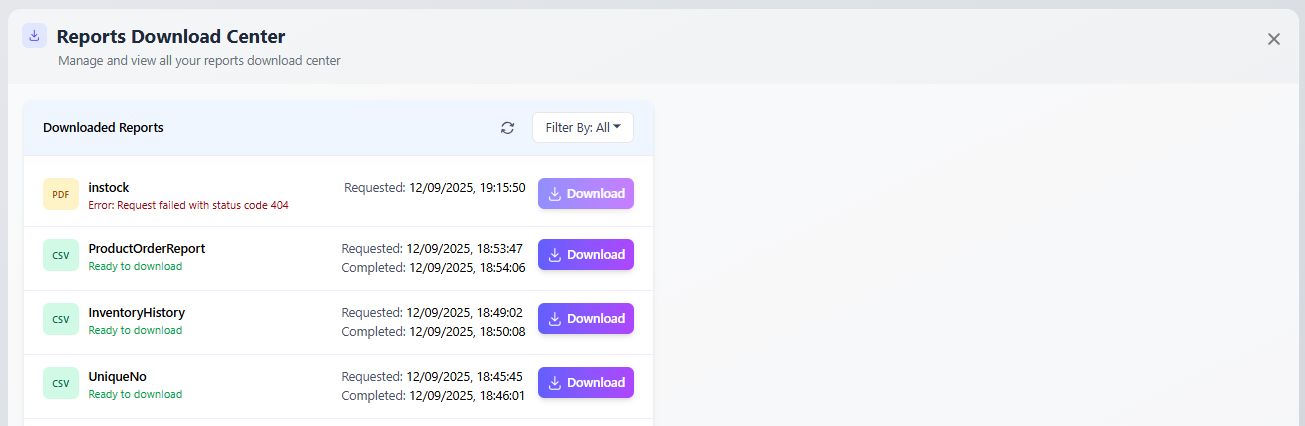
⇒Downloaded Reports
Here you can see the downloaded reports and view your download history and report from here.
10. Setup Module
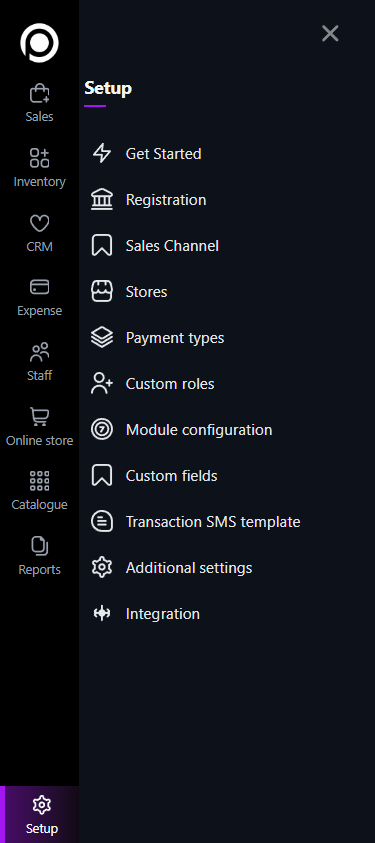
Open Setup
From the left menu click Setup.
You’ll see multiple sub-sections: Registration, Sales Channel, Stores, Payment types, Custom roles, Module configuration, Custom fields, Transaction SMS template, Additional settings, Integration.
1) Registration (Company information)
Click Registration.
Edit company details:
Business name, contact number, email
Address.
Company logo
Save.

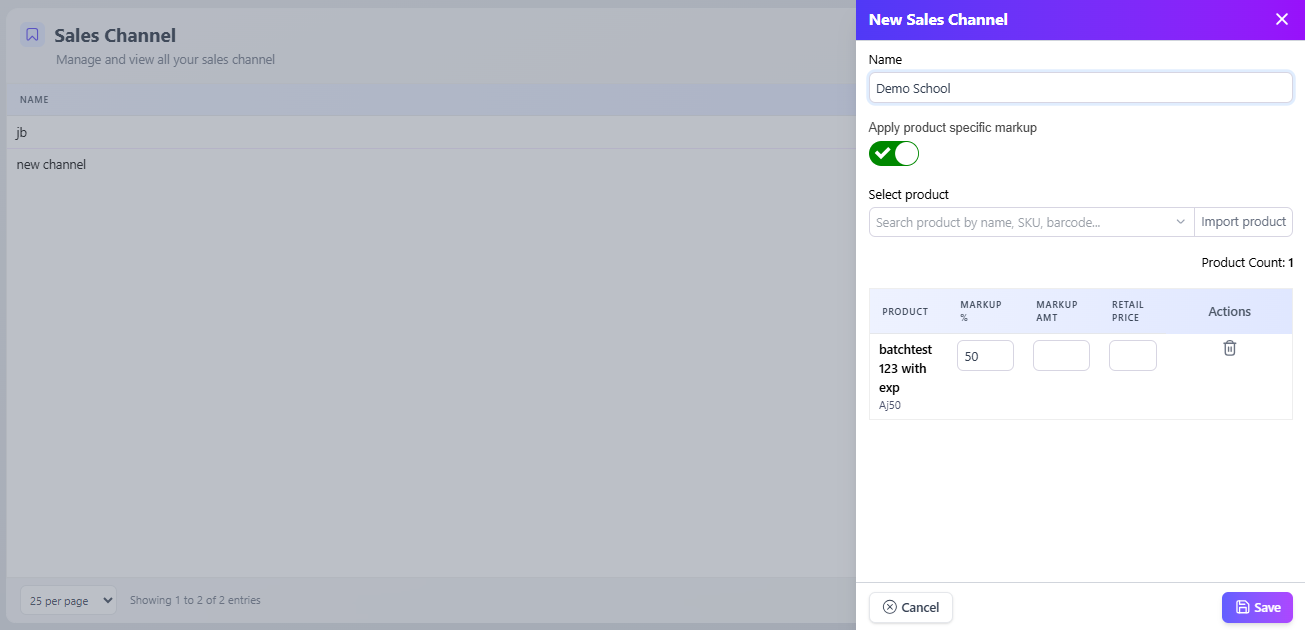
2) Sales Channel
Use sales channels to run multiple sales fronts (online, retail, wholesale) with channel-specific product values.
Go to Sales Channel → New Channel.
Enter Channel Name (e.g., Retail Store, Online Store).
Enter Markup Value if any or on toggle “Apply product specific markup”
Price override or channel-specific pricing rules to a product.
Save.
To edit channel: open it, change settings, Save.
Why: This lets you show different prices or availability per channel without changing the master product.
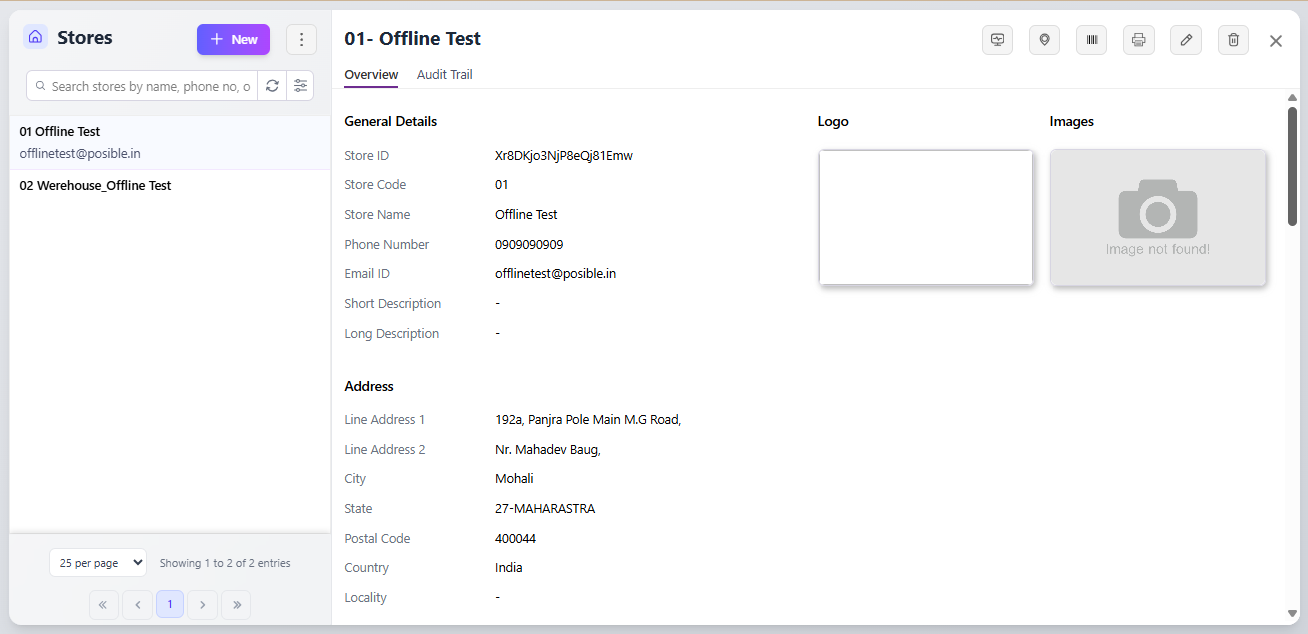
3) Stores (Add / Edit / Manage)
Each physical store has its own settings (locations, print config).
Add a new store
Go Stores → Add New Stores.
Fill: Store Name, Address, Contact, Timezone, Opening Hours and other metadata.
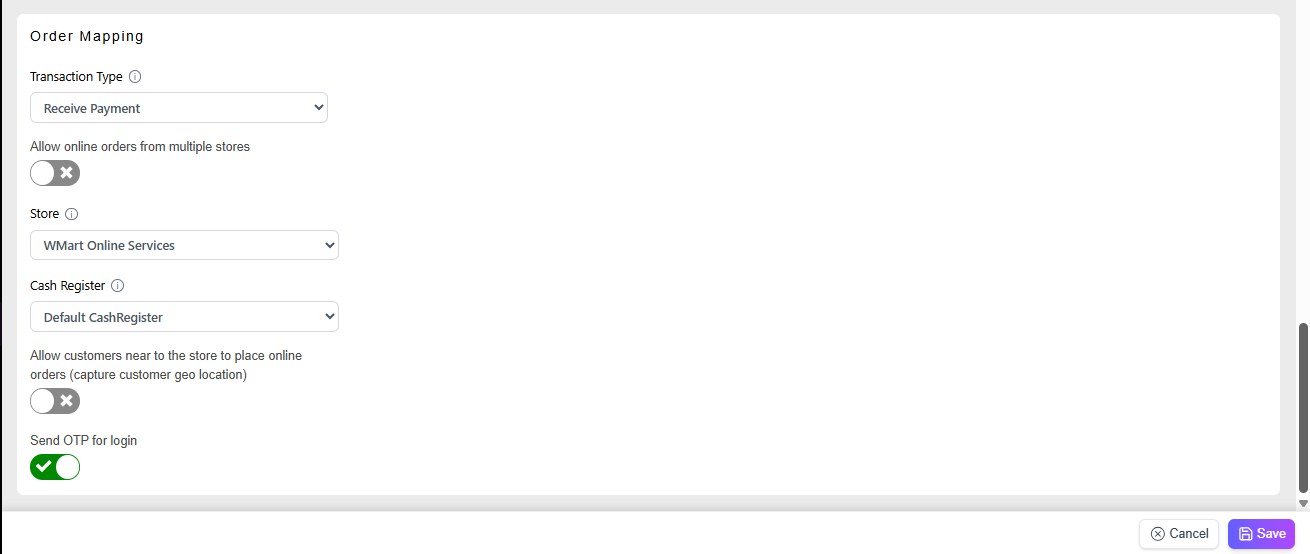
Settings (ON/OFF)
⇒Accept online orders
⇒Enable cash register closing
⇒Show product sale details during cash register closing
⇒Negative product qty not allowed for billing
⇒Sales default product search(select scanning or typing)
⇒Inventory default product search(select scanning or typing)
⇒Other settings according to you.
The Additional Information section allows you to include extra store details that you want to appear on your printed invoices or receipts.
You can use the Custom Fields to display additional business-related information, such as registration numbers, licenses, or other identification details.
How to Use:
Custom Field 1: Enter your GSTIN Number (e.g., 27ABCDE1234F1Z5).
Custom Field 2: Use this field for any secondary business details, such as FSSAI License Number, CIN, or PAN Number.
Custom Field 3: Add any additional information, such as Store Tagline, Branch Code, or Custom Notes for your business.
💡 Tip: These fields are fully customizable — the text you enter here will appear in the invoice or receipt print layout, helping you include important business identifiers or extra notes for your customers.
Save.

After adding a store
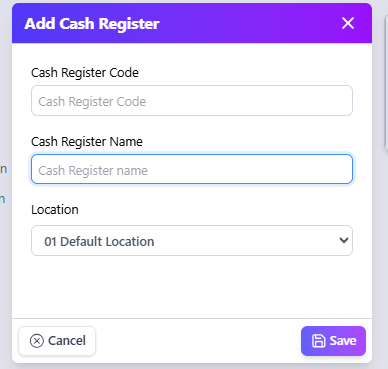
When you view a store you’ll see actions: Add Cash Register, Add Location, Print Barcode Setting, Print Config, Edit, Delete.
Add Cash Register(if Required)
Click Add Cash Register.
Enter Counter name/ select location.
Save.
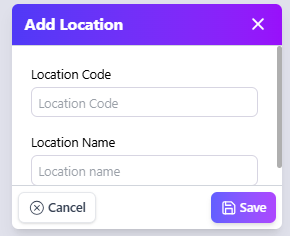
Add Location(optional)
Click Add Location (for warehouse/section within store).
Enter location name & details (e.g., Backstore, Shelf A).
Save.
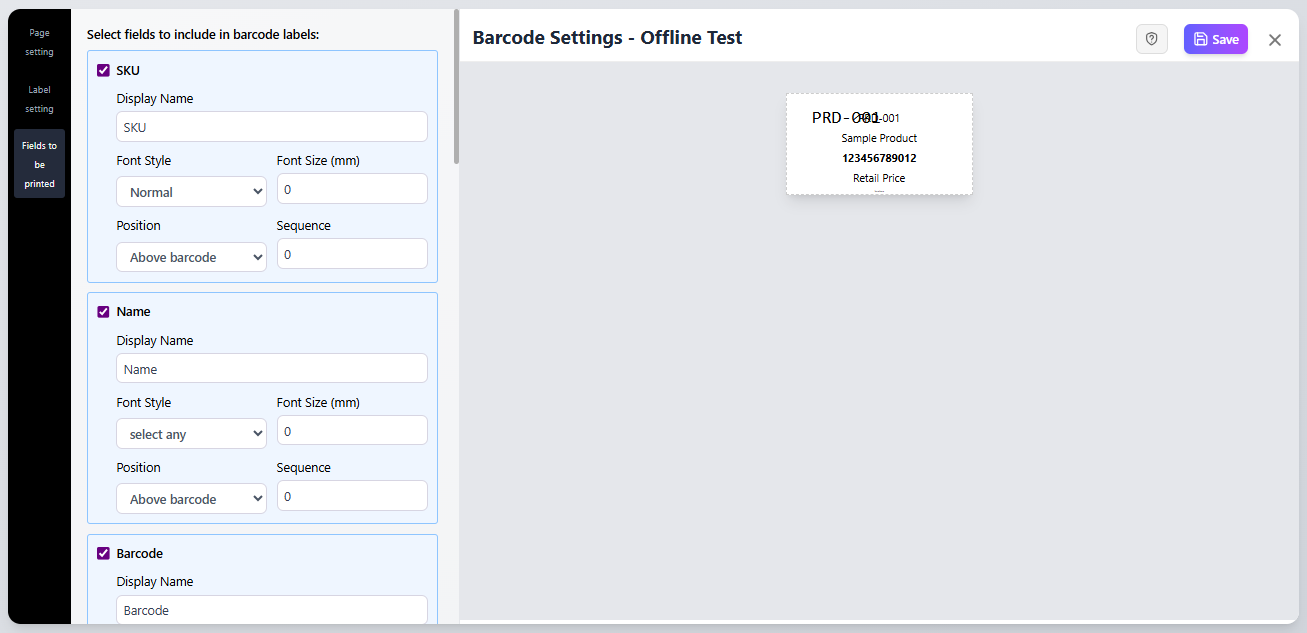
Print Barcode Setting
Click Print Barcode Setting.
Choose label size, fields to print (SKU, Name, Price, MRP, Barcode).
Save and test-print.
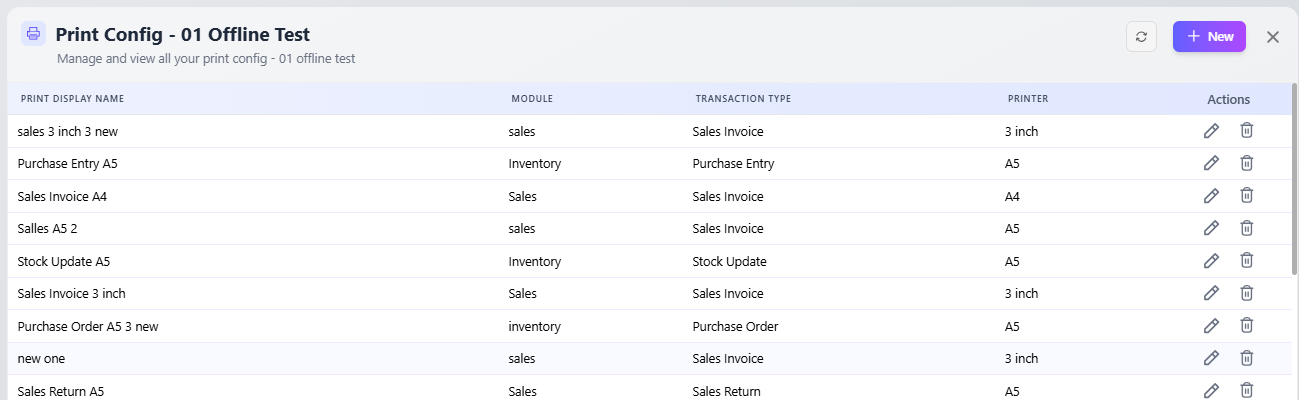
Print Config Setting
Go to Setup → Store → Print Configuration.
Click on New to create a new print template.
Select the Transaction Type for which you want to create a print design.
Example: Sales Invoice, Receive Payment, Purchase Entry, Purchase Order, Sales Return, etc.
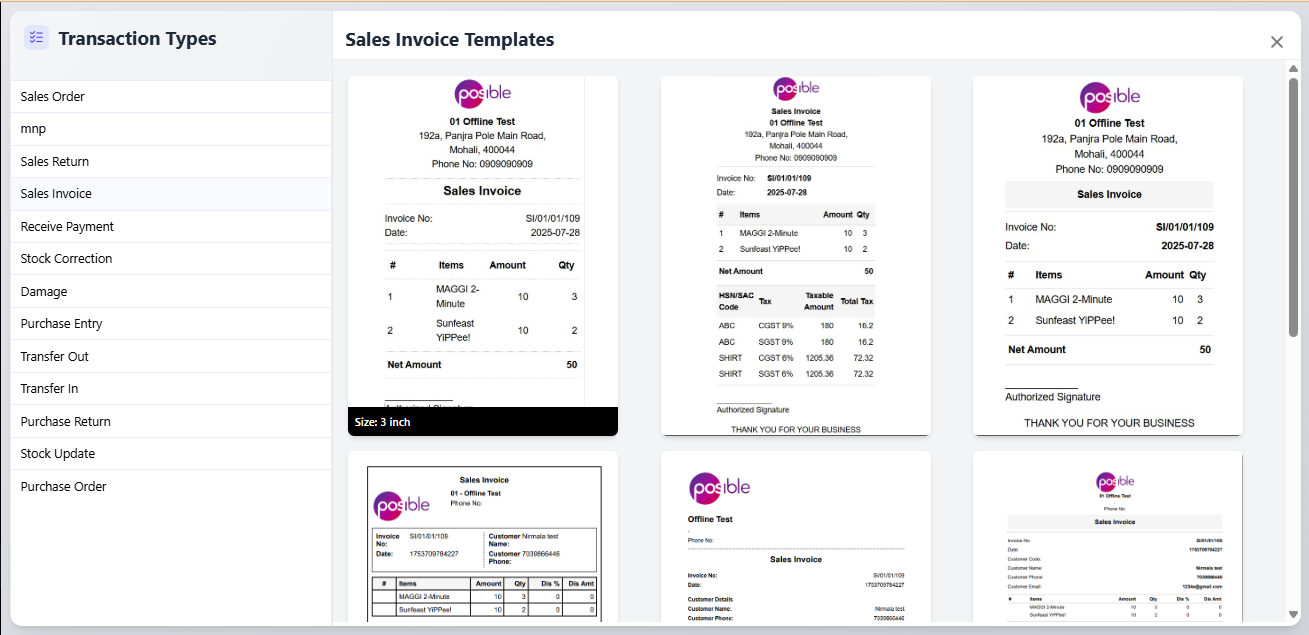
Choose the Design Layout according to your printer type and paper size — for example, 3-inch, 4-inch, or A4 size.
Under General Details, fill in the following fields:
Print Display Name: The name shown while selecting the print template.
Header Title (Invoice): The title displayed at the top of your print, such as “Tax Invoice” or “Sales Receipt.”
Configure the following sections to define what information will appear:
Header: Add your logo, store name, contact info, or invoice title.
Footer: Include thank-you notes, disclaimers, or additional information.
Store Information to be Printed: Select details such as store name, address, phone number, and postal code.
Customer Information to be Printed: Choose customer fields like name, contact number, or email.
Transaction & Transaction Details: Define which transaction data (invoice number, date, payment mode, item details, totals, etc.) should appear on the print.
Click on Save to store your configuration.
Use Preview to check how your invoice or receipt will look before finalizing.
💡 Tip: You can create multiple templates for different printer types or transaction types.

You can also edit or delete it later.
Edit / Delete
Edit updates store details.
Delete removes the store.
Tip: Assign a store manager role for each store to allow local edits without global admin rights.
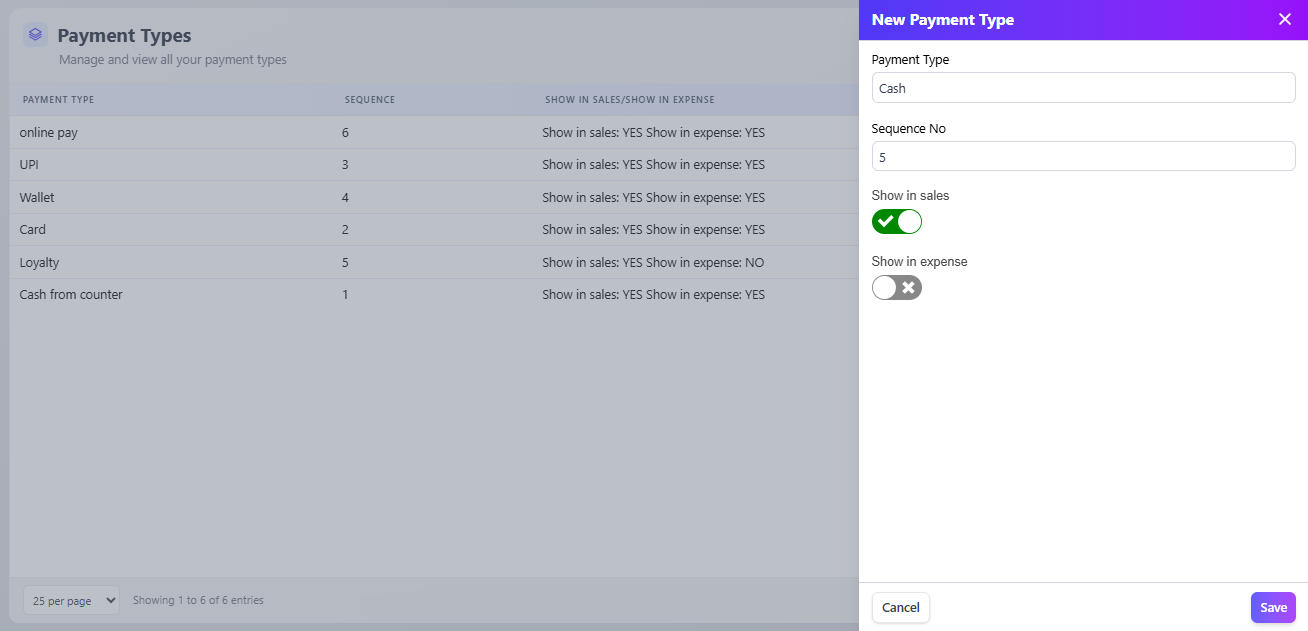
4) Payment Types
Create payment methods used in Sales and Expenses.
Go to Payment types →Click New.
Fill: Name (Cash, Card, UPI, Wallet, Bank Transfer), and Enter Sequence.
Enable where to use (Sales / Expense).
Save.
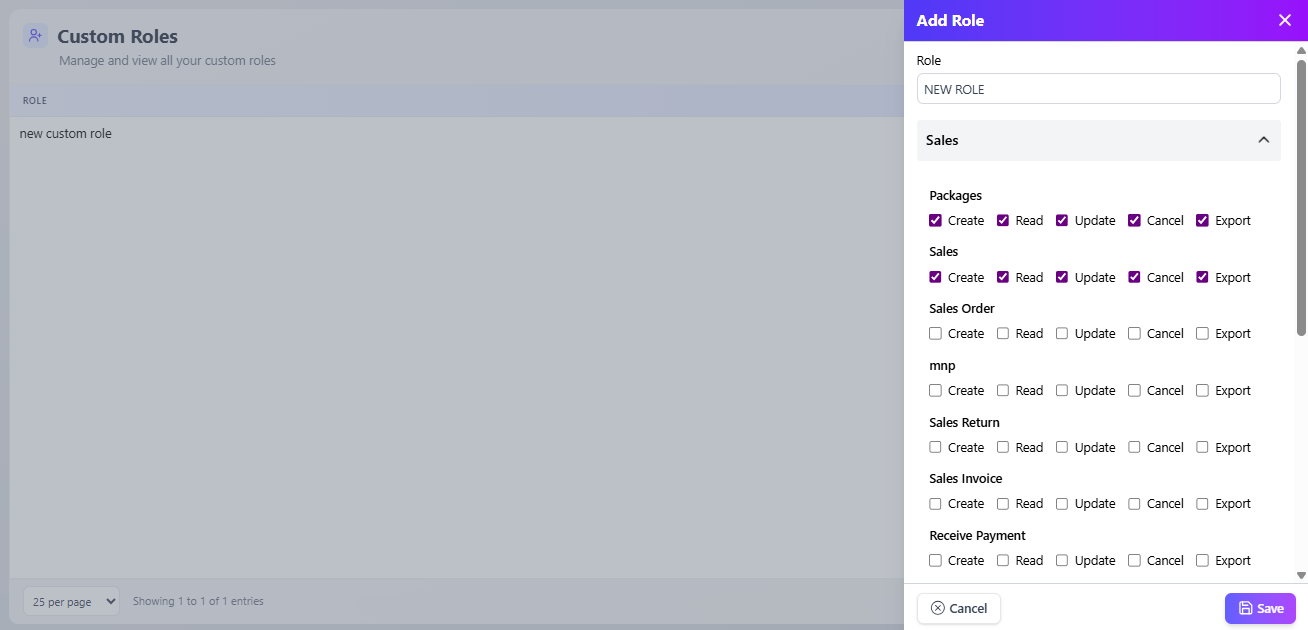
5) Custom Roles
Control who can do what in the system.
Go Custom roles → Create Roles.
Enter Role Name ( Store Manager, Cashier, Viewer).
Set module-level permissions (Sales, Inventory, CRM, Reports, Settings) and action permissions (Create / Edit / Delete / Export).
Save role.
Assign role to staff from Staff → Edit Staff → System Access.
Tip: Test new roles with a demo staff account before assigning to real users.
6) Module Configuration
Enable/disable modules and adjust module-specific behavior.
Go Module configuration.
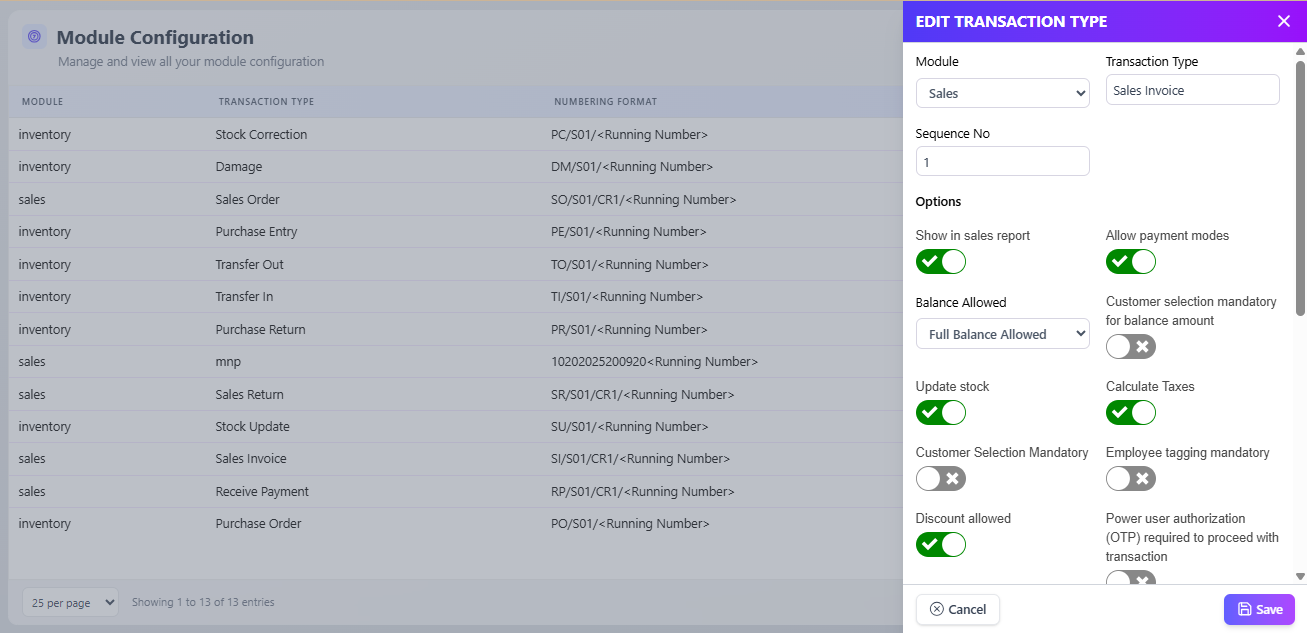
For Sales modules: toggle options such as Sales Invoice, Receive Payment, Sales Return.
Configure settings
⇒Show in sales report
⇒Allow payment modes
⇒Balance Allowed
⇒Customer selection mandatory for balance amount
⇒Update stock,Calculate Taxes
⇒Customer Selection Mandatory, Employee tagging mandatory
⇒Discount allowed, Accessible to specific stores
⇒Payment modes to be considered for billing
Note: Turn ON the toggle as per your requirement for the Sales Module.
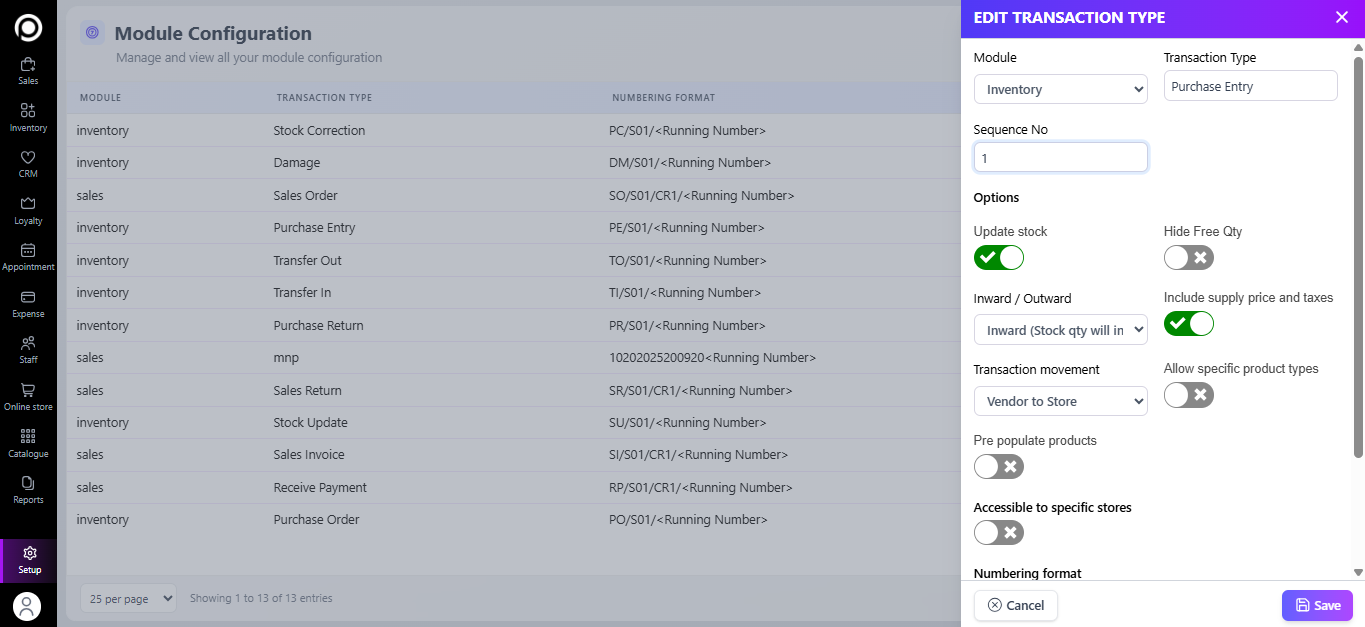
For Inventory modules: toggle Purchase Entry, Stock Update, Damage, Transfer Out, Batch Tracking, Unique No, Variants.
Update stock.Hide Free Qty
Include supply price and taxes.
Transaction movement.
Allow specific product types.
Pre-populate products.
Accessible to specific stores.
And Create Numbering format according to you.
Save changes.
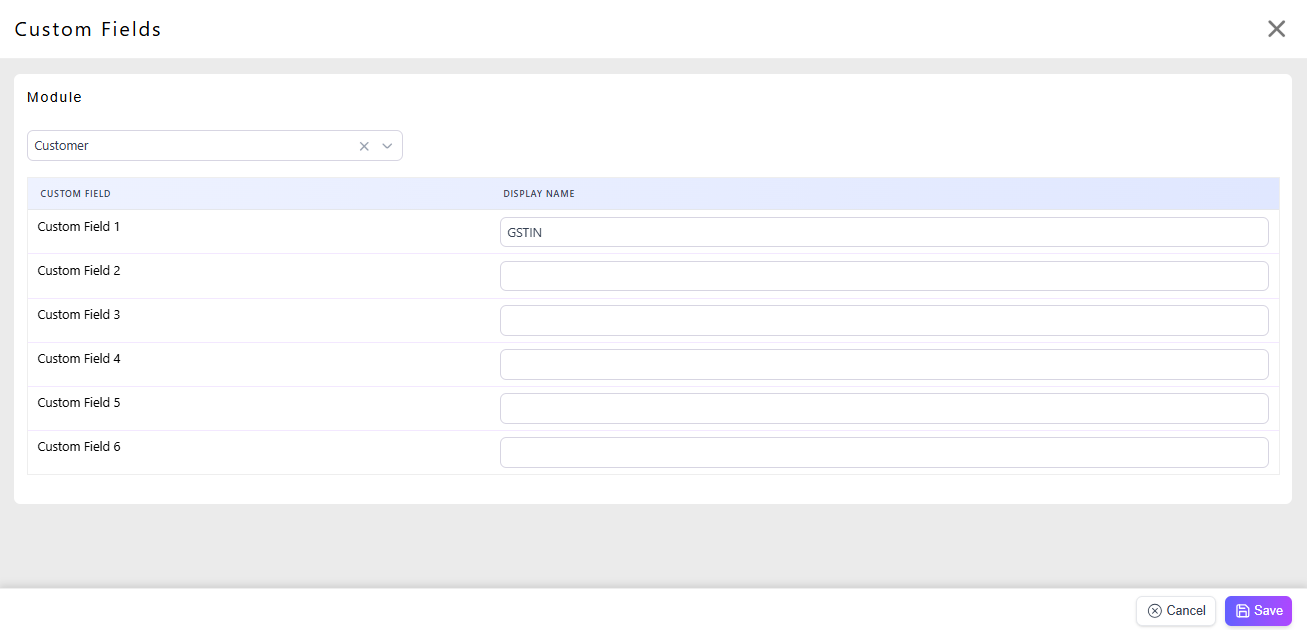
7) Custom Fields
Rename or add extra fields used across entities.
Go to Custom fields.
Choose the entity to edit: Sale, Customer, Employee, Vendor, Store.
For each CustomField slot (CustomField1 .. CustomField6):
Set Label (e.g., “Membership ID”,”GSTIN”).
Save.
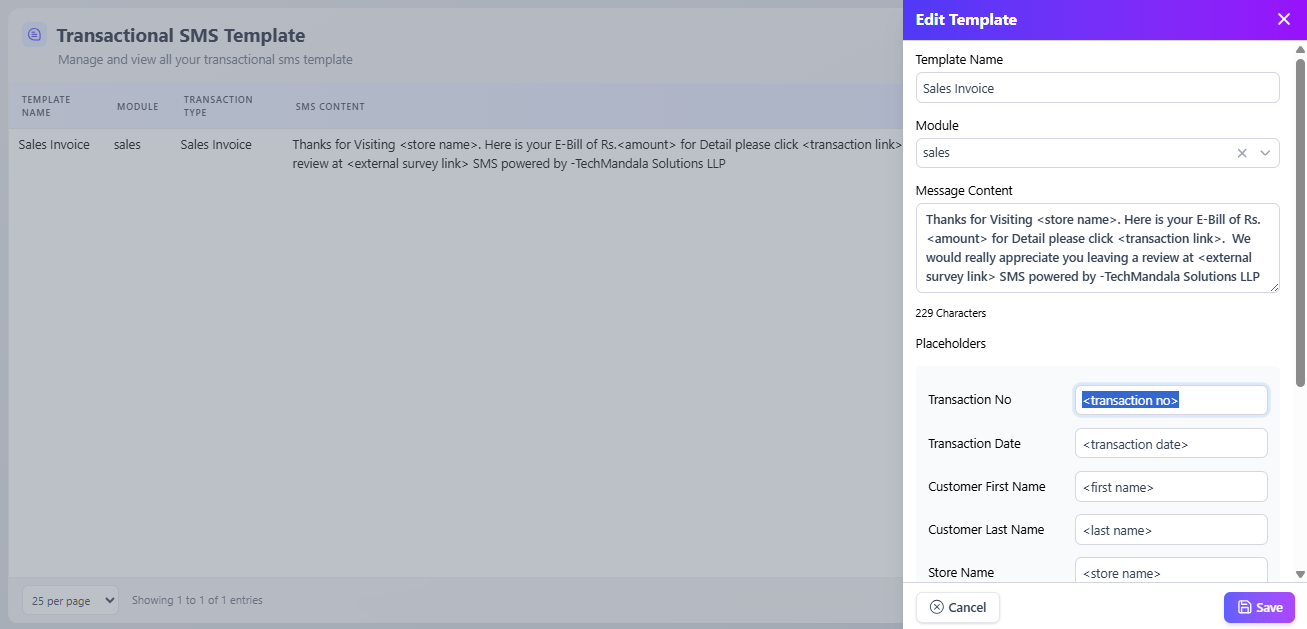
8) Transaction SMS Template
Create templates for transactional or marketing messages.
Go Transaction SMS Template → New Template.
Enter Template Name and Message Body.
Use placeholders like, <first name>,<transaction no>, <amount>.
Link templates to events (Invoice Created, Payment Received, Appointment Reminder) in respective module settings.
9) Additional Settings
Global toggles that change system behavior.
Go to Additional settings.
Example options to configure:
Enable Auto Generate SKU — system auto-creates SKU when adding a product.
Send Invoice Link — enable sending invoice URL via SMS/email after sale.
Cash Register Closing Notification to Store Owner — toggle to notify owner at register close.
And other settings.
Change toggles as needed and Save.

10) Integration (WhatsApp / SMS / Payment / Others)
Connect external services (Twilio, Gupshup, AiSensy, payment gateways).
Go Integration.
Choose provider type (WhatsApp / SMS / Payment / Accounting).
For WhatsApp providers (Twilio / Gupshup / AiSensy):
Select provider → enter required credentials (Account SID, Auth Token, API Key, Sender/WhatsApp Business Number, or Access Token).
Add webhook/ callback URL if required (system will display URL to paste into provider console).
Save and Test Connection (send test message).
Enable the provider for transactional or promotional messages.
For payment gateway integration, enter API keys and enable them on the Sales screen.
Save.
Security: Only share API keys with trusted admins. Rotate keys periodically.
11. Online Store Module.
Quick overview
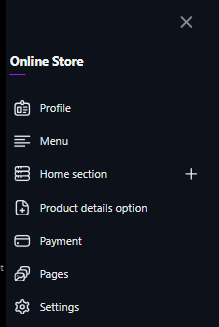
The Online Store module lets you build and publish a simple storefront (catalog or full store) where customers can view products, make orders or contact you. Use Profile to set basic store identity, Menu & Home section to control layout, Product details to customize product pages, Payment to enable payment methods, Pages to add content pages, and Settings to control store behaviors and visibility.
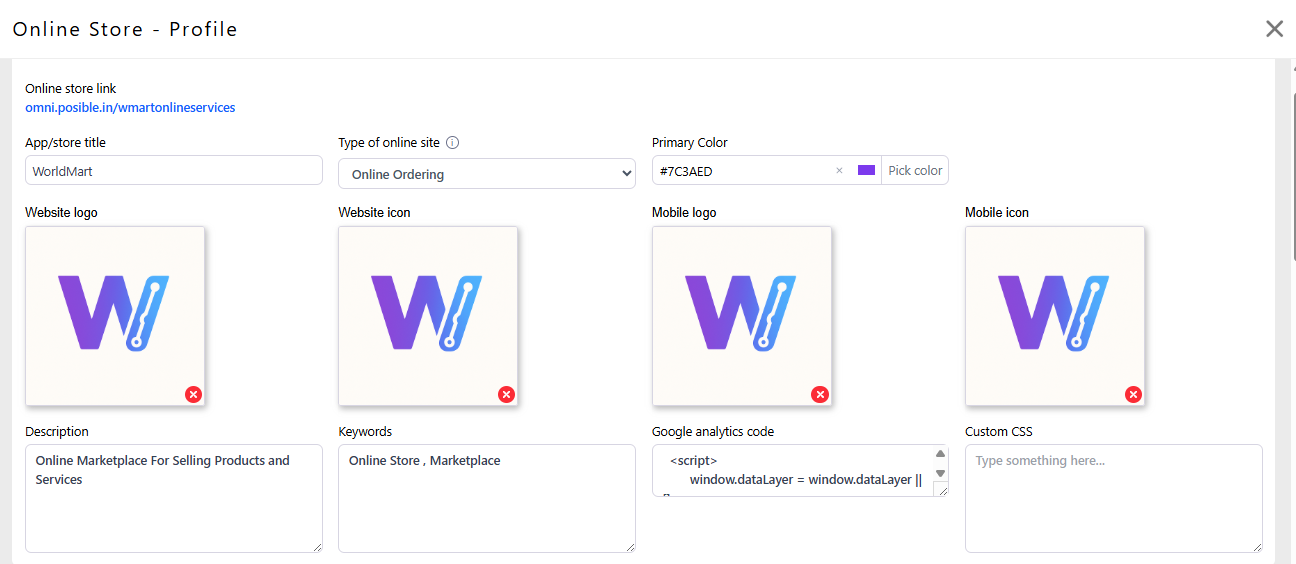
1. Profile — store identity & SEO (how to set up)
Go to Online Store → Profile.
Fill General Details:
App/store title — human-friendly name shown in browser and header.
Example: Posible
Type of online site — choose site type (e.g., Online Catalog or Online Catalog).
Primary Color — pick a primary brand color (enter hex code or use color picker).
Upload images:
Website logo — main logo for desktop header.
Website icon — favicon for browser tab (small square).
Mobile logo & Mobile icon — optimized images for mobile view.
SEO & tracking:
Description — short store description for search engines.
Keywords — comma separated keywords (e.g., salon, haircut, facial, Mumbai).
Google Analytics code — paste your GA tracking code (UA/GA4 snippet) to track traffic.
Custom CSS (optional) — paste CSS if you want visual tweaks (advanced).
Click Save.
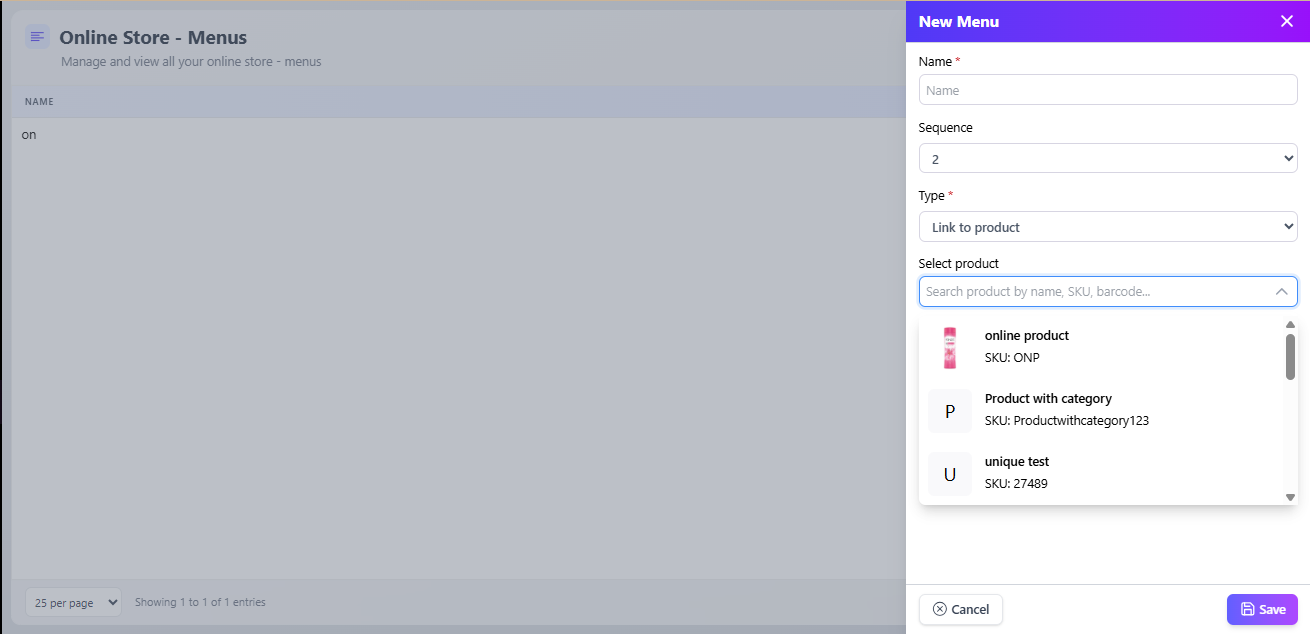
2. Menu — navigation structure
Go to the Online Store → Menu.
Create or edit.
Add menu item → select type (Category, Product).
Save menu.
3. Home Section
Go to the Online Store → Home section.
Click + to add a new block (Featured categories, Featured products, Collections, Testimonials).
For each block:
Set Title, select products/categories to show, and set display order.
Save and reorder sections to define homepage flow (banner → categories → featured products → testimonials).
Add other details.

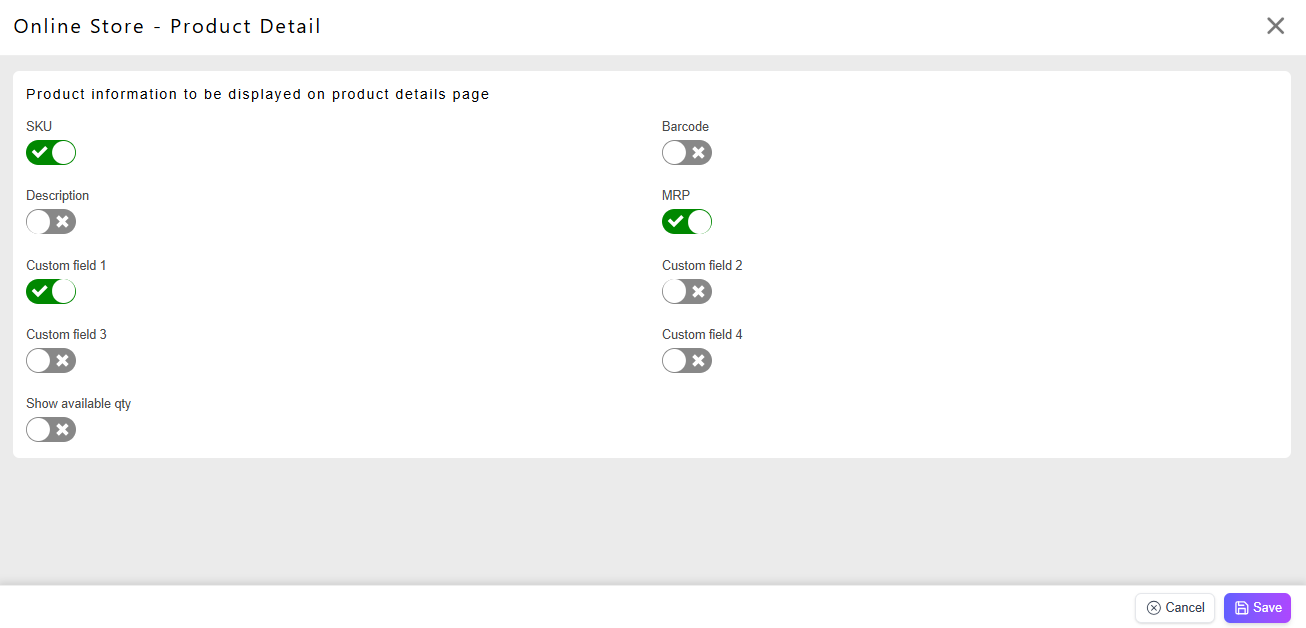
4. Product details option — control how product pages look
Go to Online Store → Product details option.
Configure fields shown on product page:
Show MRP, Description, Specifications, SKU, Variants, Custom field 1, toggle.
Save changes.
5. Payment
Go to Online Store → Payment.
Enable payment methods you support:
Cash on delivery, Wallet, Loyalty, — toggle on if you accept.
Online gateways — connect gateways (Razorpay/Atometc.) integrations.
Enter required credentials (API key, merchant ID) and Test Connection.
Save and perform a test order to verify payment flow.
6. Pages
Go to Online Store → Pages.
Click + Create Page.
Enter Title, Content (WYSIWYG editor)(title, description).
Show in page, Show in footer(ON/OFF)
7. Settings
Go to Online Store → Settings.
Enable online appointment booking for services → Turn ON if you want customers to book services online.
Enable line item notes → Allows customers to add notes for individual products/services in their cart.
Enable option to apply coupon → Lets customers use coupons during checkout.
Allow customers to provide remarks → Gives customers an extra field to write remarks while checking out.
Capture customer address at the time of checkout → Mandatory if you are delivering physical goods.
Delivery Charges
From the dropdown, choose the delivery charge type you want to apply.
If not needed, keep it as None.
Packaging Charges
From the dropdown, select the packaging charge rule (if any).
If you do not want extra charges, keep it as None.
Order Cancellation Settings
Toggle Allow customers to cancel order → ON if you want customers to be able to cancel orders themselves.
Save Settings
Once you configure everything, click on the Save button (bottom-right) to apply the changes.
👤 User Information
When you click on the User Icon located at the bottom-left corner of the dashboard, you can view your software and account details.
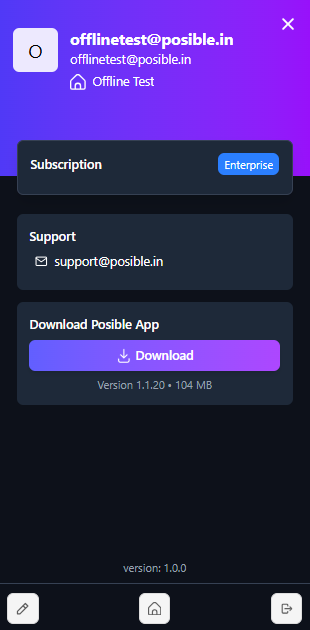
🔹 Details Displayed
- User Email ID: Shows the email address
associated with your account.
- Store/Account Name: Displays the name of the
active store or environment (e.g., Offline Test).
- Subscription Type: Indicates your current plan
(e.g., Enterprise).
- Support Information: Provides the official support
email (support@posible.in) where you can contact for
assistance.
- Download Posible App: You can directly download
the Posible Mobile App from here.
- It shows the app version (e.g.,
Version 1.1.20) and file size (e.g., 104
MB).
- Click on the Download button to get the latest version.
- Software Version: Displays the current version of the Posible software you are using (e.g., Version 1.0.0).
Below your account details, you will find three important buttons that help you manage your login and store preferences easily:
- Change Password:
- Allows you to securely update your login password.
- When clicked, you will be prompted to enter your current password
and the new password.
- Use this option whenever you need to reset or strengthen your
credentials.
- Change Store:
- Lets you switch between multiple stores or outlets linked to your
account.
- Once clicked, a list of available stores appears — simply
select the store you wish to access.
- This feature is useful for users managing multiple store locations
under the same account.
- Sign Out:
- Logs you out of the current session safely.
- Always use this option after completing your work to prevent unauthorized access to your account.